Photo Editor app is a smart Flutter photo editor app. It contains Flutter source code and to build your
photo editor
application with most useful features and eye-catching outlook. If you are planning to deploy your photo
editor
app project for android and ios users, then it’s your perfect match to have on your hand. The product
comes with Photo effect, Photo filter, Add Text support. You can customise a bit and decide what to show
or not into the app real-time.
Prerequisite
Android Studio: 4.1.2
Flutter: 2.0.0
Photo Editor App Screenshots
Project Structure & Features
Photo Editor project structure and short description for each of them is as follow:
assets: apps/widgets/snippets images as well as appIcon are stored here.
lib: Application main file and folder are located here.
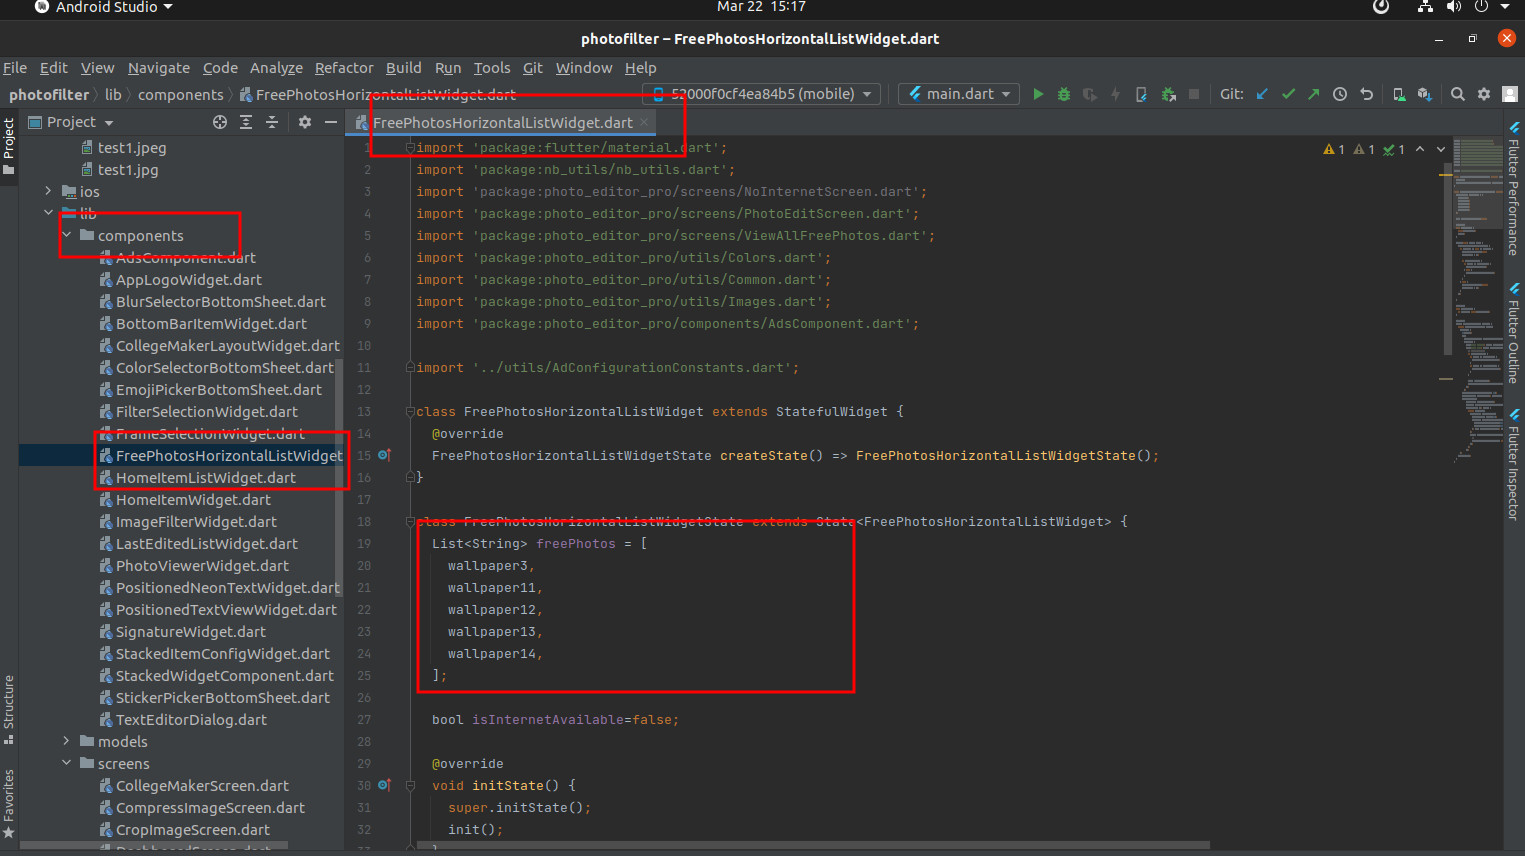
component: All the Widgets except for screen will be declared here.
models: A base class that holds some data and allows other classes to listen to
changes to that data.
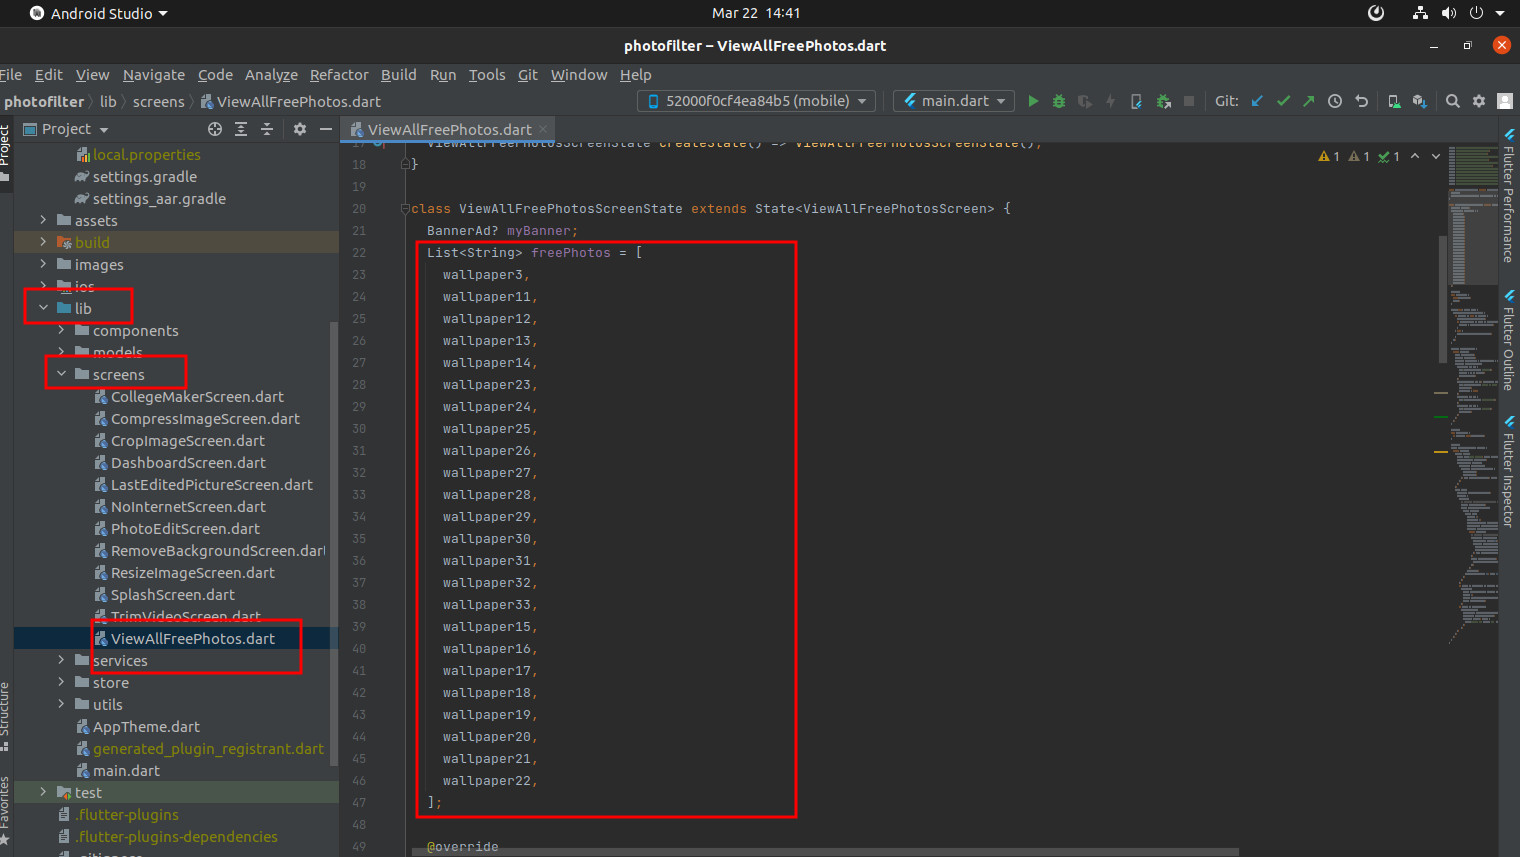
screens: FileName contents Screen at the end of name eg. DashboardScreen.
store: It is used for State management technique MOBX.
utils: Basic ready made widgets are located here.
Colors.dart: Application colors are declared here.
Common.dart: Commmon functions are declared here.
Constant.dart: All the constant values are declared here.
pubspec.yaml: Application name and other project dependencies can be found here.
Application Features
Sticker
Smilies
Adjust Brightness
Adjust Contrast
Adjust Saturation
Adjust Hue
Apply Blur effect
Apply Photo filter
Add Text with different styles
Different Neon text
Emojis
Crop Image
Rotate Image
Frames Image
Resize Image
Compress Image
B & W photo
Draw on image
Preview before saving image
Share image to others
See last edited images
Free Photos
Monetize with AdMob
Introduction to Flutter
Flutter is Google’s UI toolkit for building beautiful, natively compiled
applications for MOBILE, WEB, and DESKTOP from a
single codebase. It is
very
easy to learn and currently it is getting more and more popular. With this blog
post, you will learn some basic stuff about Flutter and after reading it, you
will be able to create a simple application using this technology.
Click here to check out more details about
flutter.
1 Download the following installation bundle to get the latest stable release of
the Flutter SDK:
2 Extract the zip file and place the contained flutter in the desired
installation location for the Flutter SDK (for example, C:\src\flutter; do not
install Flutter in a directory like C:\Program Files\ that requires elevated
privileges).
Step 2 : Update your path
If you wish to run Flutter commands in the regular Windows console, take these
steps to add Flutter to the PATH environment variable:
From the Start search bar, enter ‘env’ and select Edit environment variables
for your account.
Under User variables check if there is an entry called Path:
If the entry exists, append the full path to flutter\bin using ; as a
separator from existing values.
If the entry doesn’t exist, create a new user variable named Path with the
full path to flutter\bin as its value.
Info
Note that you have to close and reopen any existing console windows for these
changes to take effect.
You are now ready to run Flutter commands in the Flutter Console!
Step 3 : Run flutter doctor
From a console window that has the Flutter directory in the path (see above), run
the following command to see if there are any platform dependencies you need to
complete the setup:
c:\src\flutter>flutter doctor
If you find any issue during environment setup, please go online Click
here
Download the following installation bundle to get the latest stable release
of the Flutter SDK:
Download SDK and extract downloaded file, just double click on that. and
just copy extracted folder and paste it to your desired location (for
example, Documents\flutter).
Step 2 : Update your path
Warning
Path variable needs to be updated to access “flutter” command from terminal. you
can just update path variable for current terminal window only. and if you want
to access flutter commands from anywhere in terminal, we need to update SDK path
permanently.
To update PATH variable, we need to open terminal.
To update PATH variable for current terminal window only, then enter this command
"export PATH="$PATH:`pwd`/flutter/bin"" and hit enter key.
To update PATH variable permanently, then Open or create .bash_profile
file. to open or create that file, then enter "sudo open -e
$HOME/.bash_profile" and hit enter key.
Append below line to bash_profile file at bottom of all other content. "export
PATH="$PATH:[PATH_TO_FLUTTER_GIT_DIRECTORY]/flutter/bin"" as
[PATH_TO_FLUTTER_GIT_DIRECTORY] is actual path of SDK folder.
Run this command on terminal "source $HOME/.bash_profile" to refresh PATH
variables.
Then check whether our SDK is successfully installed or not.
You are now ready to run Flutter commands in the Flutter Console!
Run "flutter doctor" into terminal, If you are getting check list of
flutter sdk requirements, it means SDK is successfully installed on your
machine. and you can start building flutter apps on your machine.
If you find any issue during environment setup in macos, please go online Click
here
Download the following installation bundle to get the latest stable release
of the Flutter SDK:
Download SDK and extract downloaded file, just double click on that. and
just copy extracted folder and paste it to your desired location (for
example, Documents\flutter).
Step 2 : Update your path
Warning
Path variable needs to be updated to access “flutter” command from terminal. you
can just update path variable for current terminal window only. and if you want
to access flutter commands from anywhere in terminal, we need to update SDK path
permanently.
You’ll probably want to update this variable permanently, so you can
run flutter commands in any terminal session. To update PATH variable, we need
to open terminal.
Run source $HOME/.
to refresh the current window, or open a new terminal window to
automatically source the file.
Verify that the flutter/bin
directory is now in your PATH by running:
echo $PATH
Verify that the flutter
command is available by running:
which flutter
You are now ready to run Flutter commands in the Flutter Console!
Getting Started (Build & Run)
Warning
All below steps are must be followed to build and run application
Download Project
Download and find the your project folder, use your preferred IDE
(Android Studio / Visual Studio Code / IntelliJ IDEA) to run
the project.
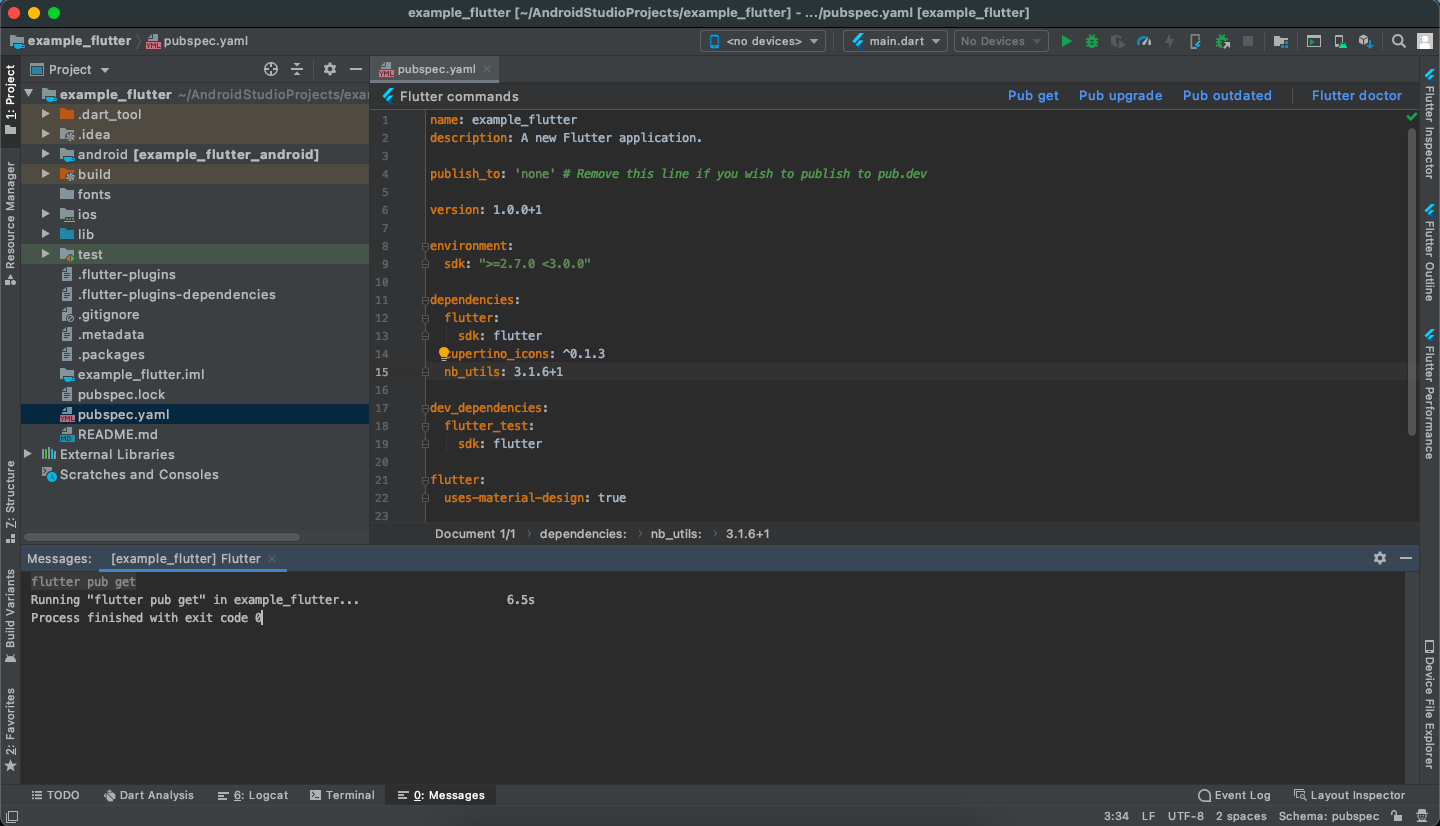
Get Dependencies
After you loaded project successfully, run the following command in the terminal
to install all the dependencies listed in the pubspec.yaml
file in the project's
root directory or just click on Pub get
in pubspec.yaml fileif you don't
want to use command.
flutter pub get
Warning
All below steps are must be followed to build and run application
Build and Run App
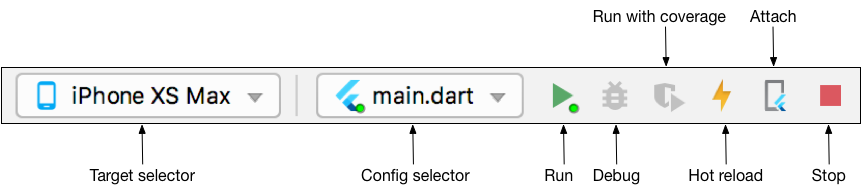
Locate the main Android Studio toolbar.
In the target
selector, select an Android
device for running the app. If none are listed as available, select
Tools >
Android > AVD Manager and
create one there. For details, see Managing
AVDs.
Click the run icon in the toolbar, or invoke the menu item Run > Run.
After the app build completes, you’ll see the app on your device.
If you don’t use Android Studio or IntelliJ you can use the command line to run
your application using the following command
Warning
Below step requires flutter path to be set in your Environment variables. See
https://flutter.dev/docs/get-started/install/windows
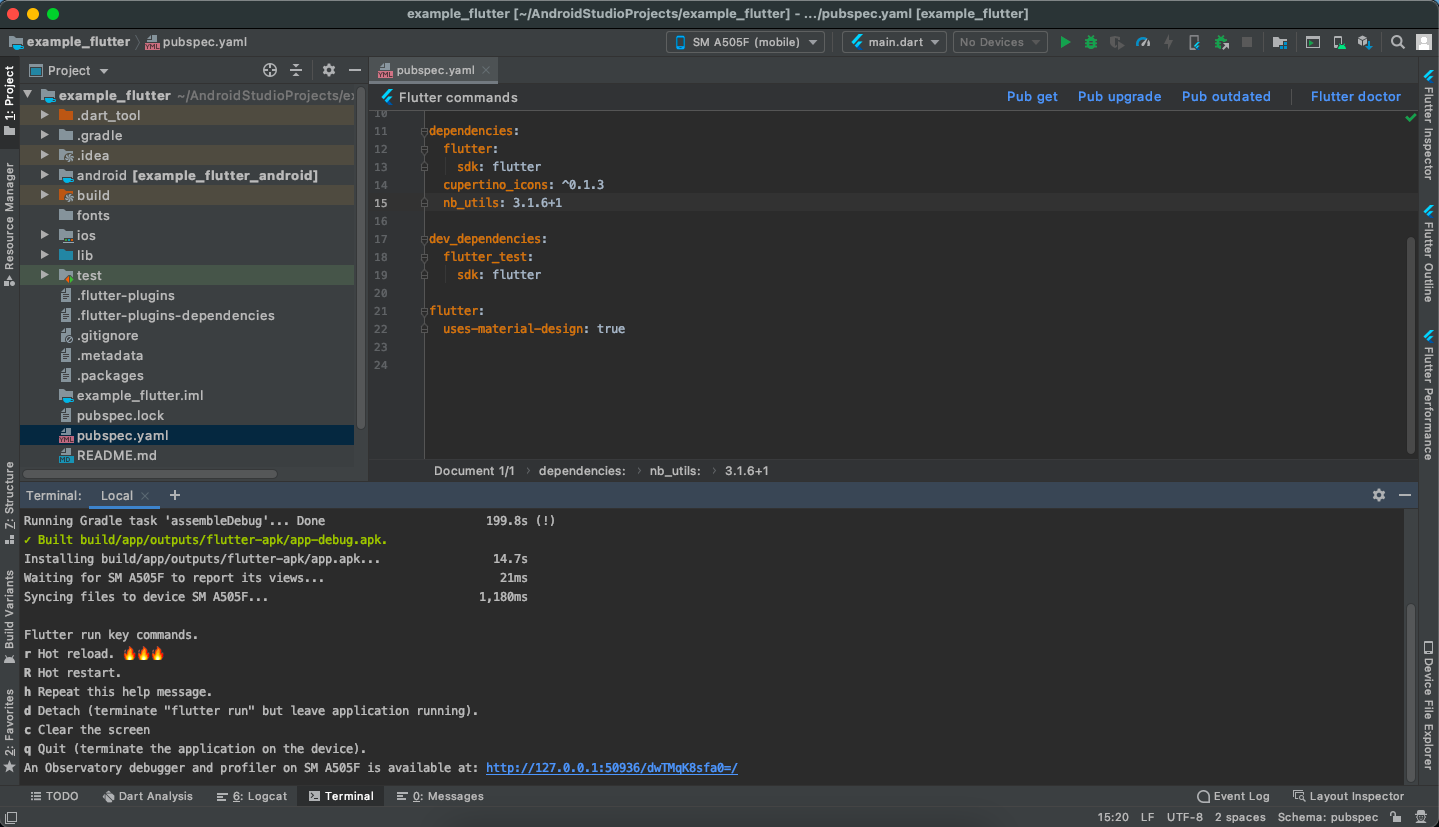
flutter run
You will see below like screen after you have build your app successfully
Try hot reload
Flutter offers a fast development cycle with Stateful Hot Reload, the ability to
reload the code of a live running app without restarting or losing app state.
Make a change to app source, tell your IDE or command-line tool that you want to
hot reload, and see the change in your simulator, emulator, or device.
If you want add/change android code, click on Tools->Flutter->Open Android module in Android Studio Or File->Open ->open android
module inside your project
Important
Don't change package name inside android/app/src/main/AndroidManifest.xml file
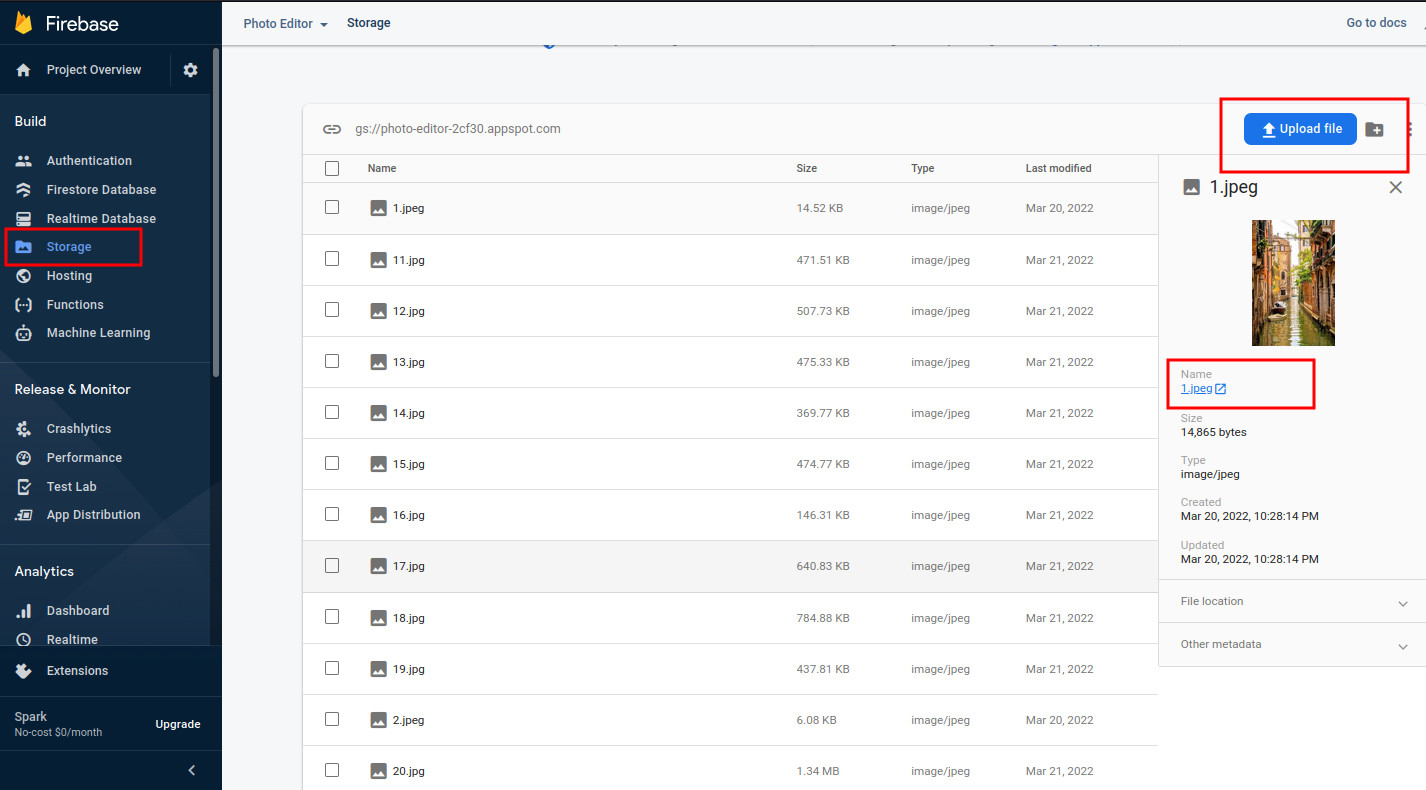
Setup Firebase
For Firebase setup, you just need to change the
android/app/google-services.json
file.
Create a new firebase account, register your application with your package
name.
Now download the google-services.json file and replace with current.
For AdMob setup, you just need to change the app id in android/app/src/main/AndroidManifest.xml file
For that, you have to create a firebase account and create a new application
in AdMob. and then you will get application id.
Now, replace ca-app-pub-1399327544318575~7586962359 with your new generated application id.
Now run the application. your ads are now live.
Open Android module in Android Studio
Open Android Studio.
Select Open an existing Android Studio Project.
Open the android directory within your app.
Wait until the project has been synced successfully. (This happens
automatically once you open the project, but if it doesn’t, select Sync
Project with Gradle Files from the File menu).
Now, click on Run button.
Change Application Name
You must want to change your application name. This is how you can do.
Follow the below step.
Open /android/app/src/main/AndroidManifest.xml and specify your application
name.
Go to your project -> Tools -> Flutter -> Open for Editing in Android Studio as shown below
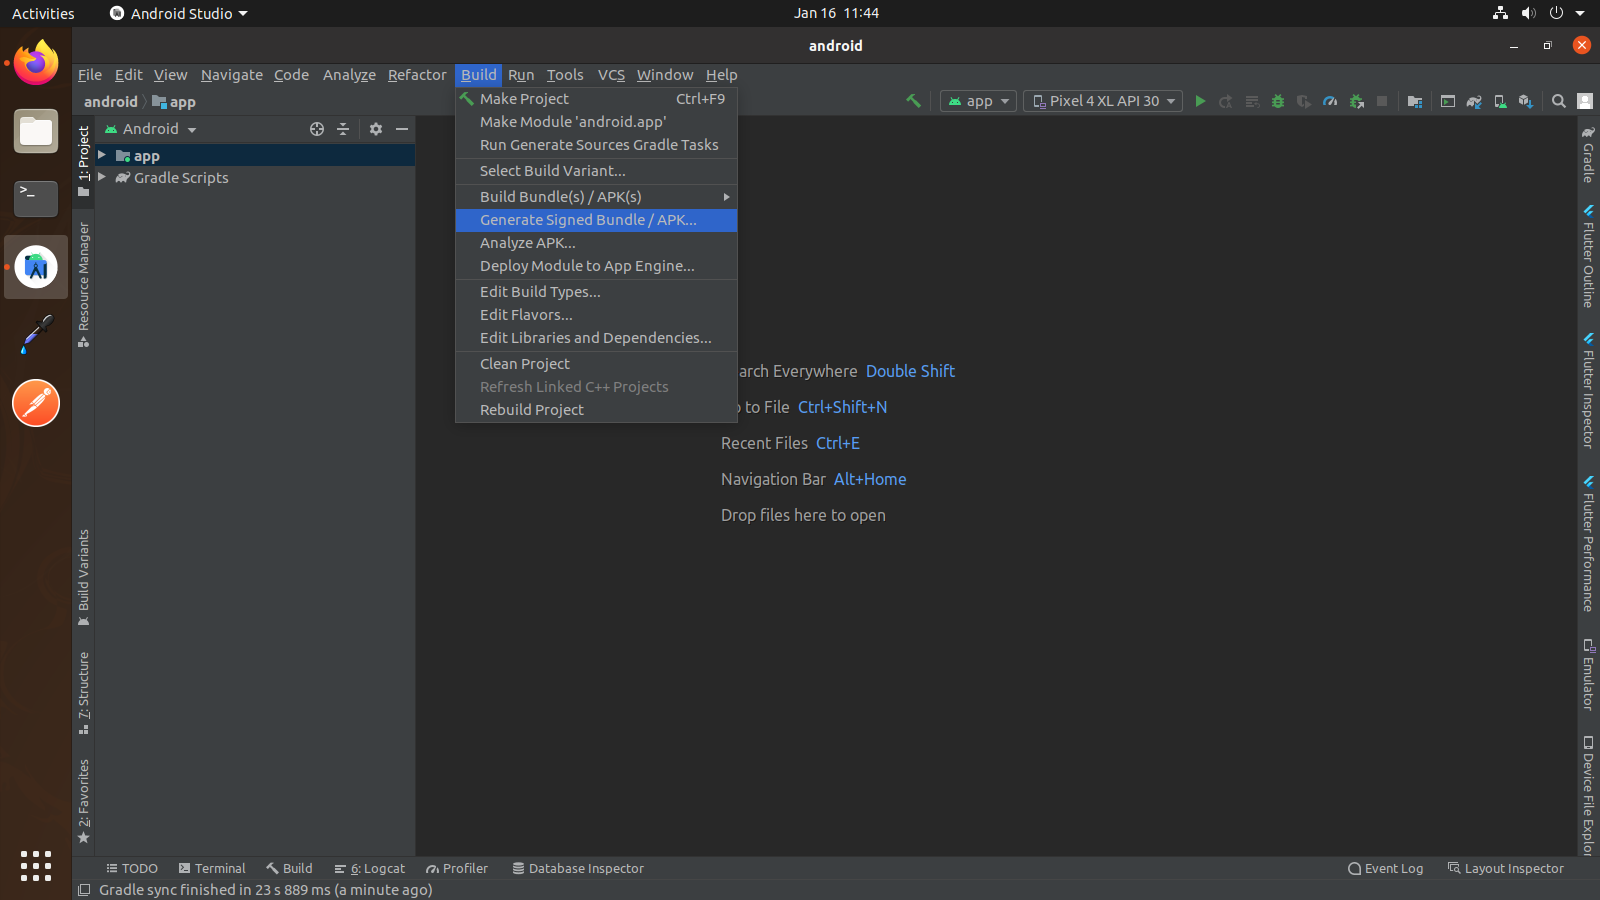
Open Project in New Window
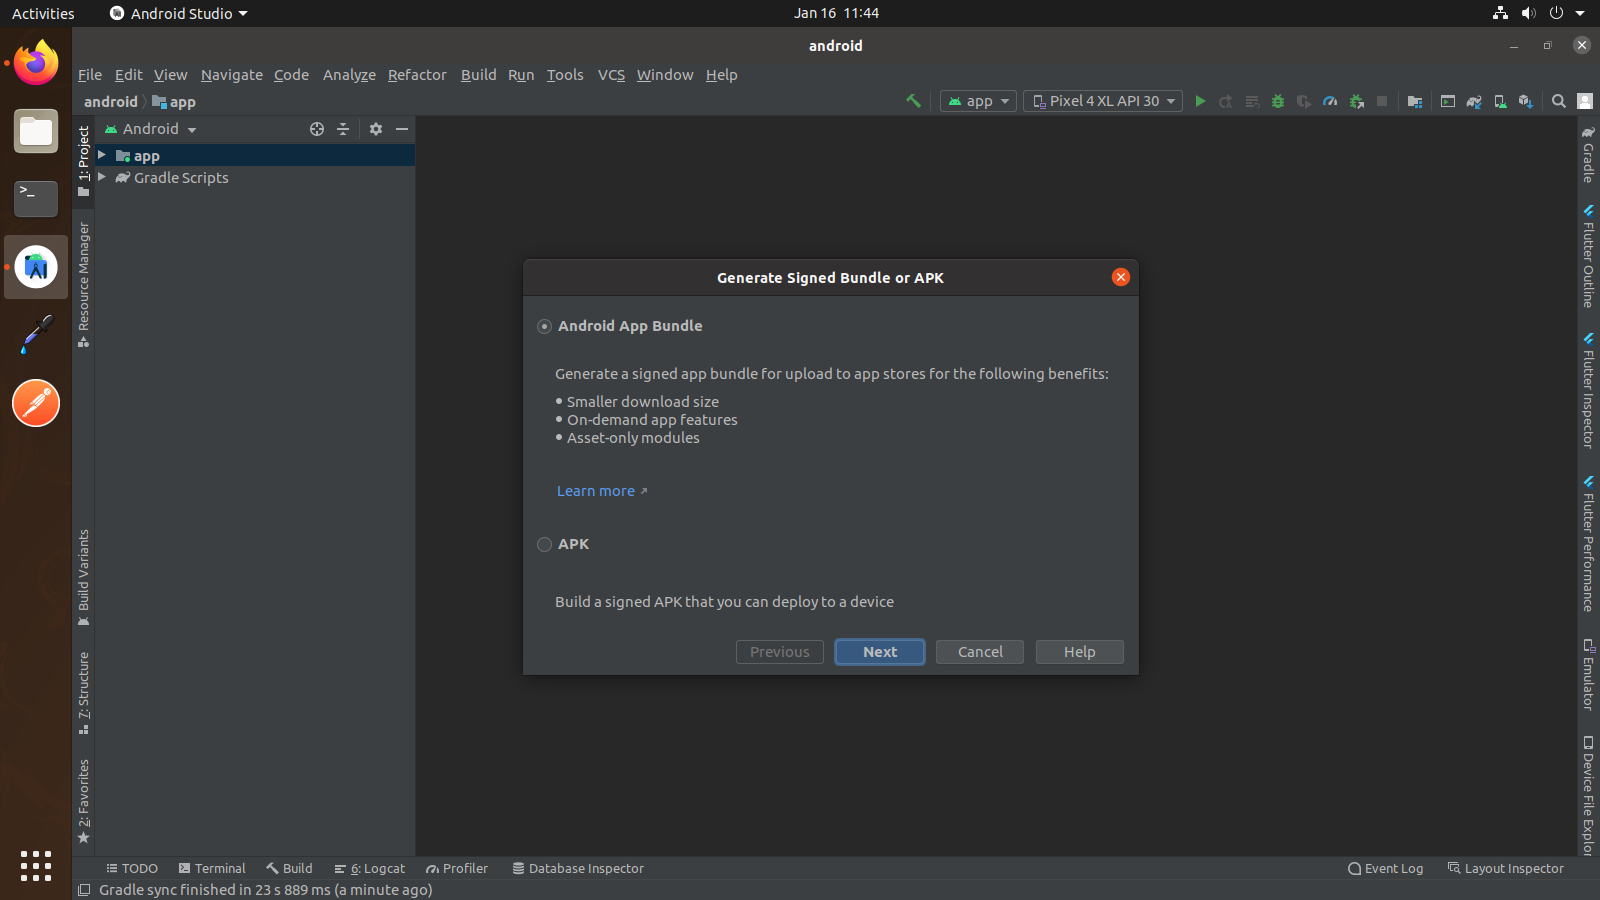
Wait for while until project synchronization. After that Go to Build -> GenerateSigned
Bundle/APK...
Select Android App Bundle or APK Option as per your need. (Android App Bundle is best solution)
and click Next button.
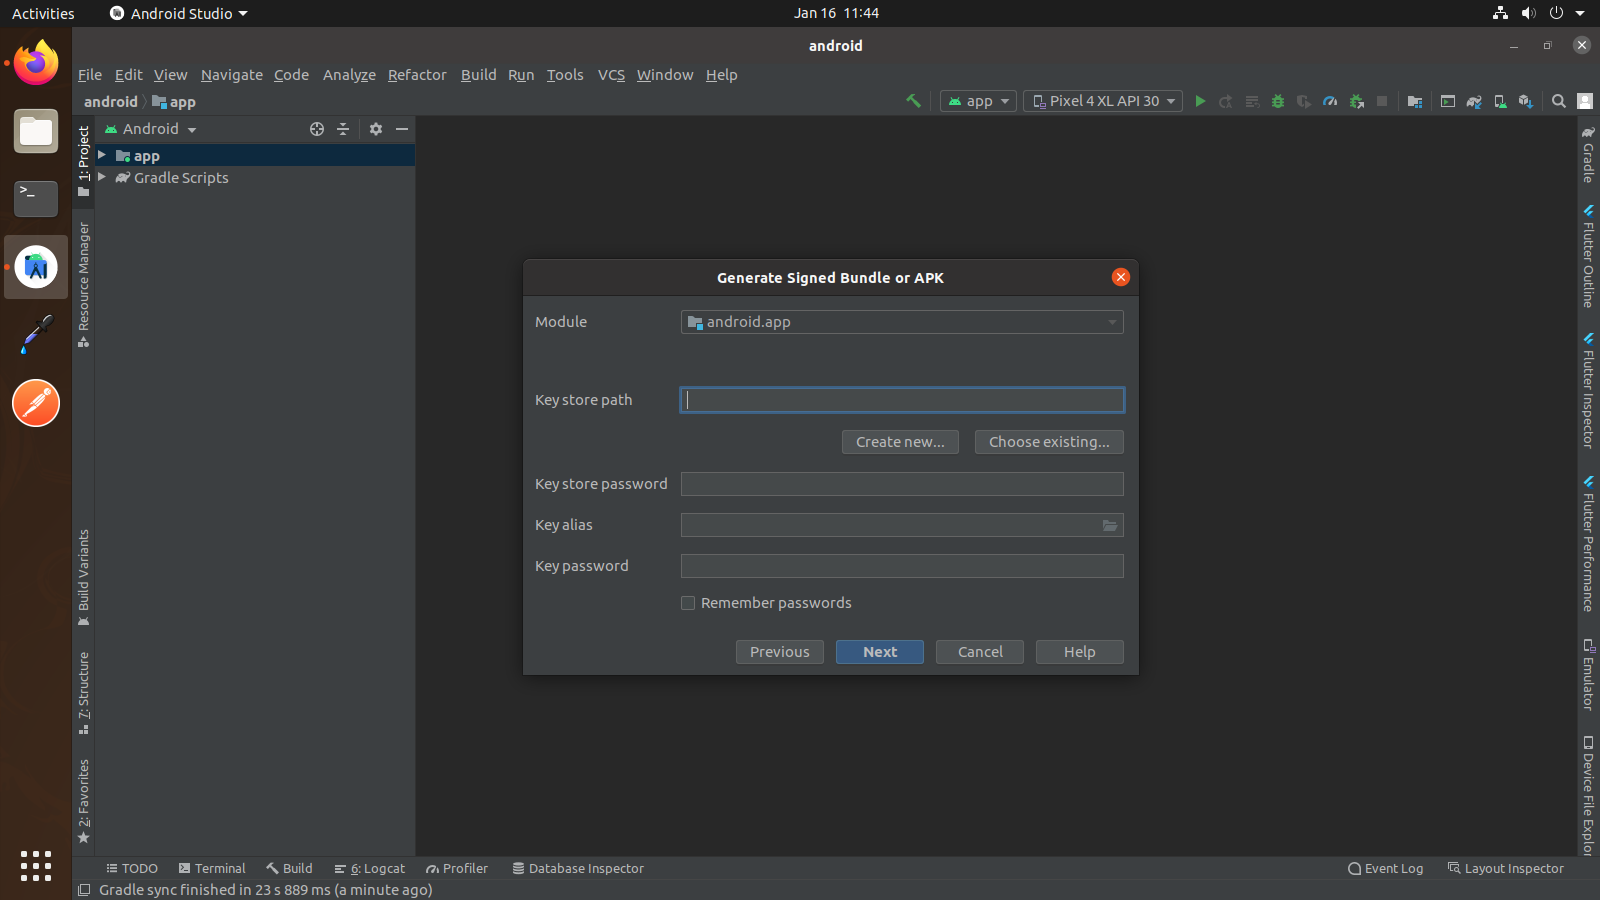
Select Create new.. option to generate new Signed key (When you release your app First Time) and
Fill all options. Refer this link
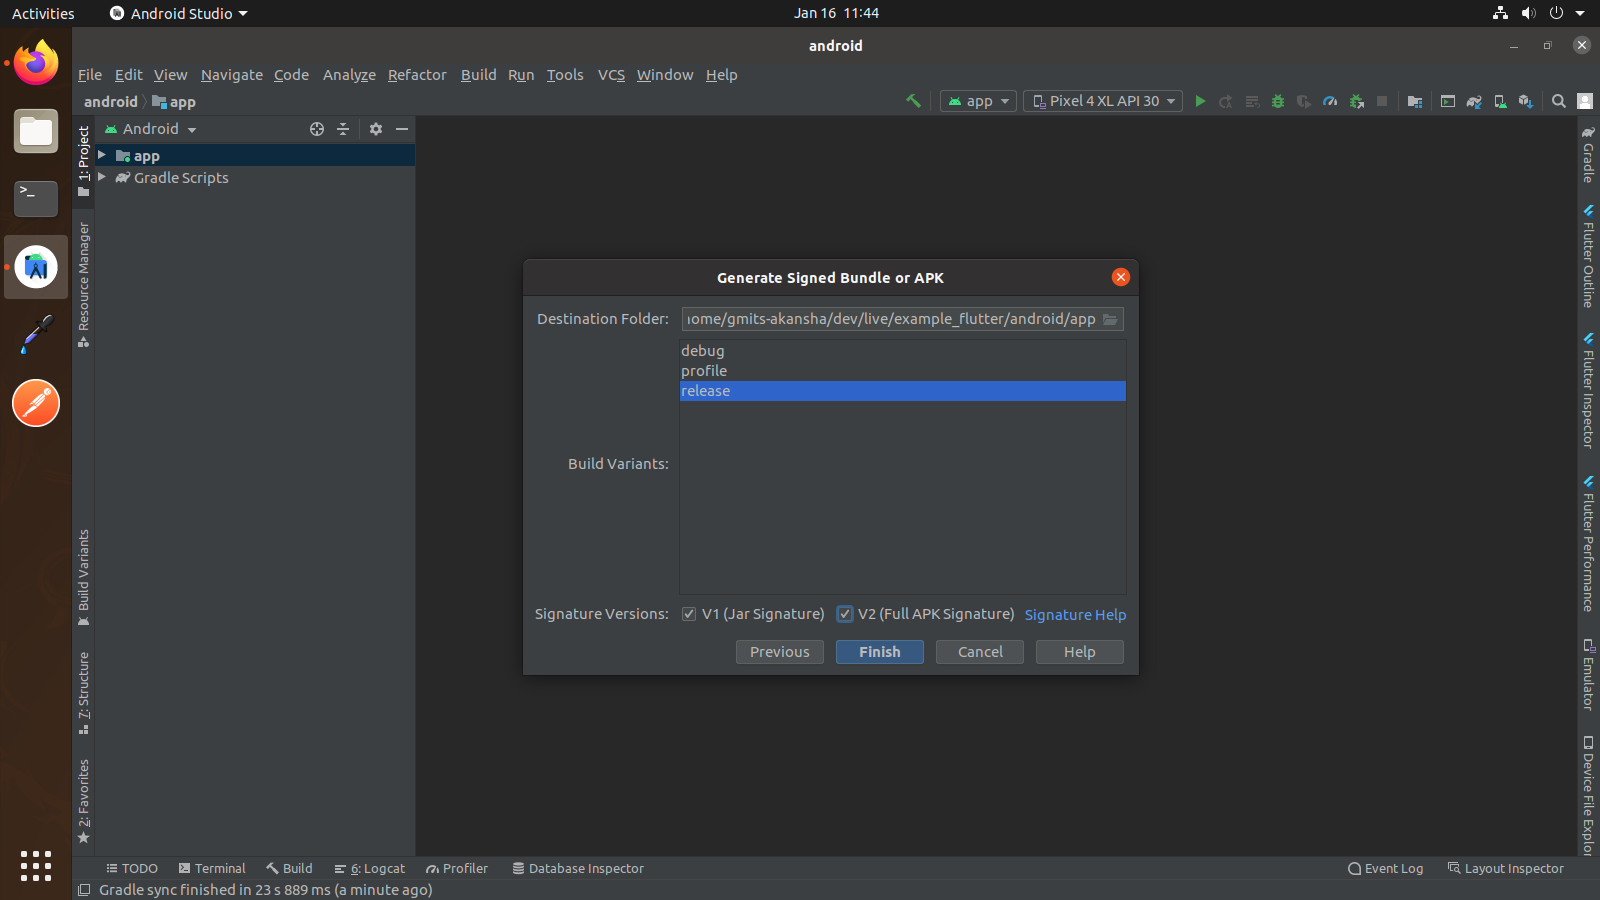
Click Next button and you will get following screen...
Select Build variants - release and Signature versions both V1 and V2 respectively as shown above
screen shot and click Finish button.
Wait for a while until Gradle Build Running process complete.and finally you will get the
Generate Signed APK : (APKs) generated successfully . from that click on Locate option to get
Location of your Generate Signed APK Key.
iOS Configuration
Open Project in Android Studio
Open android studio in your project.
Open terminal in android studio.
Pub get.
Open terminal cd ios.
pod install.
run project in xcode.
Open Project in Xcode
Open Xcode.
Select Open another Project.
Open the iOS directory within your app.
Now, click on Done button.
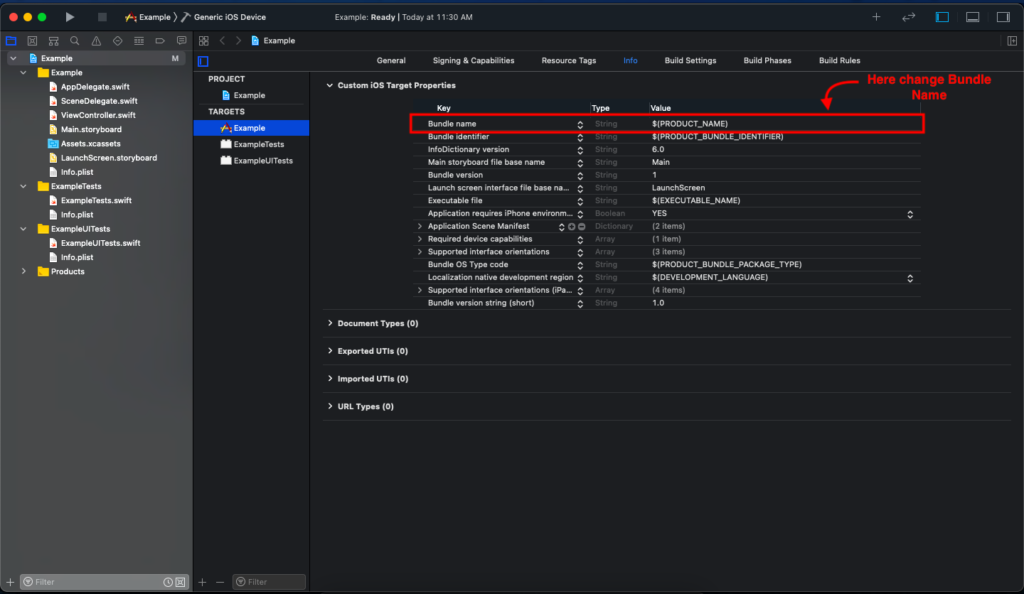
Change Bundle Name
Select your project file icon in Group and files panel.
Then Select Target -> Info Tab.
At last change Bundle Name.
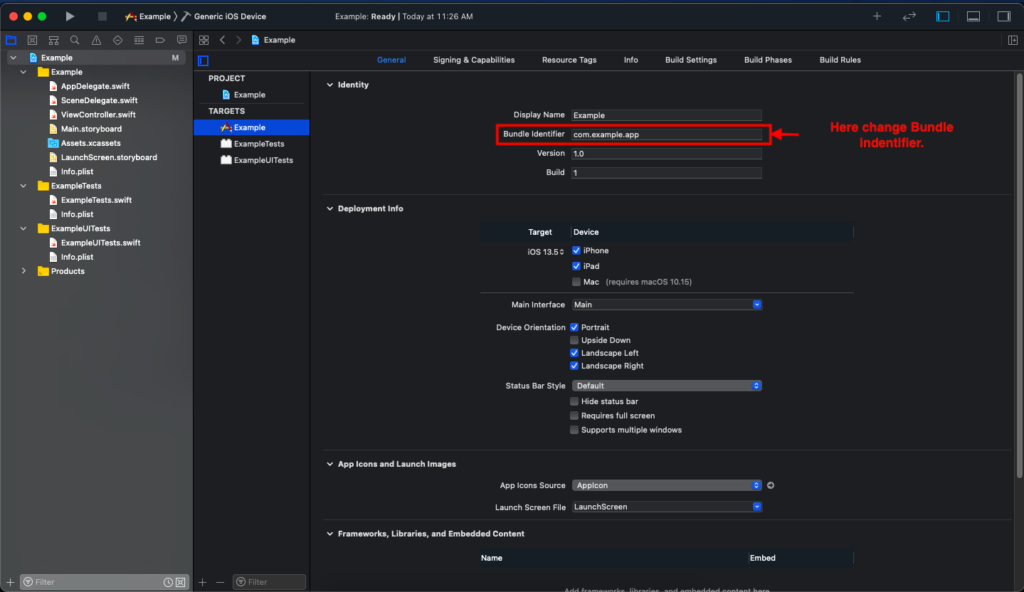
Change Bundle Identifier.
Bundle Id is a unique Identifier of your of app on iOS and MacOS. iOS and MacOS
use it to recognise updates to your app. The identifier must be unique for your
app.
Select your project file icon in Group and files panel.
Select General Tab.
After Select General tab you can see the details of your application.
In Identity section, rename your Bundle identifier.
Change App Icons
see How to Generate App Icons?
In Group and files panel find “Assets.xcassets” folder.
In Assets.xcassets folder replace AppIcon.
Change Admob App Id
Open Xcode,Select the Info.plist from the file Manager.
Change the GADApplicationIdentifier value.
    <key>GADApplicationIdentifier</key>
        <string>Add your Admob appId</string>
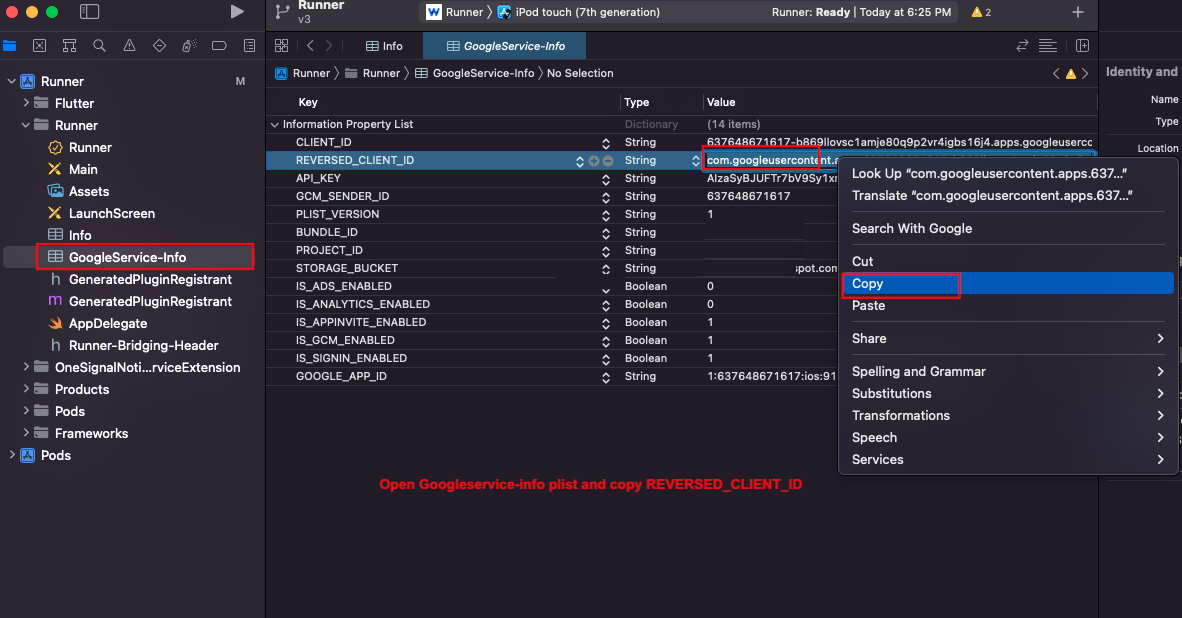
Open Xcode and then open GoogleService-Info.plist file.
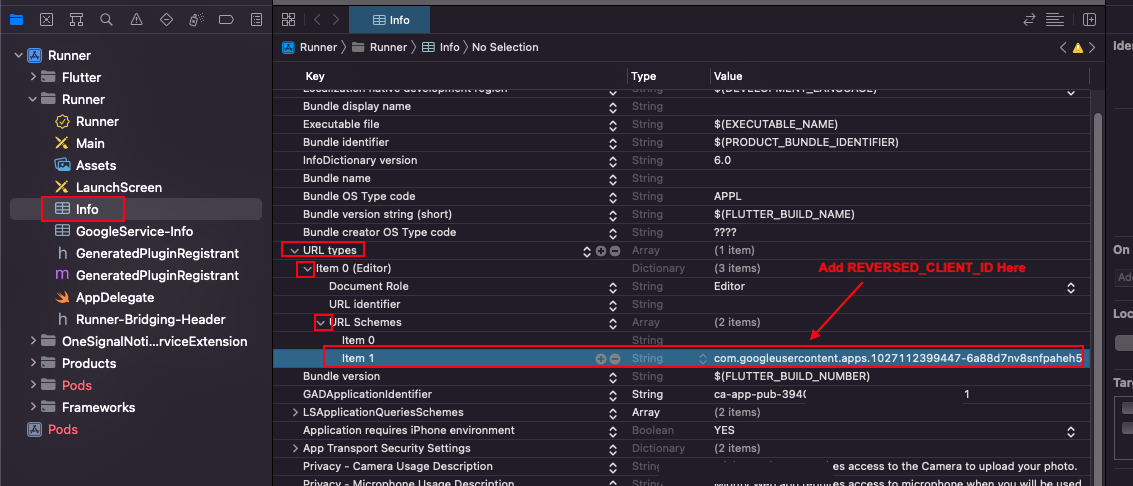
Open Xcode and then open Info.plist file.
    <key>CFBundleURLTypes</key>
    <array>
        <dict>
            <key>CFBundleTypeRole</key>
            <string>Editor</string>
            <key>CFBundleURLSchemes</key>
            <array>
                < TODO Replace this value:>
                < Copied from GoogleService-Info.plist key REVERSED_CLIENT_ID>
                <string>"Enter your REVERSED_CLIENT_ID"</string>
            </array>
        </dict>
    </array>
Open Xcode and then open Info.plist file and Change Permission App name.
Firebase Configuration
Create a Firebase project
Before you can add Firebase to your Flutter app, you need to create a Firebase
project to connect to your app. Visit Understand Firebase Projects to learn more about Firebase
projects.
Warning
If you're releasing your Flutter app on both iOS and Android, register both the
iOS and Android versions of your app with the same Firebase project.
Enter your app's package name in the Android package name field.
Warning
Make sure that you enter the ID that your app is actually using. You cannot
add or modify this value after you register your app with your Firebase
project. Both applicationId should be matched.
Click Register app.
Add a Firebase configuration file
Click Download google-services.json to obtain your Firebase Android config
file (google-services.json).
Move your config file into the android/app directory of your Flutter app.
Flutter Configuration
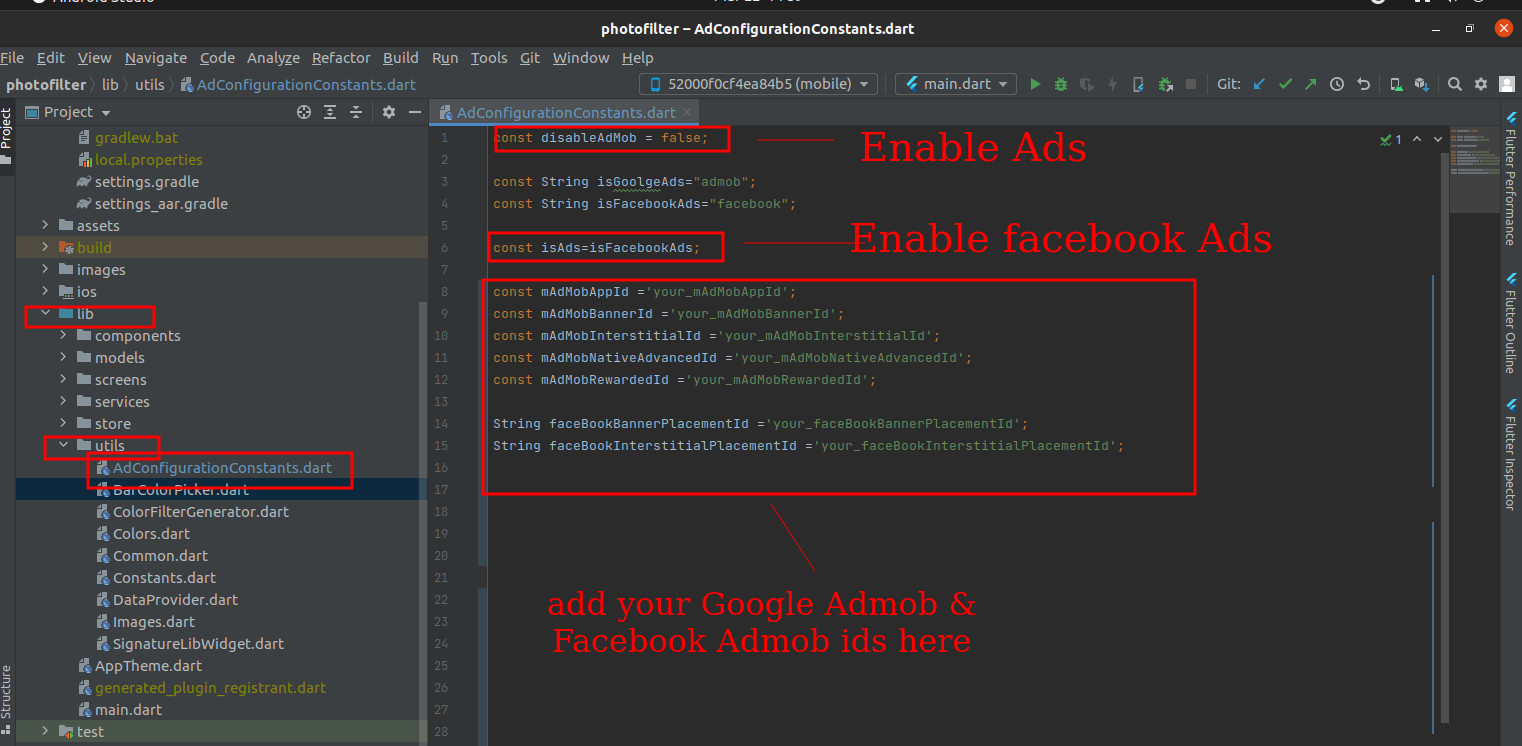
Setup AdMob
For AdMob setup, you just need to change the app id, banner id and
interstitial id.
For that, you have to create a firebase account and create a new application
in AdMob. and then create two ad unit.
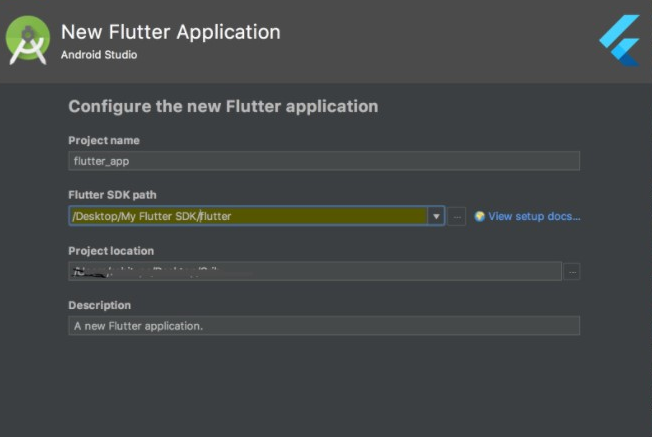
You can also Download any version(including
older)
from here (For Mac, Windows, Linux)
Use the SDK path in your future projects
Dependency Error
When you run the application and you see error like this
 Running "flutter pub upgrade" in photo_editor...
The current Flutter SDK version is 1.17.5.
Because photo_editor depends on flutter_svg >=0.18.0 which requires Flutter SDK version
>=1.18.0-6.0.pre <2.0.0, version solving failed. pub upgrade failed (1; Because
photo_editor depends on flutter_svg >=0.18.0 which requires Flutter SDK version
>=1.18.0-6.0.pre <2.0.0, version solving failed.) Process finished with exit code 1
Error Possibilities:
Generally, this error occurs when
Error Possibilities
Generally, this error occurs when
one of your third party package version is not supported.
your Flutter SDK version not matched with one of your third party packages.
for
ex, your current Flutter SDK version is 1.20.0 and third party package
targets
Flutter SDK version 1.17.0.
or upgrade your flutter version if you don't have the latest with
flutter
upgrade command.
After implementing the above solution, run the below command in the terminal.
flutter pub get
Unsupported gradle version 7.*.*
Message: Unsupported gradle version 7.*.*
Solution:
1. Open project_root_directory/android in Android Studio
2. Wait for indexing
3. Now run your application from android module
FAQ
Change Log
Version 3.2.0 - 30 Mar 2023
New Tools added
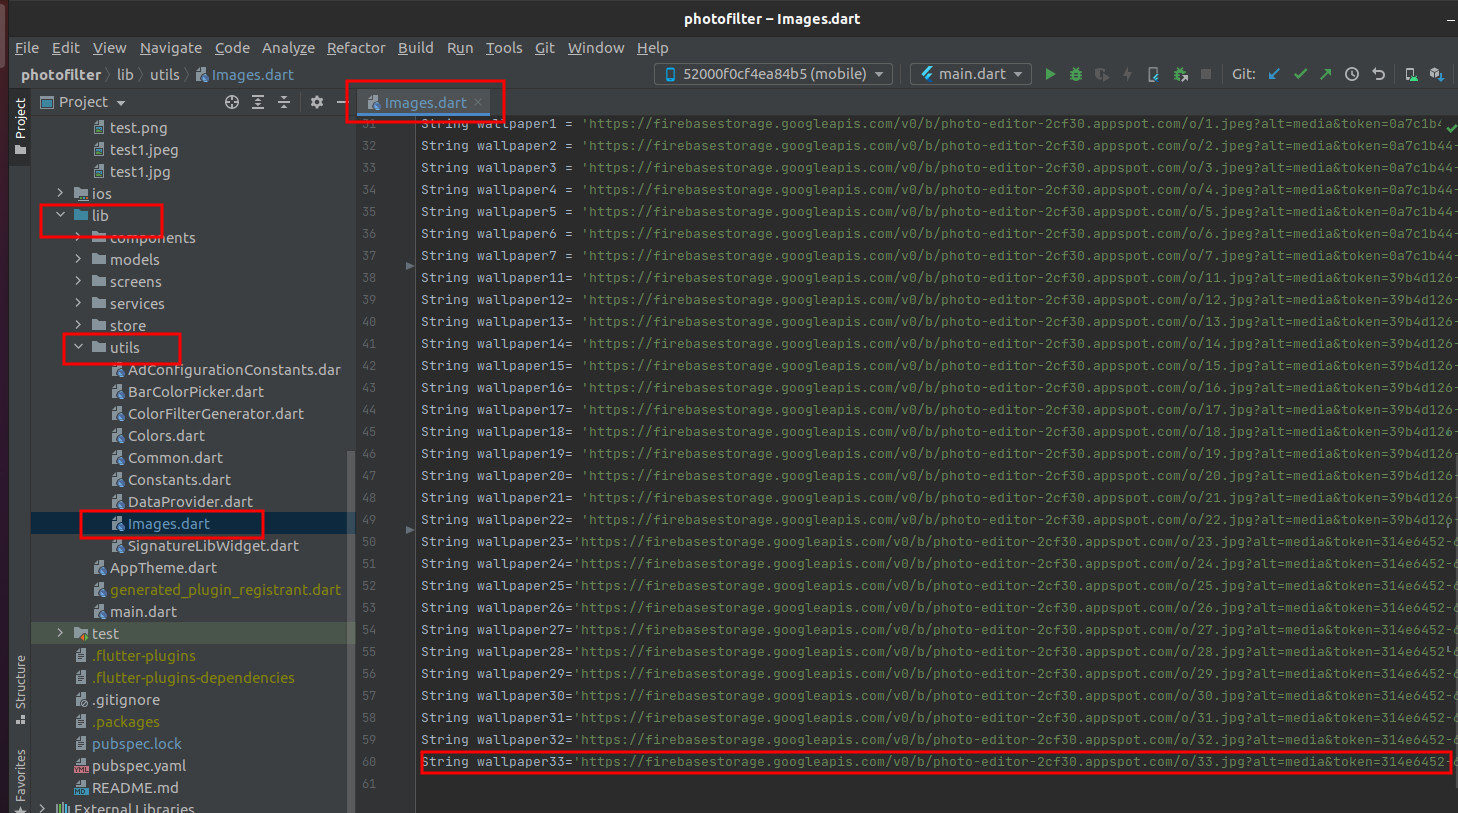
Add New Images
Pen
Add Text Templet
Image Border
Bug Fixed
Upgrade all library in latest SDK 3.x
Version 3.0.0 - 30 Aug 2022
Added Save Edited Images / Video to Gallery
Upgraded Libraries
Bug Fixed
Version 2.4.1 - 04 Jun 2022
Upgraded Dependencies
Upgraded to latest Flutter 3.0.0 SDK
Version 2.4.0 - 28 Mar 2022
Free Photos
Implement Facebook Audience Ads
Upgraded Dependencies
Upgraded to latest Flutter 2.10 SDK
UI Enhancement
Bug Fixed
Version 2.3.1 - 06 Jan 2022
Upgraded to the latest Flutter 2.8 SDK
bug fixes
Version 2.2.0 - 09 Aug 2021
Added College Maker
Added Video Trimmer
Version 2.0.0 – 30 May 2021
Fully migrated to Flutter 2.0 Null Safety
Version 1.0.2 – 06 May 2021
Update dashboard UI
Fix - Crop image issue
Version 1.0.0 – 01 May 2021
Initial Release
MeetMighty Help & Support
We like to hear you out when you get stuck or encounter difficulty with our products. As soon as you
buy one of our products – you can open a support ticket and share your concern right away.
It is recommended that before submitting a ticket you take a close look at product documentation
(Docs folder in the
archive you have downloaded from Themeforest/Codecanyon). To get technical support and assistance,
you need to have a valid purchase code. You will find this when you SignIn your
Codecanyon/Themeforest “Download” page.
Click on the product’s download link.
Please Note:
Free support policy includes troubleshooting, technical assistance with the product only.
It does not include any customization, additional features integration or concerns about third-party
plugins compatibility.
But, support is applied to plugin(s) we have developed and integrated ourselves. We appreciate your
understanding!
If you need assistance and information on purchased product that is not covered in documentation,
post them on our support portal at https://support.meetmighty.com/
You can expect answer within 24-48 hours, usually as soon as possible in the order they were
received.
Additionally, if any support ticket has no response from the item owner for more than 7 days,
that support ticket will be closed by default. However, if you need further assistance, you can
create a new ticket.
All support requests are being processed on business days (Monday to Saturday) from 9:00 to 18:00
(GMT +05.30). We are in GMT+5:30 time zone.
We address all the support queries 6 days weekly on the first-come, first-solve basis (Sundays off).
Do you have any pre-sales questions or concerns,
please write to us via our website contact page or email us at [email protected].
We like getting positive feedback from our customers, and this is why we do our best to earn it!
Write a review: https://codecanyon.net/downloads
Change Log
Update your application to give for the best experience – check out what’s new and improved.
Thank you