Mighty UI Kit is as the name says is dominating and powerful set of Flutter UI kit containing
complete
app templates,ready to use widgets, code snippets i.e. readymade code integration and stunning
screens
covering many different use cases. The biggest Flutter UI kit comes with the latest material design.
Mighty UI templates are developed with the highest quality, ease of reusing widgets, fast, and
completely
user-friendly interface. You can easily integrate these into any Flutter project. Mighty UI Kit
makes the
developer job easy to achieve modern look and feel of the mobile application. It saves your hustle
and time
to develop a perfect design UI for modern-day-use mobile application.
Step 2: Verify your purchase with valid Purchase code.
Step 3: Click on the View Source code button there you will find the 2 option for Windows and
Linux. Click on the link you want.
Step 4: Now you can run the builder following this steps: Documentation
Link
Mighty UI Kit - Video Hightlight
Project Structure & Features
Mighty UI Kit project structure and short description for each of them is as follow:
images: apps/widgets/snippets images as well as appIcon are stored here.
lib: Application main file and folder are located here.
apps: Full Apps UI Code can be found here.
snippets: Ready made code for app integrations are saved here.
widgets: Basic ready made widgets are located here.
main: Application Configuration the 1st Screen of the app (i.e. SplashScreen) is
been declared here.
pubspec.yaml: Application name and other project dependencies can be found here.
Application Features
Clean Code and a well structured project
Single code base for both Android & iOS
60 FPS Support for both Android & iOS
Fully responsive UI
Best UI & UX
Dark and light modes
Great animation
Easy to customize
Use of MobX State management
Free life time updates & stunning customer support
Easy to integrate in your project
Introduction to Flutter
Flutter is Google’s UI toolkit for building beautiful, natively compiled
applications for MOBILE, WEB, and DESKTOP from a
single codebase. It is
very
easy to learn and currently it is getting more and more popular. With this blog
post, you will learn some basic stuff about Flutter and after reading it, you
will be able to create a simple application using this technology.
Click here to check out more details about
flutter.
A Hello, World program in Flutter looks like this:
import 'package:flutter/material.dart';

void main() => runApp(HelloWorldApp());

class HelloWorldApp extends StatelessWidget {
    @override
    Widget build(BuildContext context) {

    //MaterialApp acts as a wrapper to the app and
    //provides many features like title, home, theme etc
    return MaterialApp(
        title: 'Hello World App',

        //Scaffold acts as a binder that binds the appBar,
        //bottom nav bar and other UI components at their places
        home: Scaffold(

            //AppBar() widget automatically creates a material app bar
            appBar: AppBar(title: Text('Hello World App')),

            //Center widget aligns the child in center
            body: Center(child: Text('Hello World')),
        ),
    );
  }
}
1 Download the following installation bundle to get the latest stable release of
the Flutter SDK:
2 Extract the zip file and place the contained flutter in the desired
installation location for the Flutter SDK (for example, C:\src\flutter; do not
install Flutter in a directory like C:\Program Files\ that requires elevated
privileges).
Step 2 : Update your path
If you wish to run Flutter commands in the regular Windows console, take these
steps to add Flutter to the PATH environment variable:
From the Start search bar, enter ‘env’ and select Edit environment variables
for your account.
Under User variables check if there is an entry called Path:
If the entry exists, append the full path to flutter\bin using ; as a
separator from existing values.
If the entry doesn’t exist, create a new user variable named Path with the
full path to flutter\bin as its value.
Important
Note that you have to close and reopen any existing console windows for these
changes to take effect.
You are now ready to run Flutter commands in the Flutter Console!
Step 3 : Run flutter doctor
From a console window that has the Flutter directory in the path (see above), run
the following command to see if there are any platform dependencies you need to
complete the setup:
c:\src\flutter>flutter doctor
If you find any issue during environment setup, please go online Click
here
Download the following installation bundle to get the latest stable release
of the Flutter SDK:
Download SDK and extract downloaded file, just double click on that. and
just copy extracted folder and paste it to your desired location (for
example, Documents\flutter).
Step 2 : Update your path
Important
Path variable needs to be updated to access “flutter” command from terminal. you
can just update path variable for current terminal window only. and if you want
to access flutter commands from anywhere in terminal, we need to update SDK path
permanently.
To update PATH variable, we need to open terminal.
To update PATH variable for current terminal window only, then enter this command
"export PATH="$PATH:`pwd`/flutter/bin"" and hit enter key.
To update PATH variable permanently, then Open or create .bash_profile
file. to open or create that file, then enter "sudo open -e
$HOME/.bash_profile" and hit enter key.
Append below line to bash_profile file at bottom of all other content. "export
PATH="$PATH:[PATH_TO_FLUTTER_GIT_DIRECTORY]/flutter/bin"" as
[PATH_TO_FLUTTER_GIT_DIRECTORY] is actual path of SDK folder.
Run this command on terminal "source $HOME/.bash_profile" to refresh PATH
variables.
Then check whether our SDK is successfully installed or not.
You are now ready to run Flutter commands in the Flutter Console!
Run "flutter doctor" into terminal, If you are getting check list of
flutter sdk requirements, it means SDK is successfully installed on your
machine. and you can start building flutter apps on your machine.
If you find any issue during environment setup in macos, please go online Click
here
Download the following installation bundle to get the latest stable release
of the Flutter SDK:
Download SDK and extract downloaded file, just double click on that. and
just copy extracted folder and paste it to your desired location (for
example, Documents\flutter).
Step 2 : Update your path
Important
Path variable needs to be updated to access “flutter” command from terminal. you
can just update path variable for current terminal window only. and if you want
to access flutter commands from anywhere in terminal, we need to update SDK path
permanently.
You’ll probably want to update this variable permanently, so you can
run flutter commands in any terminal session. To update PATH variable, we need
to open terminal.
Run source $HOME/.
to refresh the current window, or open a new terminal window to
automatically source the file.
Verify that the flutter/bin
directory is now in your PATH by running:
Verify that the flutter
command is available by running:
You are now ready to run Flutter commands in the Flutter Console!
Getting Started (Build & Run)
Important
All below steps are must be followed to build and run application
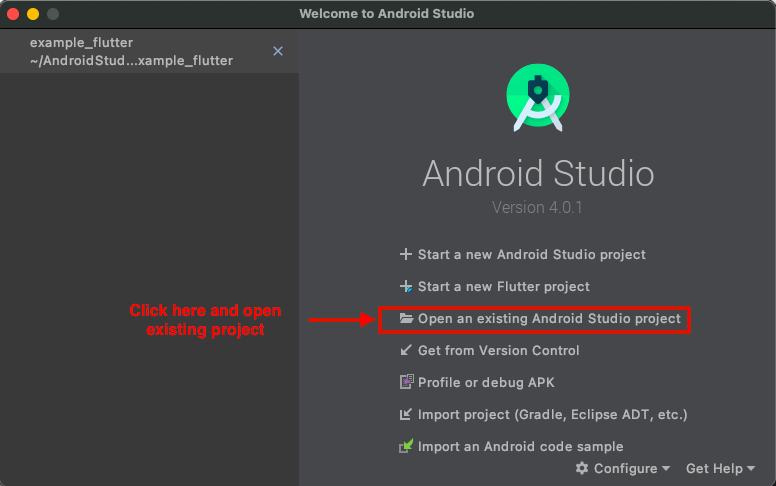
Download Project
Download and find the your project folder, use your preferred IDE
(Android Studio / Visual Studio Code / IntelliJ IDEA) to run
the project.
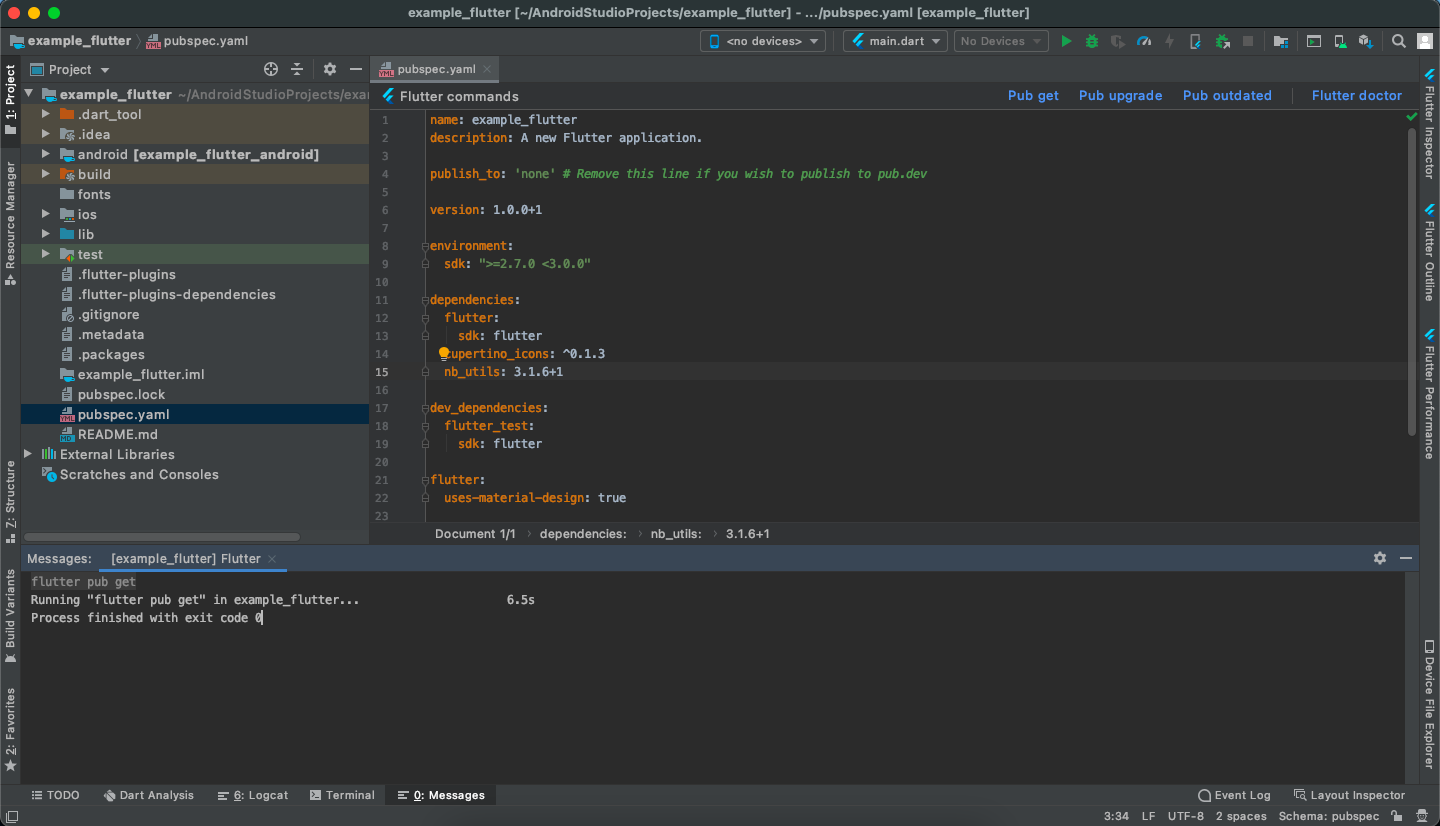
Get Dependencies
After you loaded project successfully, run the following command in the terminal
to install all the dependencies listed in the pubspec.yaml
file in the project's
root directory or just click on Pub get
in pubspec.yaml fileif you don't
want to use command.
flutter pub get
Important
All below steps are must be followed to build and run application
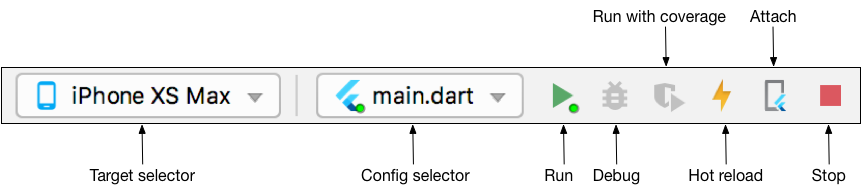
Build and Run App
Locate the main Android Studio toolbar.
In the target
selector, select an Android
device for running the app. If none are listed as available, select
Tools >
Android > AVD Manager and
create one there. For details, see Managing
AVDs.
Click the run icon in the toolbar, or invoke the menu item Run > Run.
After the app build completes, you’ll see the app on your device.
If you don’t use Android Studio or IntelliJ you can use the command line to run
your application using the following command
Important
Below step requires flutter path to be set in your Environment variables. See
https://flutter.dev/docs/get-started/install/windows
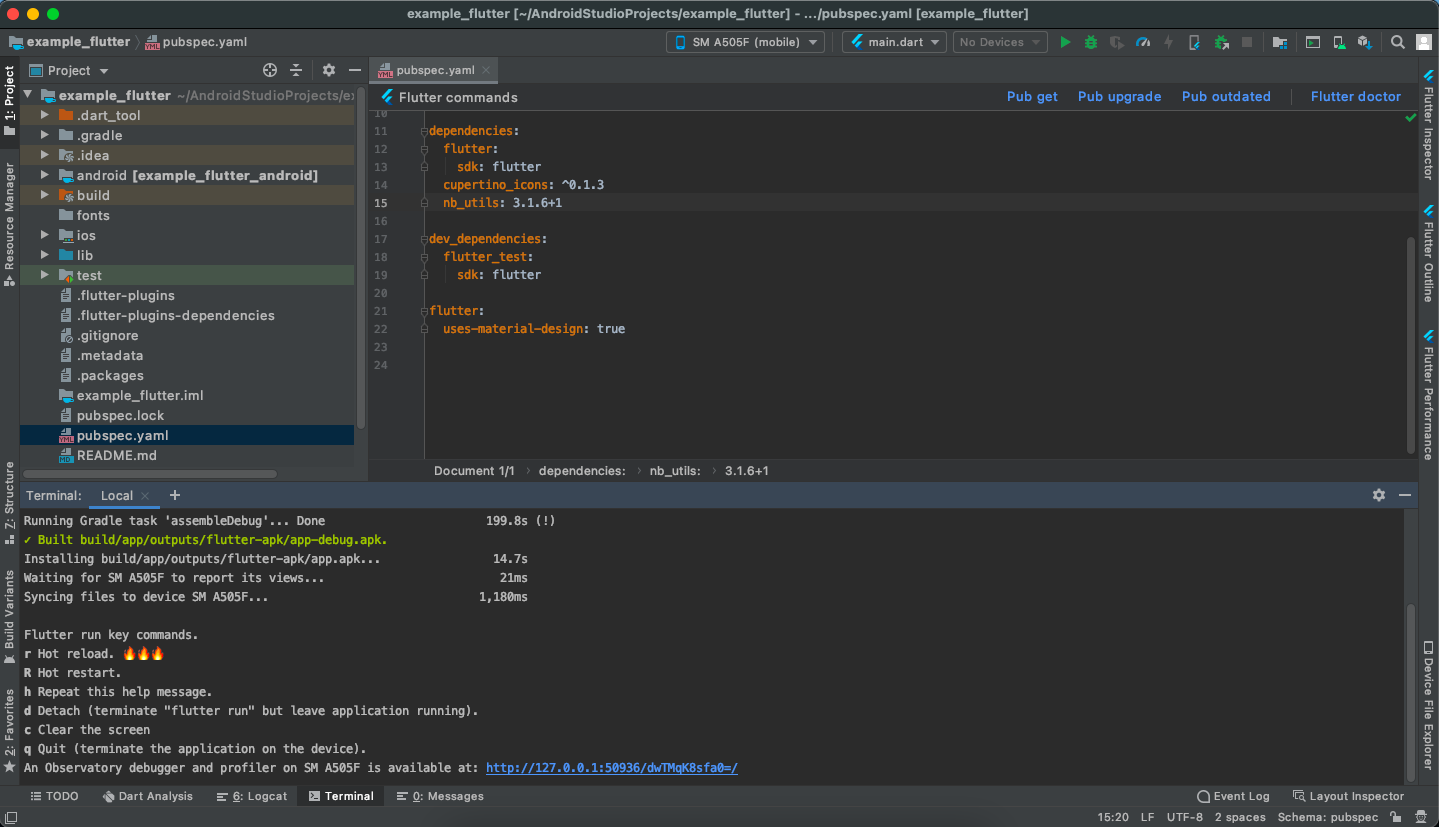
flutter run
You will see below like screen after you have build your app successfully
Try hot reload
Flutter offers a fast development cycle with Stateful Hot Reload, the ability to
reload the code of a live running app without restarting or losing app state.
Make a change to app source, tell your IDE or command-line tool that you want to
hot reload, and see the change in your simulator, emulator, or device.
Important
Do not stop your app. let your app run.
Configuration & Customization
Android Configuration
Setup Firebase
For Firebase setup, you just need to change the
android/app/google-services.json
file.
Create a new firebase account, register your application with your package
name.
Now download the google-services.json file and replace with current.
Wait until the project has been synced successfully. (This happens
automatically once you open the project, but if it doesn’t, select Sync
Project with Gradle Files from the File menu).
Now, click on Run button.
Change Application Name
You must want to change your application name. This is how you can do.
Follow the below step.
Open /android/app/src/main/AndroidManifest.xml and specify your application
name.
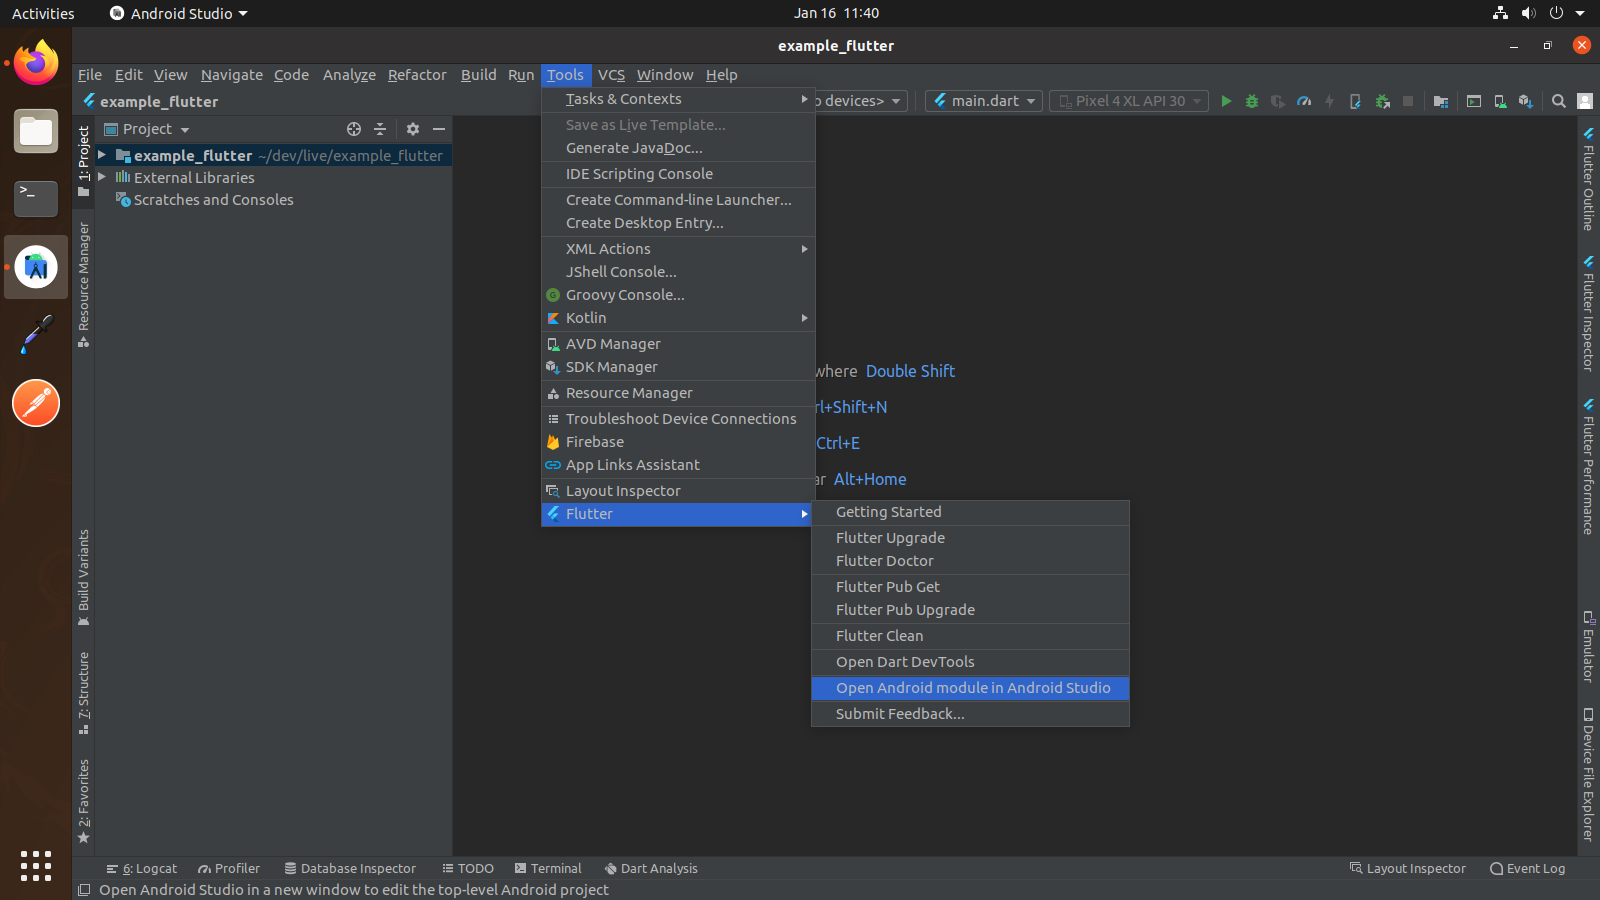
Go to your project -> Tools -> Flutter -> Open for Editing in Android Studio as shown below
Open Project in New Window
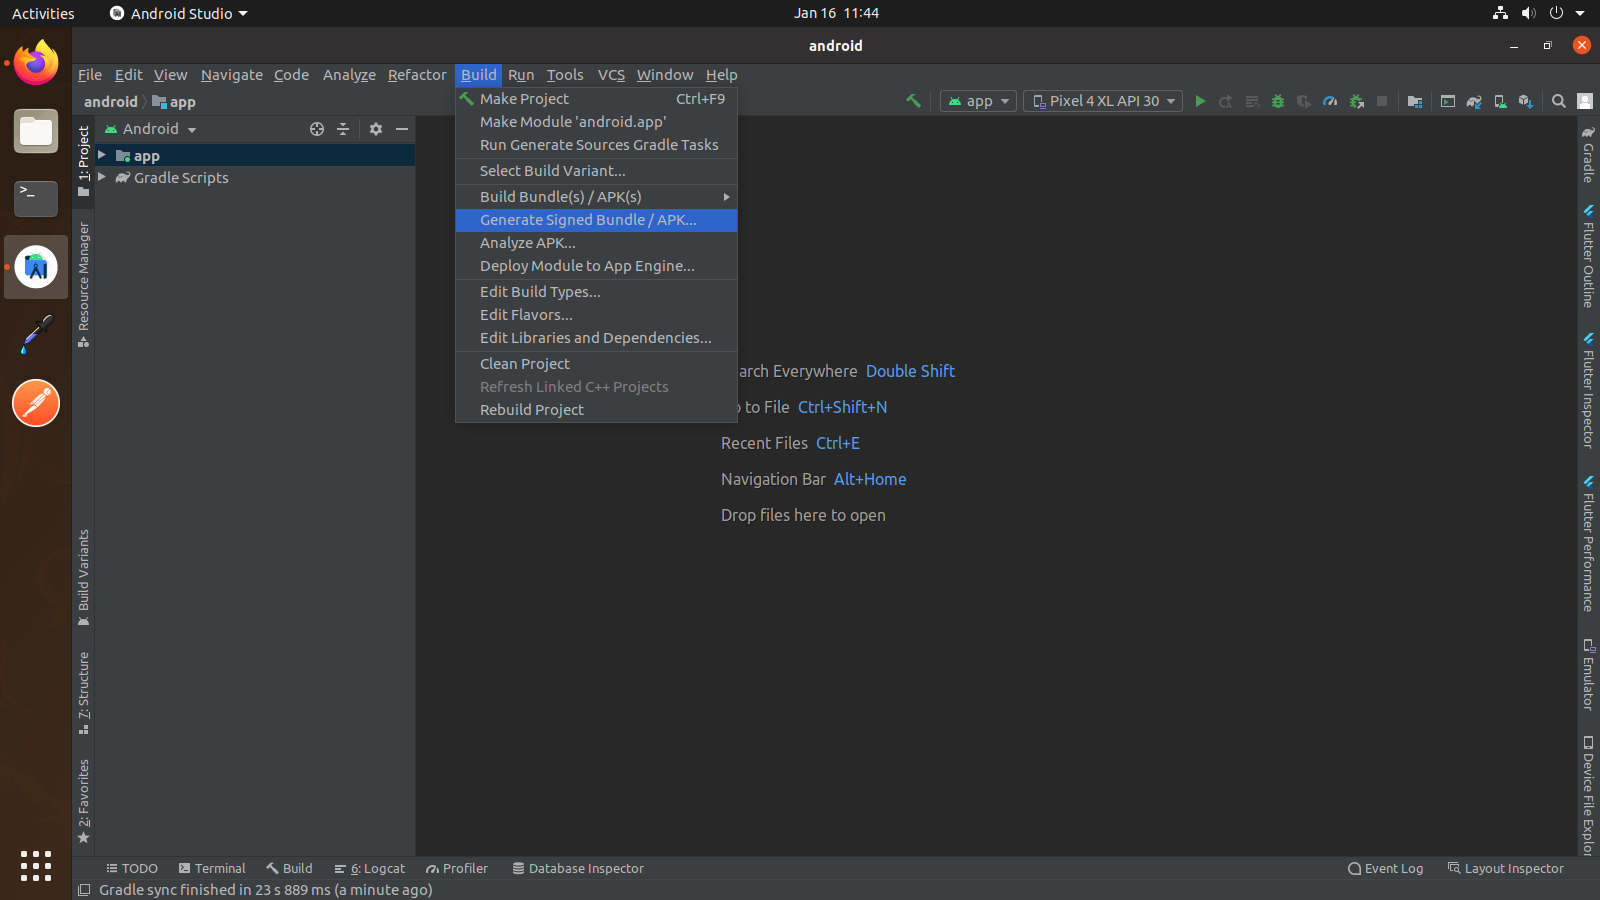
Wait for while until project synchronization. After that Go to Build -> GenerateSigned
Bundle/APK...
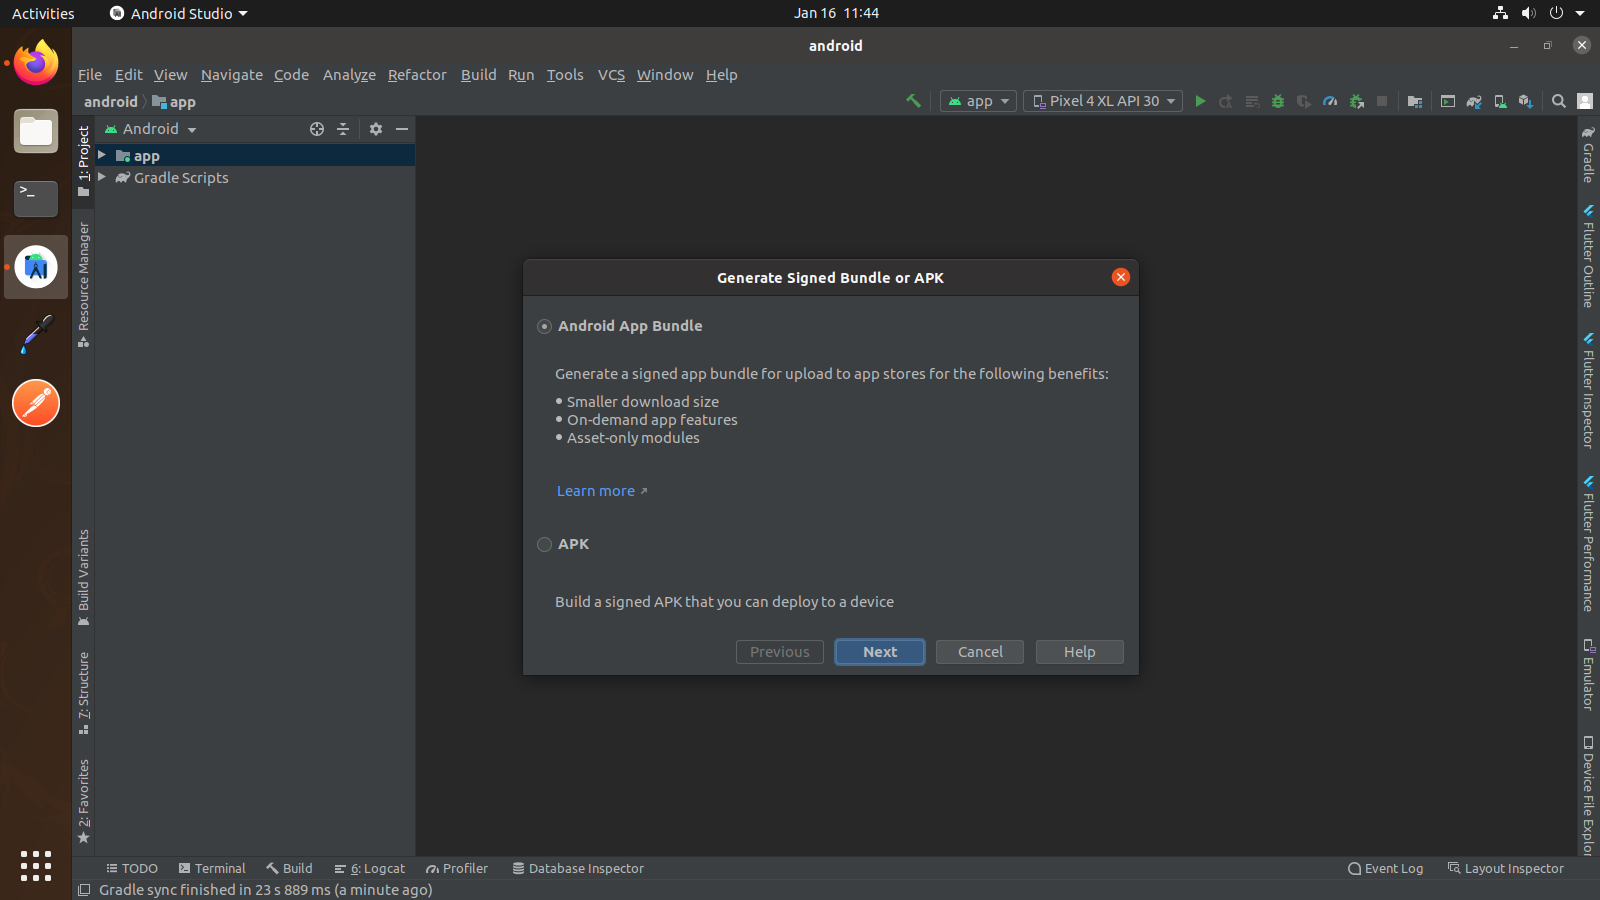
Select Android App Bundle or APK Option as per your need. (Android App Bundle is best solution)
and click Next button.
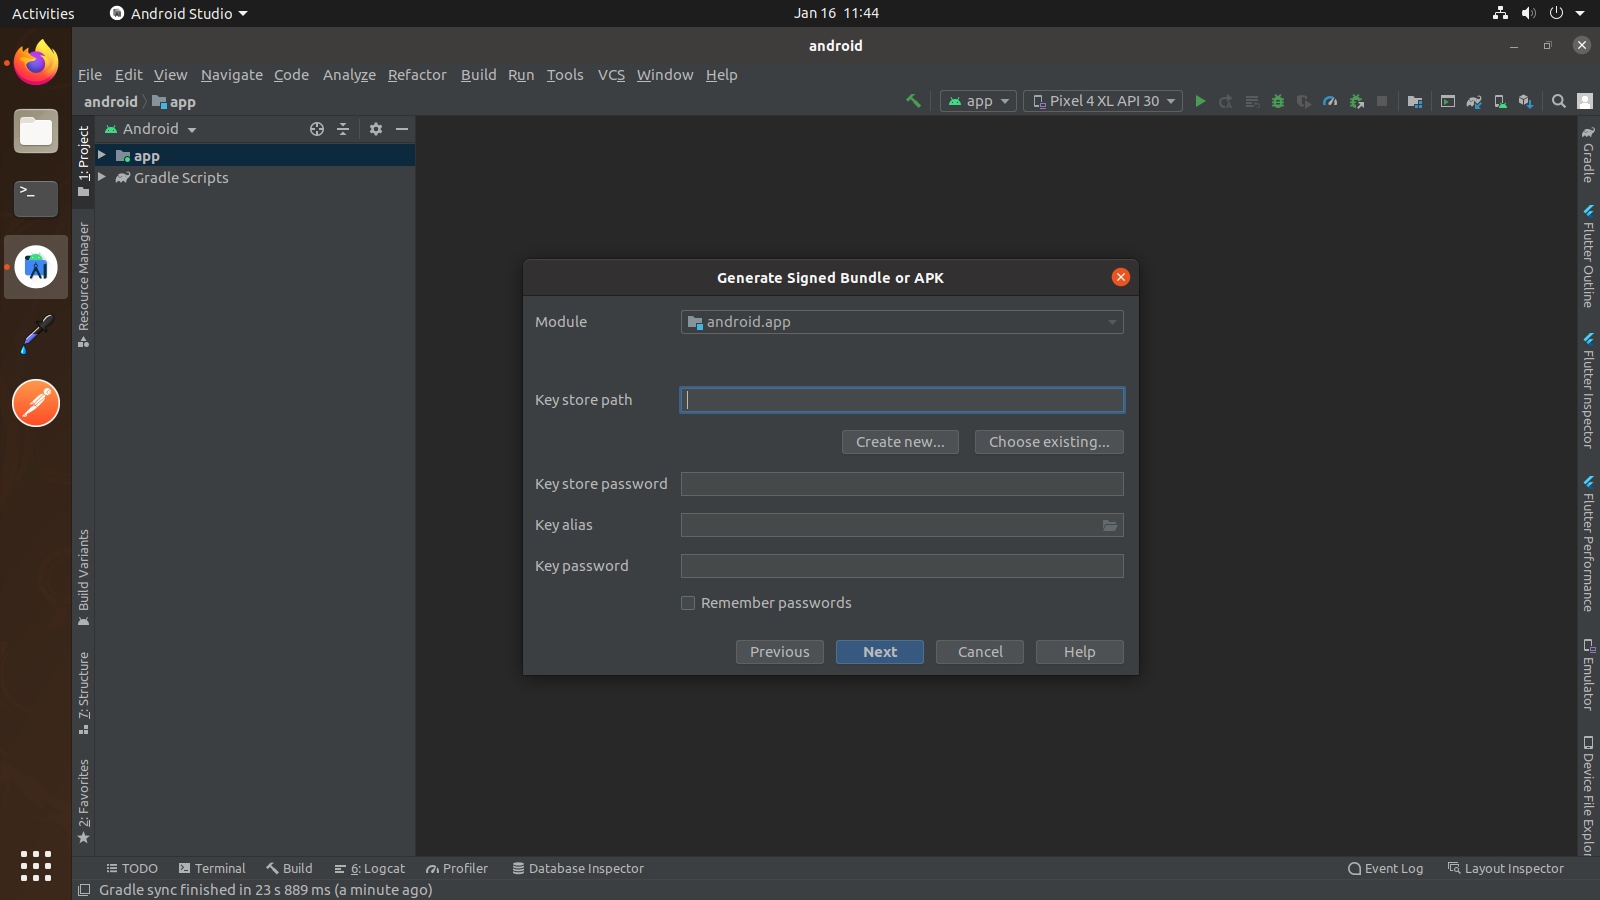
Select Create new.. option to generate new Signed key (When you release your app First Time) and
Fill all options. Refer this link
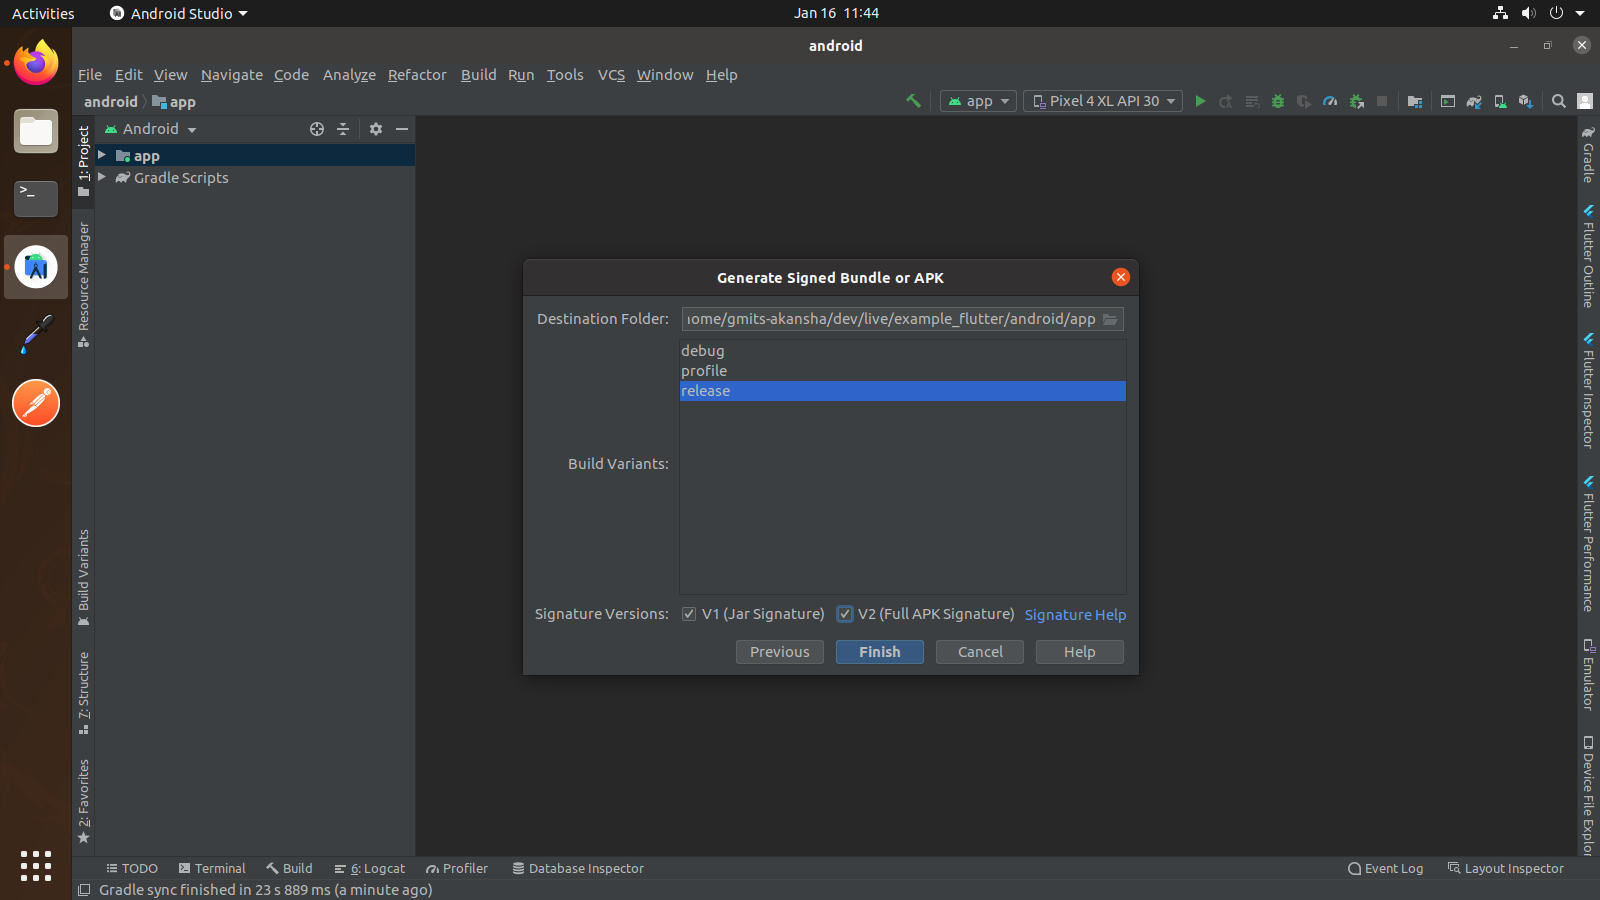
Click Next button and you will get following screen...
Select Build variants - release and Signature versions both V1 and V2 respectively as shown above
screen shot and click Finish button.
Wait for a while until Gradle Build Running process complete.and finally you will get the
Generate Signed APK : (APKs) generated successfully . from that click on Locate option to get
Location of your Generate Signed APK Key.
iOS Configuration
Open Project in Xcode
Open Xcode.
Select Open another Project.
Open the iOS directory within your app.
Now, click on Done button.
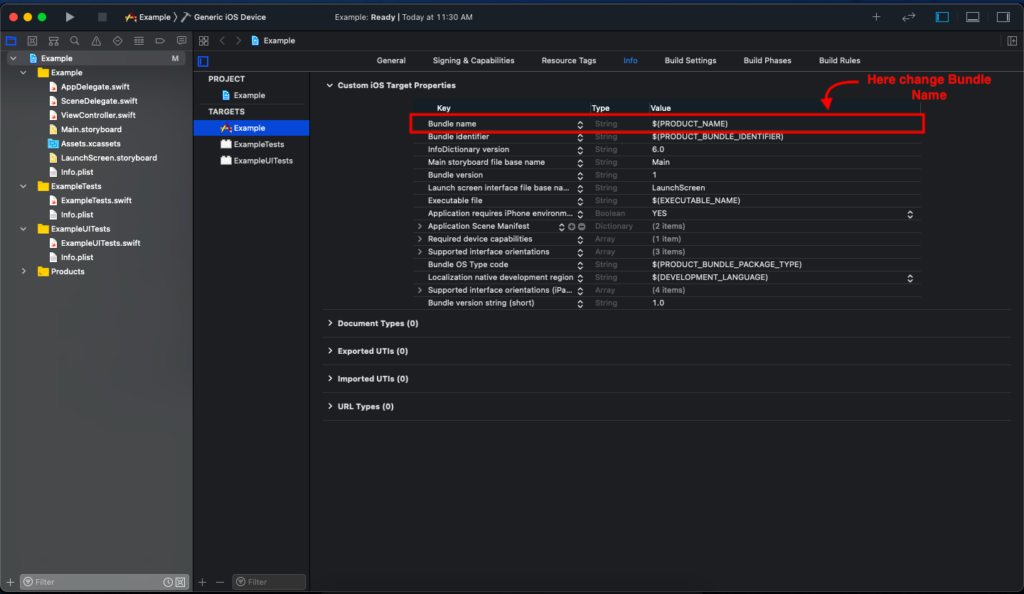
Change Bundle Name
Select your project file icon in Group and files panel.
Then Select Target -> Info Tab.
At last change Bundle Name.
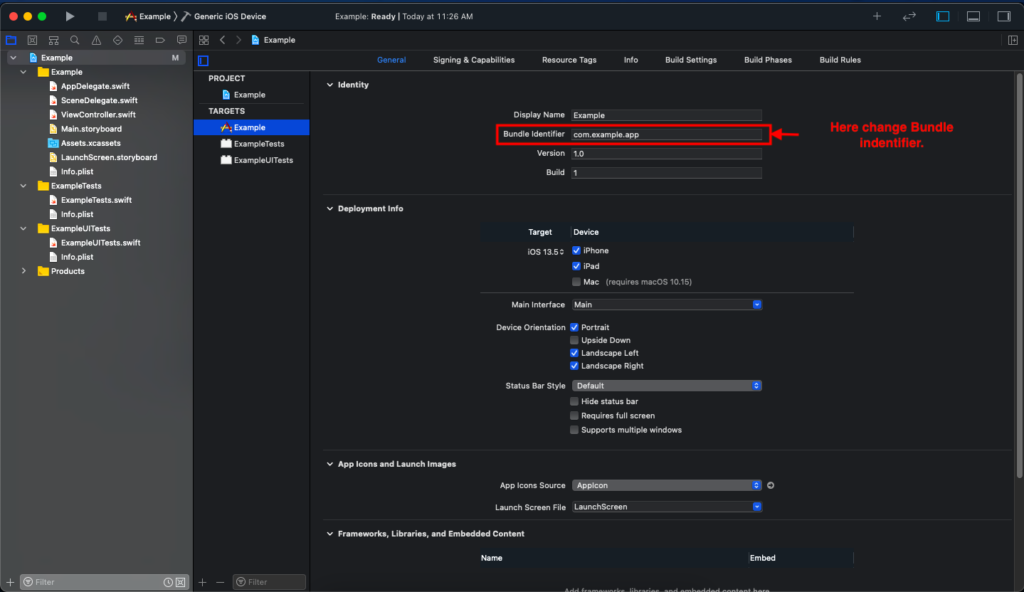
Change Bundle Identifier.
Bundle Id is a unique Identifier of your of app on iOS and MacOS. iOS and MacOS
use it to recognise updates to your app. The identifier must be unique for your
app.
Select your project file icon in Group and files panel.
Select General Tab.
After Select General tab you can see the details of your application.
In Identity section, rename your Bundle identifier.
Change App Icons
see How to Generate App Icons?
In Group and files panel find “Assets.xcassets” folder.
In Assets.xcassets folder replace AppIcon.
Firebase Configuration
Create a Firebase project
Before you can add Firebase to your Flutter app, you need to create a Firebase
project to connect to your app. Visit Understand Firebase Projects to learn more about Firebase
projects.
Important:
If you're releasing your Flutter app on both iOS and Android, register both the
iOS and Android versions of your app with the same Firebase project.
Enter your app's package name in the Android package name field.
Important:
Make sure that you enter the ID that your app is actually using. You cannot
add or modify this value after you register your app with your Firebase
project. Both applicationId should be matched.
Click Register app.
Add a Firebase configuration file
Click Download google-services.json to obtain your Firebase Android config
file (google-services.json).
Move your config file into the android/app directory of your Flutter app.
Follow the instruction for enabling Firebase services in your Android app here
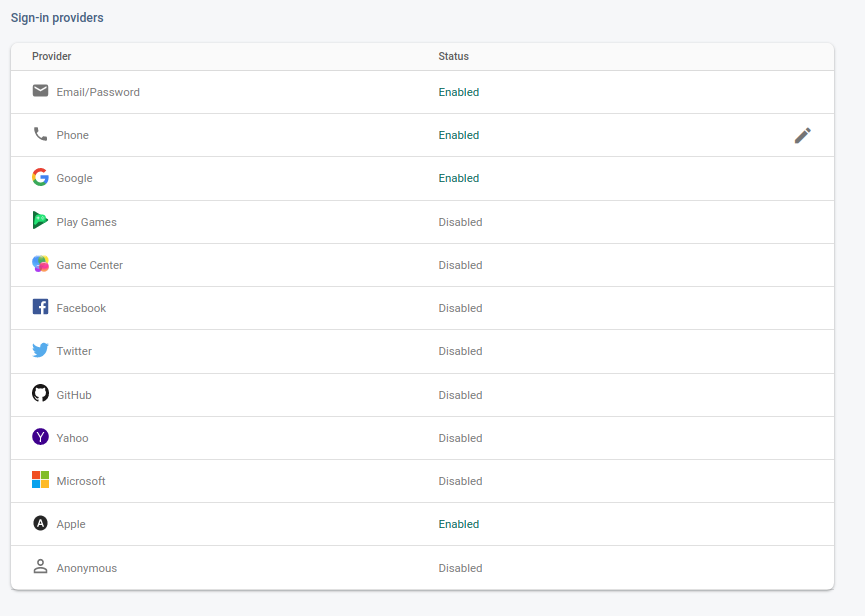
Enable the Google, Phone and Apple SignIn
In Firebase console, open the Authentication section.
On the Sign-in Method tab, enable the Google Sign method and click save same
as Apple and Phone signIn method.
Flutter Configuration
Create a OneSignal Account
Follow below steps
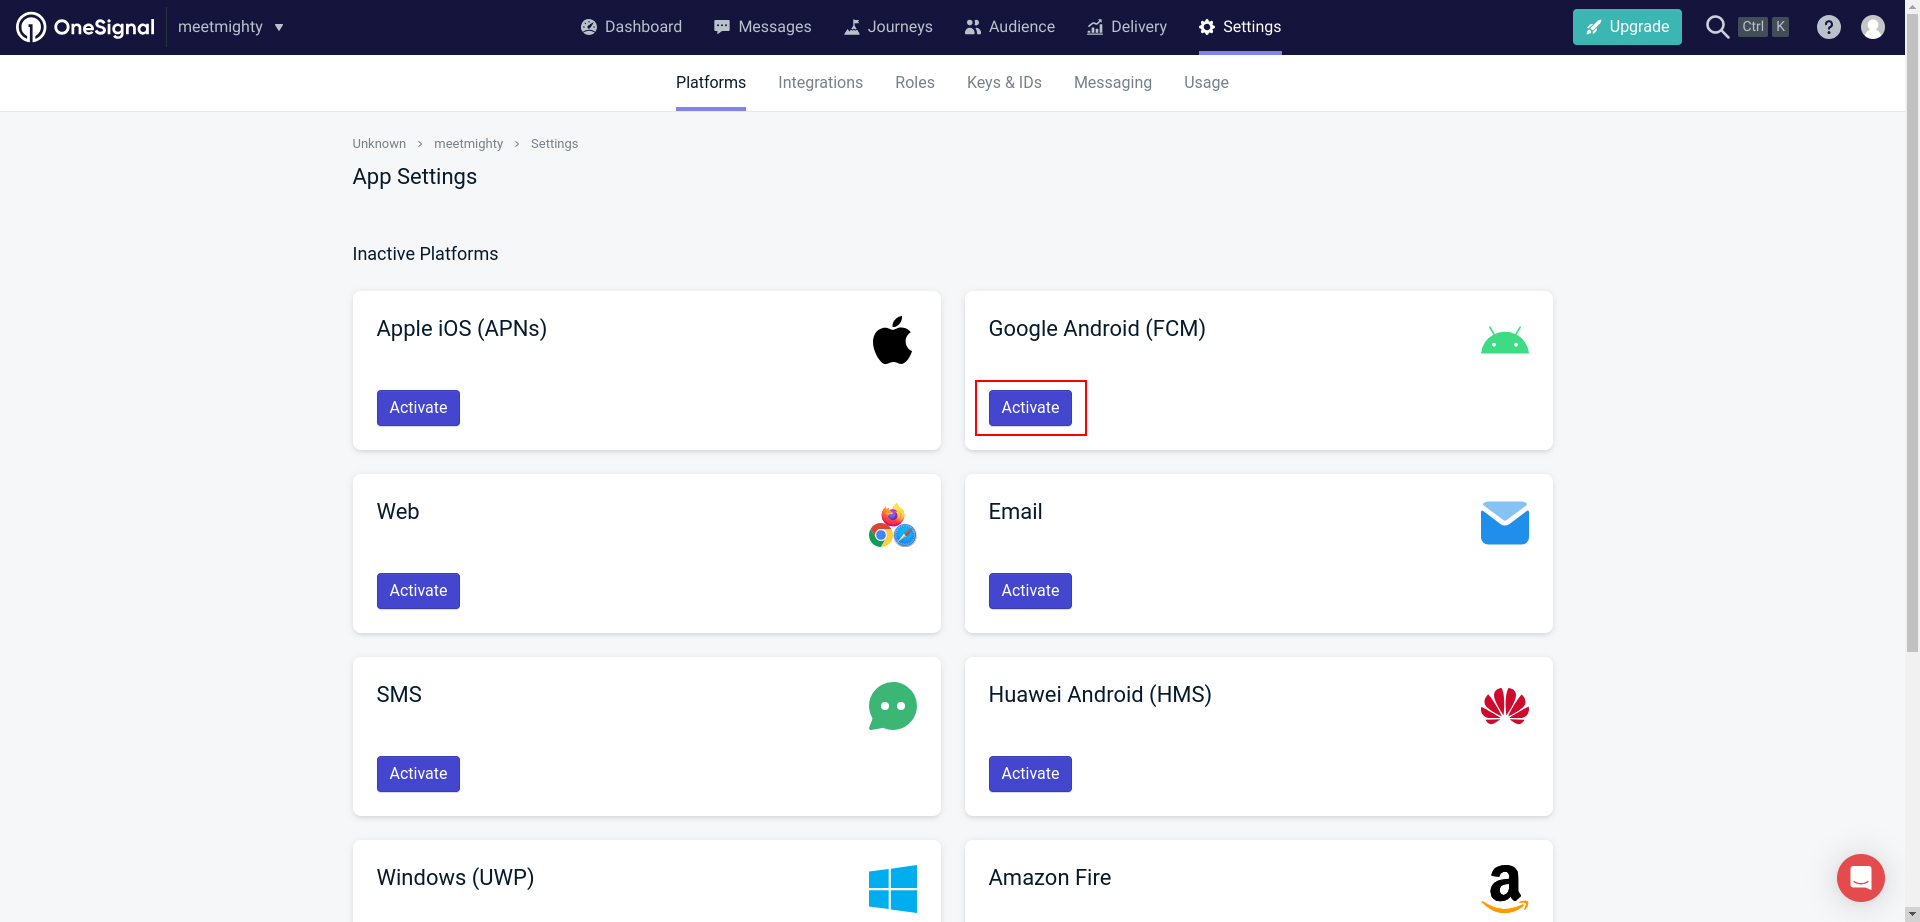
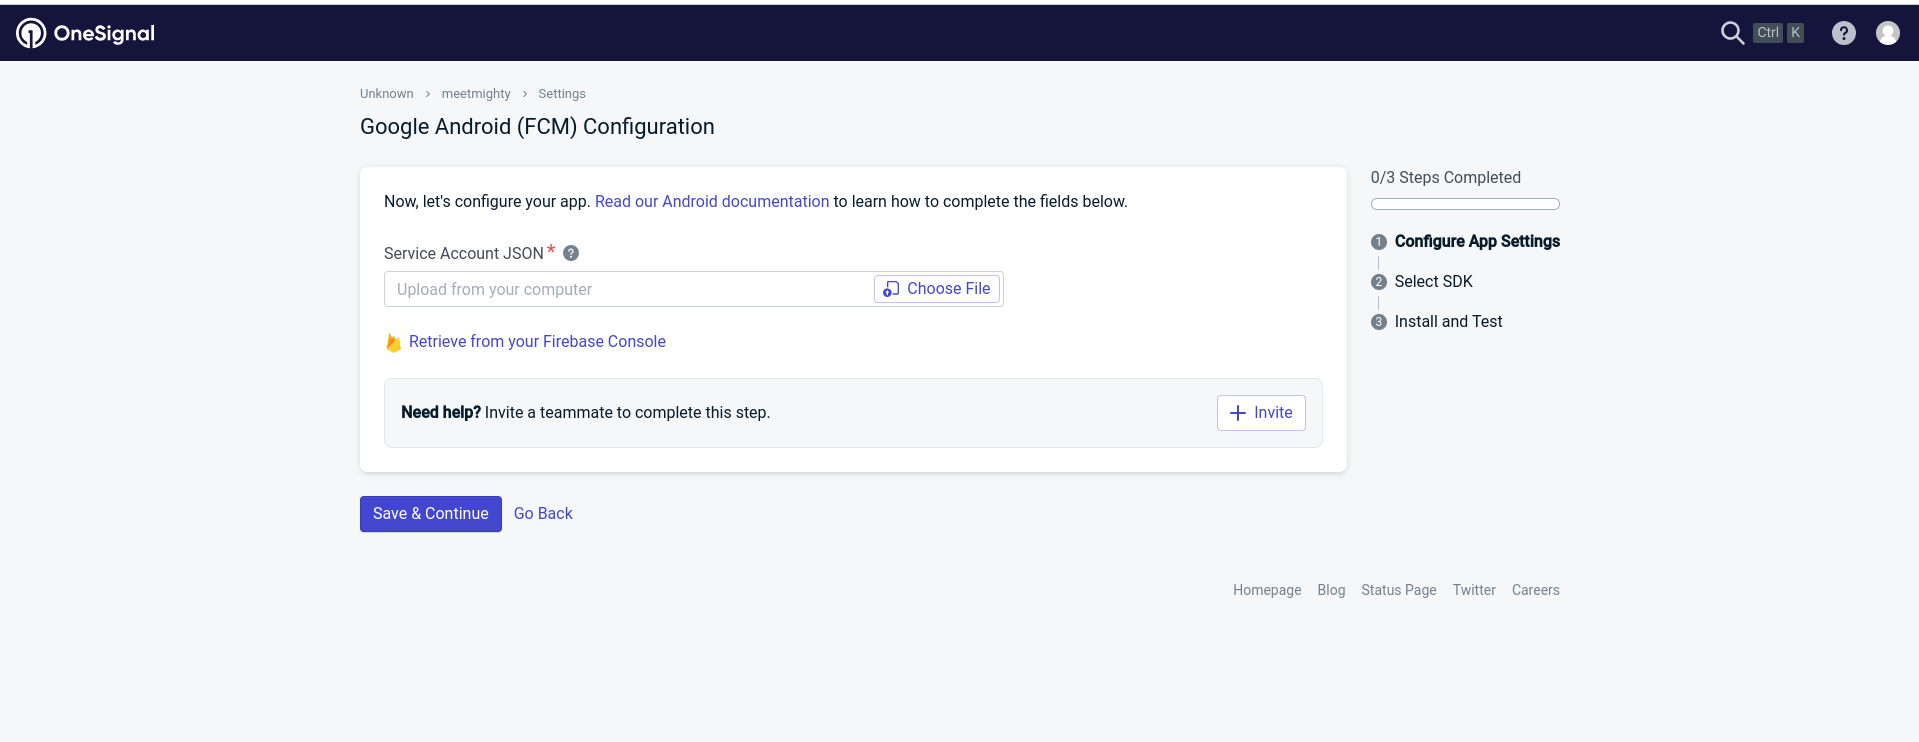
Create onesignal project in your account and click setup platform redirect in settings->platforms-> Choose android platform
After choose platform -> android configration, Generate json file and follow below link for how to generate JSON file
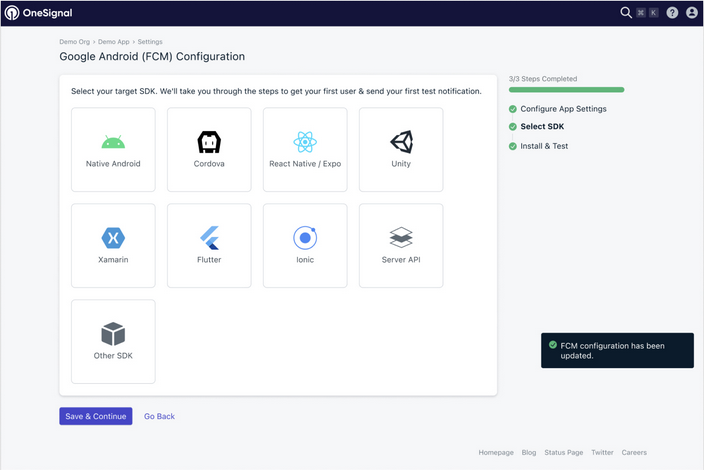
Choose Target SDK as Flutter and click Save & Continue
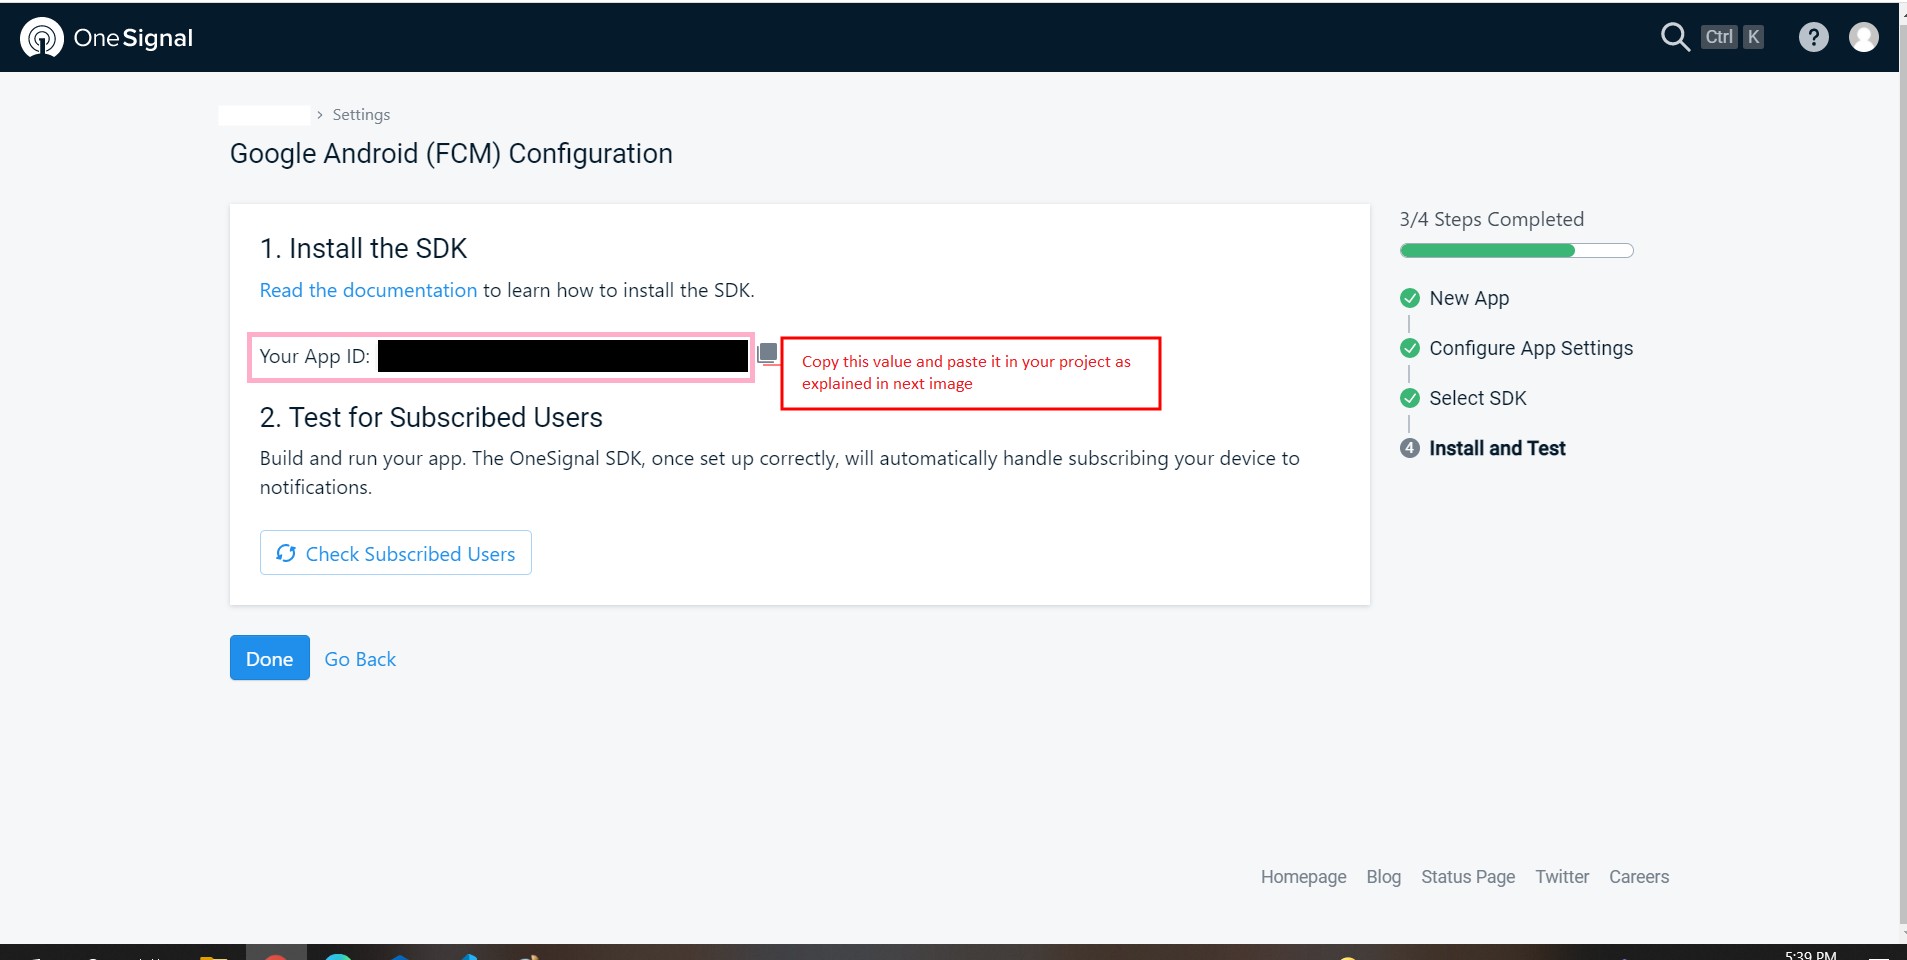
Now copy App ID as shown below and click on Save & Continue to complete your setup
In main directory goto the lib -> utils -> app_config.dart file and repalce the one signal at line number 21.
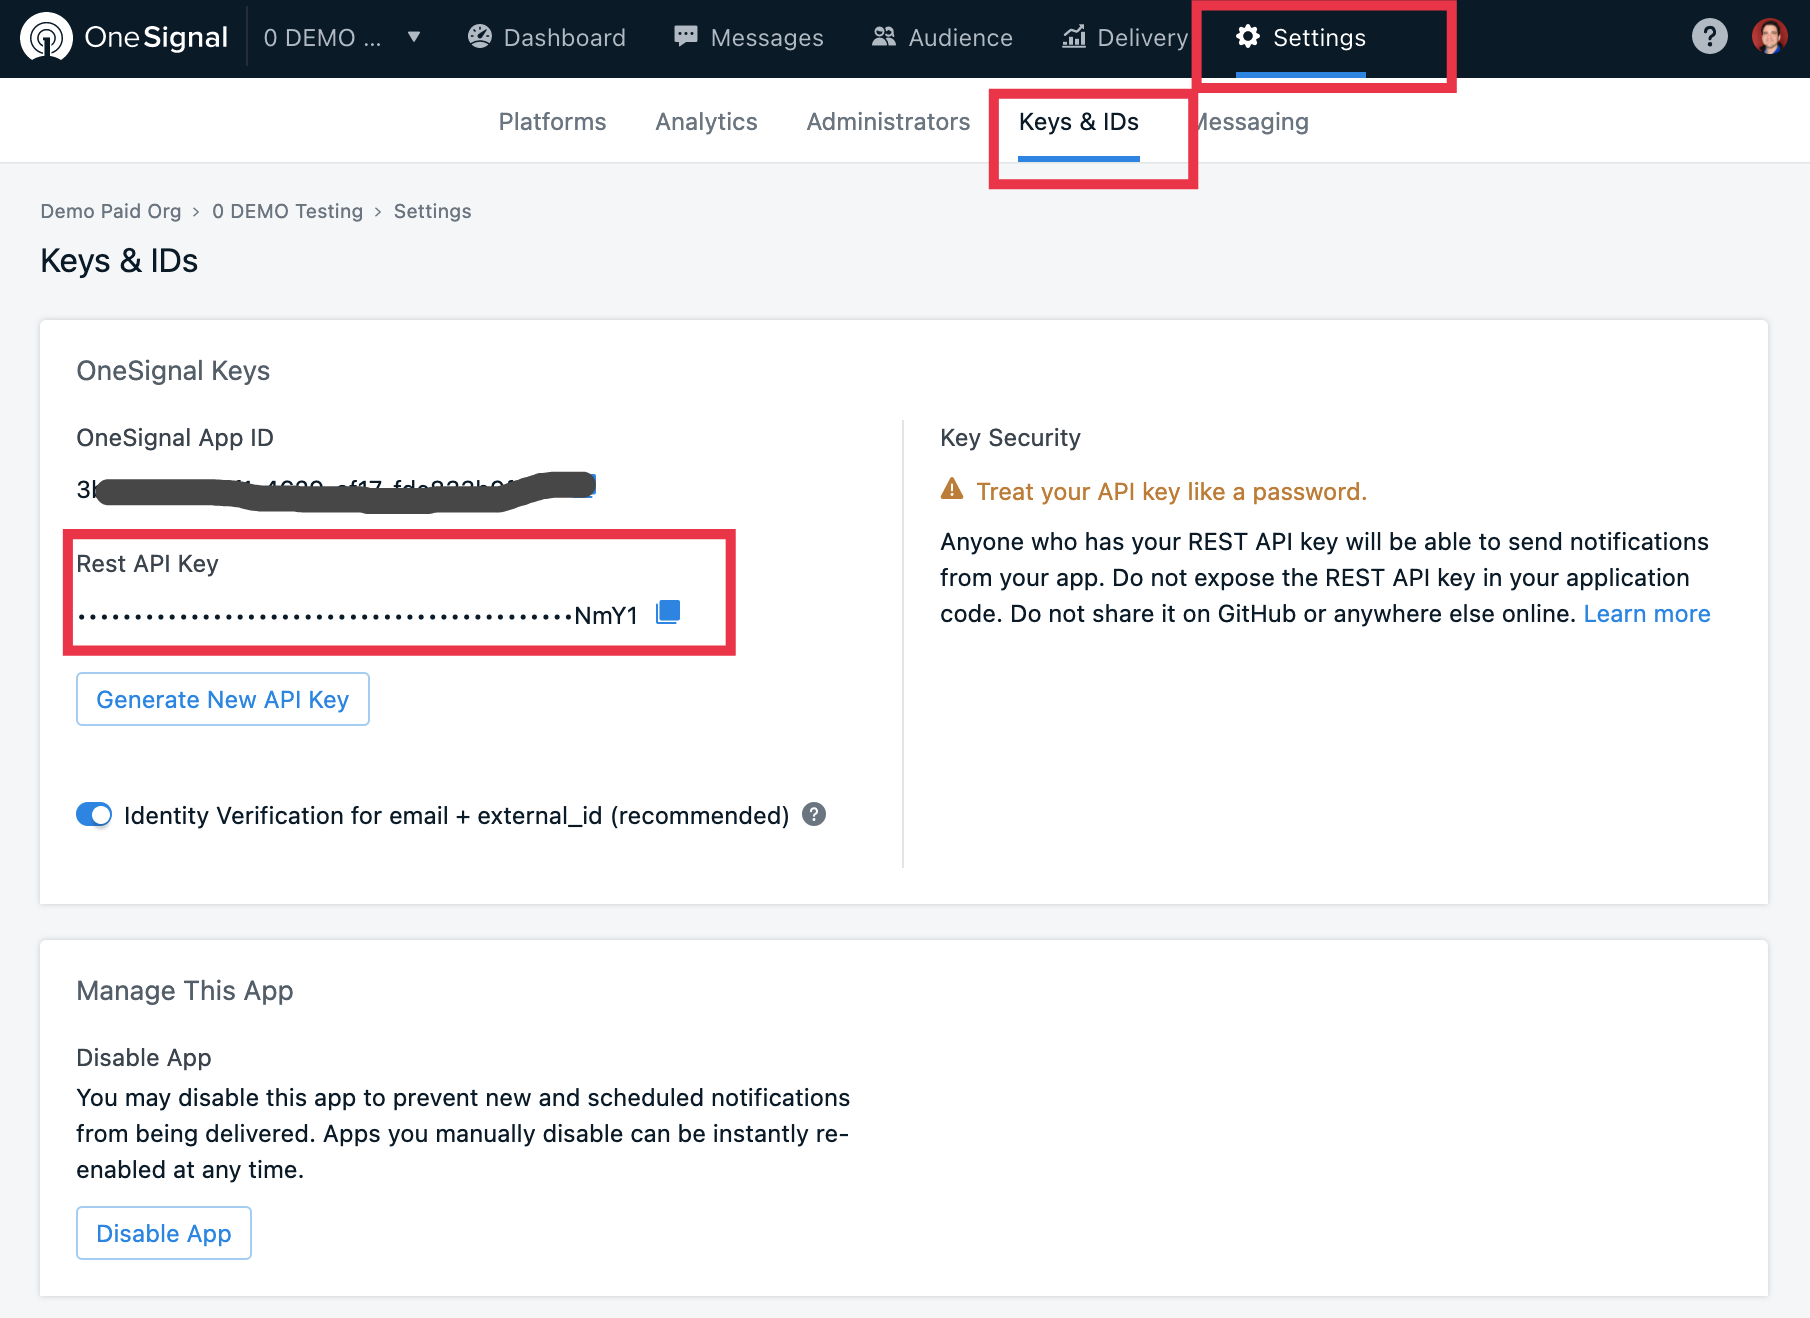
Go to Setting -> Keys & IDs in OneSignal project and copy 'Rest API Key'
You have connected android application to your Onesignal account successfully
How to change OneSignal Logo
You can genrate and download your onesignal logo to Click here
Add Downloaded that folder. Afte that open your project and replace the folder. Go to android -> app -> src -> main -> res folder
Configure OneSignal on App
We have already added code for SDK and other configuration for oneSignal push notification. Then open
Constant.dart file under lib/main/utils/AppConstants.dart folder and change your ONESIGNAL_ID app ID.
const ONESIGNAL_ID = 'YOUR_ONESINGAL_APP_ID';
For Android and iOS:-
Follow instruction for OneSignal Configure Here.
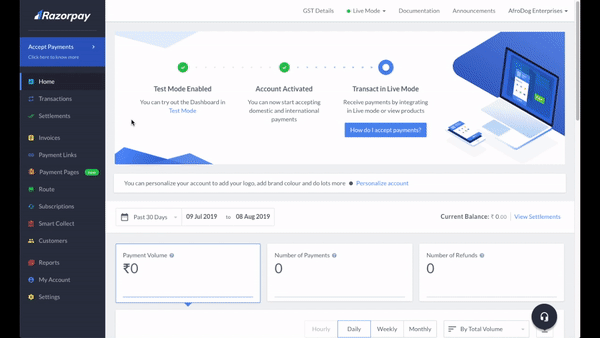
Setup API Keys for Razorpay
1. Create a API Keys
API key is a combination of the key_id and key_secret and is required to make any API request to
Razorpay. You also have to implement the API key in your code as part of your integration process.
1. Log into your Dashboard. Dashboard with appropriate credentials.
2. Select the mode (Test or Live) for which you want to generate the API key.
Note:
You have to generate separate API Keys for the test and live modes. No real money is used in
test mode.
3. Navigate to Settings → API Keys → Generate Key to generate key for the selected mode.
After generating the keys from the Dashboard, download and save them securely. If you do not
remember your API Keys, you need to re-generate it from the Dashboard and replace it
wherever required.
Warning:
Do not share your API Key secret with anyone or on any public platforms. This can pose
security threats for your Razorpay account.
Setup API Keys for Stripe
1. Create a API Keys
Manage your API keys to authenticate requests with Stripe.
Stripe authenticates your API requests using your account’s API keys. If you do not include your key
when making an API request, or use one that is incorrect or outdated, Stripe returns an error.
Every account is provided with separate keys for testing and for running live transactions. All API
requests exist in either test
or live mode, and objects-customers, plans, coupons, and so forth—in one mode cannot be
manipulated by objects in the other.
There are also two types of API keys: publishable and secret.
Publishable API keys are meant solely to identify your account with Stripe, they
aren’t secret. In other words, they can safely be published in places like your Stripe.js JavaScript
code, or in an Android or iPhone app.
Secret API keys should be kept confidential and only stored on your own servers.
Your account’s secret API key can perform any API request to Stripe without restriction.
Obtaining your API keys
Your API keys are always available in the Dashboard. For your convenience, your test API keys for your account
are:
Stripe automatically populates code examples in our documentation with your test API keys while
you are logged in—only you can see these values.
If you don’t have an administrator or developer role, you may not have access to view your
API keys in the Dashboard. Contact your Stripe account’s owner and ask to be added to their team as a developer.
Alert:
only your test API keys for testing and development. This ensures that you
don’t accidentally modify your live customers or charges.
Test and live modes:
In test mode, payments are not processed by card networks or payment providers, and only our test payment information can be
used.
Some payment methods using Sources
have a more nuanced flow in live mode, with more steps required than those in test mode.
Disputes also have a more nuanced flow in live mode, and a simpler testing process.
Webhooks that were not
successfully acknowledged are retried three times over a few hours (as opposed to 72 hours for
live mode).
No matching client found for package name
The error is "package_name" in google-services.json is not matching with your
"applicationId" in app gradle.
Just make sure the package_name and applicationId both
are
same.
Flutter SDK Not Available
Download the SDK and point the SDK folder path in your future projects.
You can also Download any version(including
older)
from here (For Mac, Windows, Linux)
Use the SDK path in your future projects
Dependency Error
When you run the application and you see error like this
Running "flutter pub upgrade" in mighty_ui_kit...
The current Flutter SDK version is 1.17.5.
Because mighty_ui_kit depends on flutter_svg >=0.18.0 which requires Flutter SDK version
>=1.18.0-6.0.pre <2.0.0, version solving failed. pub upgrade failed (1; Because
mighty_ui_kit depends on flutter_svg >=0.18.0 which requires Flutter SDK version
>=1.18.0-6.0.pre <2.0.0, version solving failed.) Process finished with exit code 1
Error Possibilities:
Generally, this error occurs when
Error Possibilities:
Generally, this error occurs when
one of your third party package version is not supported.
your Flutter SDK version not matched with one of your third party packages.
for
ex, your current Flutter SDK version is 1.20.0 and third party package
targets
Flutter SDK version 1.17.0.
or upgrade your flutter version if you don't have the latest with
flutter
upgrade command.
After implementing the above solution, run the below command in the terminal.
flutter pub get
FAQ
Change Log
Version 3.15.1 - 17 Nov 2023
Update all libraries to the latest flutter sdk 3.13.9
Migrate to all library to Flutter latest SDK 3.13.x
Migrate to OneSignal 5.0.x
Version 3.15.0 - 28 June 2023
upgrade all library to latest flutter SDK 3.10.x
Added : Mighty Wine full app ui
Version 3.14.0 - 24 Nov 2022
Added ERecipe App
Added EMedical app
Version 3.13.0 - 8 Apr 2022
Added Meditation App
Added Travel app
Version 3.12.0 - 25 Mar 2022
Upgraded to the Flutter 2.10.3 SDK
Add Strip payment gateway
Upgraded Dependencies
Version 3.11.0 - 18 Feb 2022
New NFTs Full App
Upgraded to the Flutter 2.8 SDK
Upgraded Dependencies
Version 3.10.0 - 29 Oct 2021
New EStudy Full App
New ToDo Full App
Upgraded Dependencies
Version 3.8.0 - 18 Aug 2021
New Full App - Crpyto Currency
Version 3.7.0 - 05 Aug 2021
New Full App - ECommerce
Version 3.6.0 – 23 July 2021
New Full App - News Blog
Version 3.3.0 – 15 July 2021
New Full App - Fitness App
Minor bug fixes in Handyman App
Version 3.0.0 – 30 May 2021
New Full App - Yoga App
Fully migrated to Flutter 2.0 Null Safety
Version 2.5.0 – 16 April 2021
New Full App - Finance UI Kit
New Snippet - Story View
New Widget - Wrap
New Widget - Banners
New Widget - Animated List
New Widget - Category ListViews
New Widget - Digital Signature
New Widget - Sliver Tab
New Widget - Transfrom Widget
New Widget - ClipRRect Widget
Version 2.4.0 – 26 March 2021
New Full App - Food Delivery App
Version 2.3.0 – 06 Feb 2021
New Full App - Grocery App
Version 2.0.0 – 29 Jan 2021
Bug Fixed - Dark mode
Version 1.0.0 – 23 Jan 2021
Initial Release
Meet Mighty Help & Support
We like to hear you out when you get stuck or encounter difficulty with our products. As soon as you
buy one of our products – you can open a support ticket and share your concern right away.
It is recommended that before submitting a ticket you take a close look at product documentation
(Docs folder in the
archive you have downloaded from Themeforest/Codecanyon). To get technical support and assistance,
you need to have a valid purchase code. You will find this when you SignIn your
Codecanyon/Themeforest “Download” page.
Click on the product’s download link.
Please Note:
Free support policy includes troubleshooting, technical assistance with the product only.
It does not include any customization, additional features integration or concerns about third-party
plugins compatibility.
But, support is applied to plugin(s) we have developed and integrated ourselves. We appreciate your
understanding!
If you need assistance and information on purchased product that is not covered in documentation,
post them on our support portal at https://support.meetmighty.com/
You can expect answer within 24-48 hours, usually as soon as possible in the order they were
received.
Additionally, if any support ticket has no response from the item owner for more than 7 days,
that support ticket will be closed by default. However, if you need further assistance, you can
create a new ticket.
All support requests are being processed on business days (Monday to Saturday) from 9:00 to 18:00
(GMT +05.30). We are in GMT+5:30 time zone.
We address all the support queries 6 days weekly on the first-come, first-solve basis (Sundays off).
Do you have any pre-sales questions or concerns,
please write to us via our website contact page or email us at [email protected].
We like getting positive feedback from our customers, and this is why we do our best to earn it!
Write a review: https://codecanyon.net/downloads
Change Log
Update your application to give for the best experience – check out what’s new and improved.
Thank you