MightyDelivery - On Demand Local Delivery System Flutter App

Documentation Version 1.0


Introduction


First of all, Thank you so much for purchasing this application and for being our loyal customer.

This documentation is to help you regarding set up.

Requirement

This project have required following depandency

Flutter/iOS Requirements

  1. Android Studio: 4.1.2
  2. Flutter: 3.0

Laravel Requirements

  1. PHP 7.3, 7.4
  2. OpenSSL PHP Extension
  3. PDO PHP Extension
  4. Mbstring PHP Extension
  5. Tokenizer PHP Extension
  6. XML PHP Extension
  7. Ctype PHP Extension
  8. JSON PHP Extension
  9. GD PHP Extension (or Imagick PHP Extension)
  10. PHP Fileinfo extension
  11. PHP Zip Archive
  12. Rewrite Module (Apache or Nginx)

PHP.INI Requirements

  1. open_basedir must be disabled

File and folder permissions

  1. /bootstrap 775
  2. /storage 775 (recursively)

File Structure

Here is the general File structure of the application:

How_to_start

Here is the general File structure of the laravel:

    laravel
    • app
      • Console
      • Exceptions
      • Helper
      • Http
        • Controllers
          • Auth
            • API
        • Middleware
        • Requests
        • Resources
      • Model
      • Notifications
      • Providers
    • bootstrap
    • config
    • database
    • node_modelus
    • public
      • css
      • js
      • images
    • resources
      • css
      • js
      • lang
      • views
    • routes
    • storage
    • tests
    • .editorconfig
    • .env.example
    • .styleci.yml
    • .htaccess
    • artisan
    • composer.json
    • package.json
    • phpunit.xml
    • README.md
    • server.php
    • tailwind.config.js
    • webpack.config.js
    • webpack.mix.js

Source code folder Structure:

"Backend Api" Folder is for php code

"FlutterCode" folder is for flutter app and backend

Inside "FlutterCode" Folder

"User_Deliveryboy app" folder app for user and delivery boy app

"AdminWeb" for backend admin panel

How_to_start

Installation

Install flutter on windows

  • Download Android Studio

    Click here
  • Get the Flutter SDK

    1. Install https://flutter.dev/docs/get-started/install flutter_sdk

      Extract the zip file and copy flutter folder into your desired installation location for the Flutter SDK (eg. C:\src\flutter; do not install Flutter in a directory like C:\Program Files\).

    2. Update your path flutter_sdk
    3. Now set your enviournment variable
    4. From the Start search bar in , type ‘env’ and select Edit environment variables for your account
    5. Under User variables check if there is an entry called Path:
    6. Click on Edit. New Dialog open from it click on new and copy full path to flutter\bin as its value
    7. Now Restart your pc for changes to take effect
    8. flutter_win2
    9. Now check everything is ok or not
    10. open cmd and run flutter doctor as shown the below picture
    11. flutter_win3
    12. Now open Android Studio and create new flutter project then select your flutter sdk file to the location where we have downloaded earlier and that's it
    13. flutter_sdk_path
  • Learn more about Android Studio - Click here

Install flutter on mac

  • Download Android Studio - Click here
  • Download Xcode - Click here
  • Get the Flutter SDK - Click here
    1. Install Click here flutter_sdk

      Extract downloaded file, just double click on that. and just copy extracted folder and paste it to your desired location (for example, Documents\flutter).

    2. Update your path

      Warning

      Path variable needs to be updated to access “flutter” command from terminal. you can just update path variable for current terminal window only. and if you want to access flutter commands from anywhere in terminal, we need to update SDK path permanently.

      To update PATH variable, we need to open terminal.

      To update PATH variable for current terminal window only, then enter this command "export PATH="$PATH:`pwd`/flutter/bin"" and hit enter key.

      To update PATH variable permanently, then Open or create .bash_profile file. to open or create that file, then enter "sudo open -e $HOME/.bash_profile" and hit enter key.

      Append below line to bash_profile file at bottom of all other content. "export PATH="$PATH:[PATH_TO_FLUTTER_GIT_DIRECTORY]/flutter/bin"" as [PATH_TO_FLUTTER_GIT_DIRECTORY] is actual path of SDK folder.

      Run this command on terminal "source $HOME/.bash_profile" to refresh PATH variables.

      Then check whether our SDK is successfully installed or not.

      You are now ready to run Flutter commands in the Flutter Console!

      Run "flutter doctor" into terminal, If you are getting check list of flutter sdk requirements, it means SDK is successfully installed on your machine. and you can start building flutter apps on your machine.

      If you find any issue during environment setup in macos, please go online Click here

Install flutter on linux

  • Download Android Studio - Click here
  • Get the Flutter SDK - Click here
    1. Install Click here

      Extract downloaded file, just double click on that. and just copy extracted folder and paste it to your desired location (for example, Documents\flutter).

    2. Update your path

      Warning

      Path variable needs to be updated to access “flutter” command from terminal. you can just update path variable for current terminal window only. and if you want to access flutter commands from anywhere in terminal, we need to update SDK path permanently.

      You’ll probably want to update this variable permanently, so you can run flutter commands in any terminal session. To update PATH variable, we need to open terminal.

      export PATH="$PATH:[PATH_TO_FLUTTER_GIT_DIRECTORY]/flutter/bin"

      1. Run source $HOME/. to refresh the current window, or open a new terminal window to automatically source the file.
      2. Verify that the flutter/bin directory is now in your PATH by running:

      echo $PATH

      Verify that the flutter command is available by running:

      which flutter

      You are now ready to run Flutter commands in the Flutter Console!

How to start

  • 1.) Setup Backend api to your server. Laravel Configuration
  • If you have to check your Laravel configuration is successfully done or not.
  • Open your domain url in browser and login using admin credentials.
  • change_app_label

    change_app_label

  • 2.) For Admin Web Admin Configuration
  • 2.1) Buid website and upload to your server Hosting Flutter Web
  • 3.) User/Delivery Man App Configuration Flutter Configuration
  • Laravel Configuration (Backend API)

    1. Create Database
    2. Upload the Codes in below directory based on your server
      In Linux
      Path: var/www/html/
      In cPanel:
      Inside File manager -> Path: public_html/
    3. For database settings, open the .env file with a text editor and set your database settings.
      Note: .env is a hidden file, you can see it by opening directory to a text editor.
    4. Link your storage folder to public. Run in terminal or CMD:
      php artisan storage:link
      After this if you are facing a problem storage link using command please follow the below steps :
                                                              ln -s /home/your_application/storage/app/public  /home/your_application/public/storage
                                                          

    Steps to be follow for getting started with the template:

    Laravel Configuration

    App Configuration

                                                              APP_NAME="your app name"
                                                              APP_ENV=production
                                                              APP_KEY=yourkey
                                                              APP_DEBUG=false
                                                              APP_URL=yourappurl
    1. Open and edit the /.env file and provide following details:
    2. Enter App name, App env, App debug and App url
      Run in terminal or CMD: php artisan key:generate generate App key

    Database Configuration

    1. Create the database on your server
    2. Open and edit the /.env file and provide your server details:
    3.                                                         DB_CONNECTION=mysql
                                                              DB_HOST=127.0.0.1
                                                              DB_PORT=3306
                                                              DB_DATABASE=laravel
                                                              DB_USERNAME=root
                                                              DB_PASSWORD=
    4. Open and edit the /.env file and provide following details:
    5. After that run in terminal or CMD,
      Note: Only necessary for those, who is setup project first time.
      php artisan migrate --seed

      Note: When you update new code then run in terminal or CMD for new table migration, php artisan migrate

    6. If you are facing problem to migrate database using command then, import the mightylocaldelivery.sql file in your database. You will find the sql file in mighty-local-delivery/mightylocaldelivery.sql.
      Already imported mightylocaldelivery.sql

      If you have already installed mightylocaldelivery.sql file than you need to install alter-mightylocaldelivery.sql file ( Note : Not Necessary for those,who is setup project first time. )

    Mail Configuration

    1. Open and edit the /.env file and provide following details:
    2.                                                       MAIL_MAILER=your mail mailer
                                                            MAIL_HOST=your mail host
                                                            MAIL_PORT=your mail port
                                                            MAIL_USERNAME=your mail id
                                                            MAIL_PASSWORD=your mail password
                                                            MAIL_ENCRYPTION=your mail encryption
    3. Enter mail host name, mail port, mail username( Mail ID ), mail password and mail encryption type.
    4. Note If you configure Gmail SMTP then, you have to Generate App Password. Follow this link: Click Here

    Onesignal Configuration

    1. Open and edit the /.env file and provide following details:
    2.                                                     IS_ONESIGNAL_NOTIFICATION=
                                                          ONESIGNAL_APP_ID=
                                                          ONESIGNAL_REST_API_KEY=
      
                                                          ONESIGNAL_ADMIN_APP_ID=
                                                          ONESIGNAL_ADMIN_REST_API_KEY=
                                                      
    3. If you want to enable onesignal notifications you have set,
      IS_ONESIGNAL_NOTIFICATION=1 and
      add ONESIGNAL_APP_ID,ONESIGNAL_REST_API_KEY, ONESIGNAL_ADMIN_APP_ID, ONESIGNAL_ADMIN_REST_API_KEY.
    4. If you want to disable onesignal notifications you have set,
      IS_ONESIGNAL_NOTIFICATION=0

    Firebase Configuration

    1. Open and edit the /.env file and provide following details:
    2.                                                     IS_FIREBASE_NOTIFICATION=
                                                          FCM_SECRET_KEY=
                                                      
    3. If you want to enable firebase notifications you have set,
      IS_FIREBASE_NOTIFICATION=1 and
      add FCM_SECRET_KEY.
    4. If you want to disable firebase notifications you have set,
      IS_FIREBASE_NOTIFICATION=0

    Google Map Key Configuration

    1. Open and edit the /.env file and provide following details:
    2.                                                     GOOGLE_MAP_API_KEY=
                                                      
    1. Link your storage folder to public folder. Run in your project root directory (where you uploaded code) terminal or CMD:
      php artisan storage:link

      After this if you are facing a problem storage link using command please follow the below steps: ln -s

                                                              ln -s /home/your_application/storage/app/public /home/your_application/public/storage
                                                          

      Also set your APP_URL=yourappurl

                                                              APP_URL=https://your-website-url.com
                                                          

    Admin Credentials

                                                          Email    : [email protected]
                                                          Password : 12345678
                                                      

    Admin/Website Configuration

    Admin Web/Front-End Website

    • Open /lib/utils/Constants.dart file and change BaseUrl & OneSignal Keys of User Application.
    • admin_web1

      Your mBaseUrl = 'ADD_YOUE_BASE_URL/api/';

    • Open /assets/builder.json file and change Website Constants as you need.
    • builder_json

    • Open web/index.html file and add your Google map key.
    • admin_web1

    • For Firebase Configuration in web refer Add Web App section
    • For Firebase Clould Messaging(FCM) setup refer FCM Setup section

    Admin App

    • Open /lib/utils/Constants.dart file and change BaseUrl & GoogleMapKey & OneSignalAppId of Admin Application
    • admin_app1

    • To add Android app in Firebase refer Add Android App section
    • To add Ios app in Firebase refer Add Ios App section
    • For Basic Android Configuration refer Android Configuration section
    • For Basic Ios Configuration refer Ios Configuration section

    Hosting Flutter Web

    Flutter web hosting

  • step 1) Delete build folder
  • logo

  • step 2) Run this command in your project terminal
  • logo
  • step 3) Open Project location in files /build/web and upload this web folder contents on server.
  • step 4) Upload .htaccess file on server.
  •                                                     <IfModule mod_rewrite.c>
                                                            RewriteEngine On
                                                            RewriteBase /
                                                            RewriteRule ^index\.html$ - [L]
                                                            RewriteCond %{REQUEST_FILENAME} !-f
                                                            RewriteCond %{REQUEST_FILENAME} !-d
                                                            RewriteCond %{REQUEST_FILENAME} !-l
                                                            RewriteRule . /index.html [L]                                                      
                                                        </IfModule>
                                                    

    Configuration

    Android Configuration

    Change Application Name

    Open android/app/src/main/AndroidManifest.xml and specify your application name.

    change_app_label

    Change Application Icon

      1. Open Android Asset Studio Click here
      2. Then Select Image and Click on Download button to download launcher icons
      3. set_app_ico

      4. Open android/app/src/main/res and replace following folders
      5. app_logo_dir

    Change Application ID

      1. Open Android studio. Select File -> open -> select root folder -> android
      2. Wait for indexing
      3. Open android/app/build.gradle file and change YOUR_APP_ID
      4. after making changes sync your Project
      5. change_app_id

    Setup Firebase

      1. For Firebase setup, you just need to change the android/app/google-services.json file.
      2. Create a new firebase account, register your application with your package name.
      3. Now download the google-services.json file and replace with current.
      4. Refer to Link
      5. update_google_json

    Generate Signed APK && AAB

    1. Go to your project -> Tools -> Flutter -> Open for Editing in Android Studio as shown below
    2. logo
    3. Open Project in New Window
    4. Wait for while until project synchronization. After that Go to Build -> GenerateSigned Bundle/APK...
    5. logo
    6. Select Android App Bundle or APK Option as per your need. (Android App Bundle is best solution) and click Next button.
    7. logo
    8. Select Create new.. option to generate new Signed key (When you release your app First Time) and Fill all options. Refer this link
    9. logo

    10. Click Next button and you will get following screen...
    11. logo

      Select Build variants - release and Signature versions both V1 and V2 respectively as shown above screen shot and click Finish button.

    12. Wait for a while until Gradle Build Running process complete.and finally you will get the Generate Signed APK : (APKs) generated successfully. from that click on Locate option to get Location of your Generate Signed APK Key.

    iOS Configuration

    Open Project in Android Studio

    1. Open android studio in your project.
    2. Open terminal in android studio.
    3. flutter pub get
    4. Open terminal cd ios.
    5. pod install.
    6. run project in xcode.

    Open Project in Xcode

    1. Open Xcode.
    2. Select Open another Project.
    3. Open the iOS directory within your app.
    4. Now, click on Done button.

    Change Bundle Name

    1. Select your project file icon in Group and files panel.
    2. Then Select Target -> Info Tab.
    3. At last change Bundle Name.

    logo

    Change Bundle Identifier

    Bundle Id is a unique Identifier of your of app on iOS and MacOS. iOS and MacOS use it to recognise updates to your app. The identifier must be unique for your app.

    1. Select your project file icon in Group and files panel.
    2. Select General Tab.
    3. After Select General tab you can see the details of your application.
    4. In Identity section, rename your Bundle identifier.

    logo

    Change App Icons

    1. see How to Generate App Icons?
    2. In Group and files panel find “Assets.xcassets” folder.
    3. In Assets.xcassets folder replace AppIcon.

    logo

    How to create firebase on iOS

    1. Open firebase console with login your account
    2. Firebase Link
    logo
    1. Here you need to add bundle id (Apple Unique Identifier for your application.) Whatever bundle identifier you put here, you need to put the same in the iOS application.
    2. Click Register App button
    3. logo
    1. Click Download Plist file and store it in your computer, because we will need it in a second.
    2. logo
    1. Go to your project you downloaded and navigate to project folder
    2. Find folder iOS and go inside
    3. Find folder Runner and go inside
    4. Replace the GoogleService-Info.plist file with the one you just downloaded
    5. logo

    Google Map iOS

    1. Open "AppDelegate.swift" file and add your api key
    logo

    Flutter Configuration

    Change Base URL

    logo

    Your mBaseUrl = 'ADD_YOUE_BASE_URL/api/';


    Change Primary Color

    logo

    Change One Signal Key

    logo

    OneSignal Configuration

    • Create onesignal project in your account Choose android platform
    • logo
    • Go to your Firebase Console -> Project Settings -> Cloud Messgaing and copy 'Server Key' and 'Server ID'
    • logo
    • Now paste those values one by one here
    • logo
    • Choose Target SDK as Flutter
    • logo
    • Now copy App ID as shown below
    • logo
    • Go to lib/main/utils/Constants.dart and change mOneSignalAppId
    • logo
    • Go to Setting -> Keys & IDs in OneSignal project and copy 'Rest API Key'
    • logo
    • Go to lib/main/utils/Constants.dart and change mOneSignalRestKey
    • logo
    • To generate OneSignal channel id Refer this link
    • You have connected android application to your Onesignal account successfully

    How to integrate firebase

    Create Firebase Project

    • Create new project to your firebase console
    • logo

      logo

      logo

    Add Android App

    • Add andorid application to your firebase project
    • logo

    • Add package name and sha-1 key (sha-1 optional for now)
    • logo

      logo

      logo

    • You have connected andorid application to your firebase project successfully
    • Now download the google-services.json file and replace with current.
    • update_google_json

    Add iOS app

    • Add iOS application to your firebase project
    • logo

    • Get your bundle id from \ios\Runner.xcodeproj\project.pbxproj file or search for PRODUCT_BUNDLE_IDENTIFIER and you will get following result
    • logo

    • Enter your iOS bundle id
    • logo

      logo

      logo

    • You have connected iOS application to your firebase project successfully
    • Now download the GoogleService-Info.plist file and replace with current.
    • update_google_json

    Add Web app

    • Add Web application to your firebase project
    • logo

    • Add App nickname and click on Register app button
    • logo

    • You have connected web application to your firebase project successfully
    • Now copy the firebase config code and replace with current.
    • logo

      logo

      logo

    Firebase Cloud Messaging

    • Open /web/firebase-messaging-sw.js file and change firebase config code
    • logo

    Enable SignIn Methods

    • In Firebase console, open the Authentication section.
    • On the Sign-in Method tab, enable the Google Sign and Phone method and click save.

    • logo
    • Go to Project setting and Add your debug and release SHA1 Key. Refer link
    • logo

    Create Firestore Database

    • Go to Firestore Database -> click on create database
    • logo

    • Select Start in test mode and click on Next button.
    • logo

    • Click on Enable button and create your collection
    • logo

    How to integrate googlemap Key

    Google Map Key Documentation

    Enable the below listed apis in google map key

    logo

    Change Google Map API Key

  • Open lib/main/utils/constants.dart and change googleMapAPIKey.
  • Go to your Android Folder -> app -> src -> main -> AndroidManifest file
  • Add Google Map Key.

    App Status

    Create

    The order has been created by the user

    Courier Arrived

    Delivery person has been arrived at pickup location and waiting for a client.

    Courier Picked up

    Delivery Person have picked up courier from pickup location.

    Courier Departed

    Delivery Person departed from pickup location.

    Completed

    Order has been successfully delivered.

    Cancelled

    Order has been cancelled.

    App Setting

  • Onesignal and Firebase Notification Setting
  • Order Auto assign Setting
  • OTP Verification on Pickup and Delivery location Setting
  • Currency Setting

  • logo

    Common error

    No matching client found for package name

    • The error is "package_name" in google-services.json is not matching with your "applicationId" in app gradle.
    • Just make sure the package_name and applicationId both are same.
    logo

    Flutter SDK Not Available

    Download the SDK and point the SDK folder path in your future projects.

    There are different sources you can try

    1. You can clone it from the Github Repository
    2. Download SDK zip file + extract it after downloading
    3. You can also Download any version(including older) from here (For Mac, Windows, Linux)
    Use the SDK path in your future projects
    logo

    FAQ

    Migrate Database issue?

    • If you are facing a problem migrating database using command the please follow the below steps.
      Go to the main directory of download project then find mightylocaldelivery.sql file and import to the database.

    symlink() has been disabled for security reasons?

    When you get an error while run php artisan storage:link, please follow the below steps :

    Second way, just fire this command

                                                    ln -s /home/your_application/storage/app/public  /home/your_application/public/storage
                                                

    Update the existing code with new release


    Special Notes

    As per envato policy installation, setup and configurations or modification are not included in free support. Free support is only for any bug/ error in original code. we do not provide installation and customization support in FREE SUPPORT.
    Still, We are providing steps for How to update future release code to existing source code for your knowledge purpose.

    PLEASE DO NOT CREATE TICKETS IF YOU FACE ANY ISSUE DURING UPDATE YOUR CODE. WE WILL NOT PROVIDE ANY SUPPORT ON THAT.


    How to update future release code to existing source code

    If you want which file changes are on the latest updated version then you have to manage the git repository by yourself.

    For First time: Initial project downloaded from codecanyon server.

    Step 1: Create or login with gitlab

    Login or register your account with gitlab: https://gitlab.com/users/sign_in
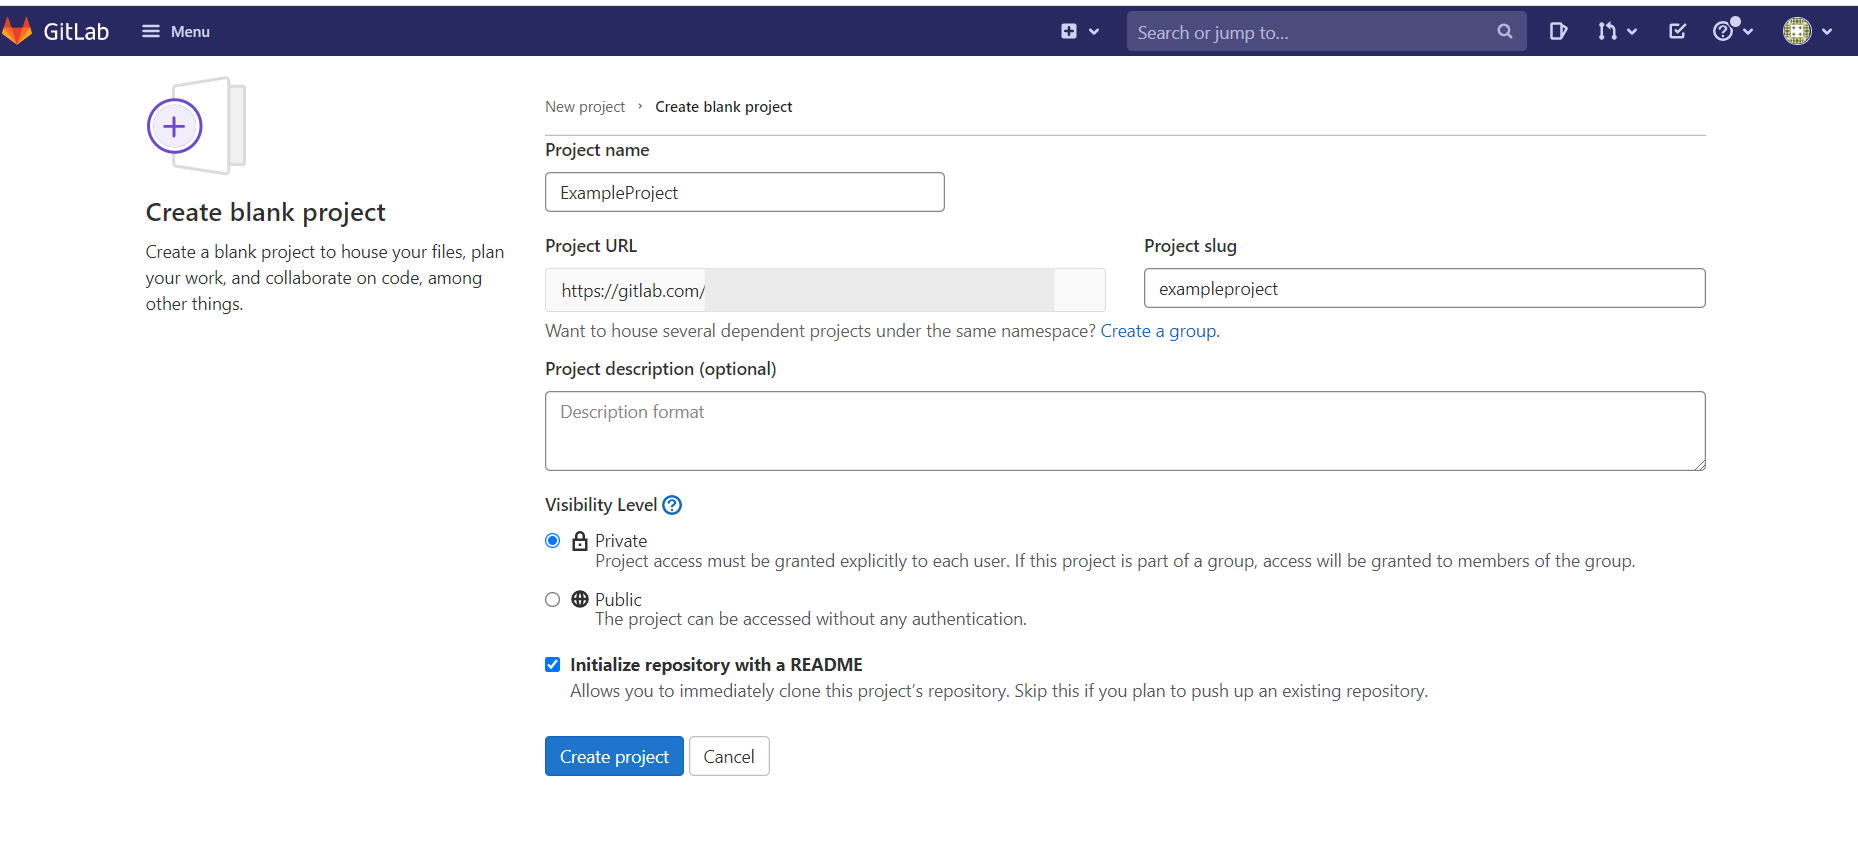
    Step 2: Create a new project in GitLab
    • In your dashboard, click the green New project button or use the plus icon in the navigation bar. This opens the New project page.
    • On the New project page -> Create a blank project.

    • logo
      logo
    Step 3: Clone your project to your local system
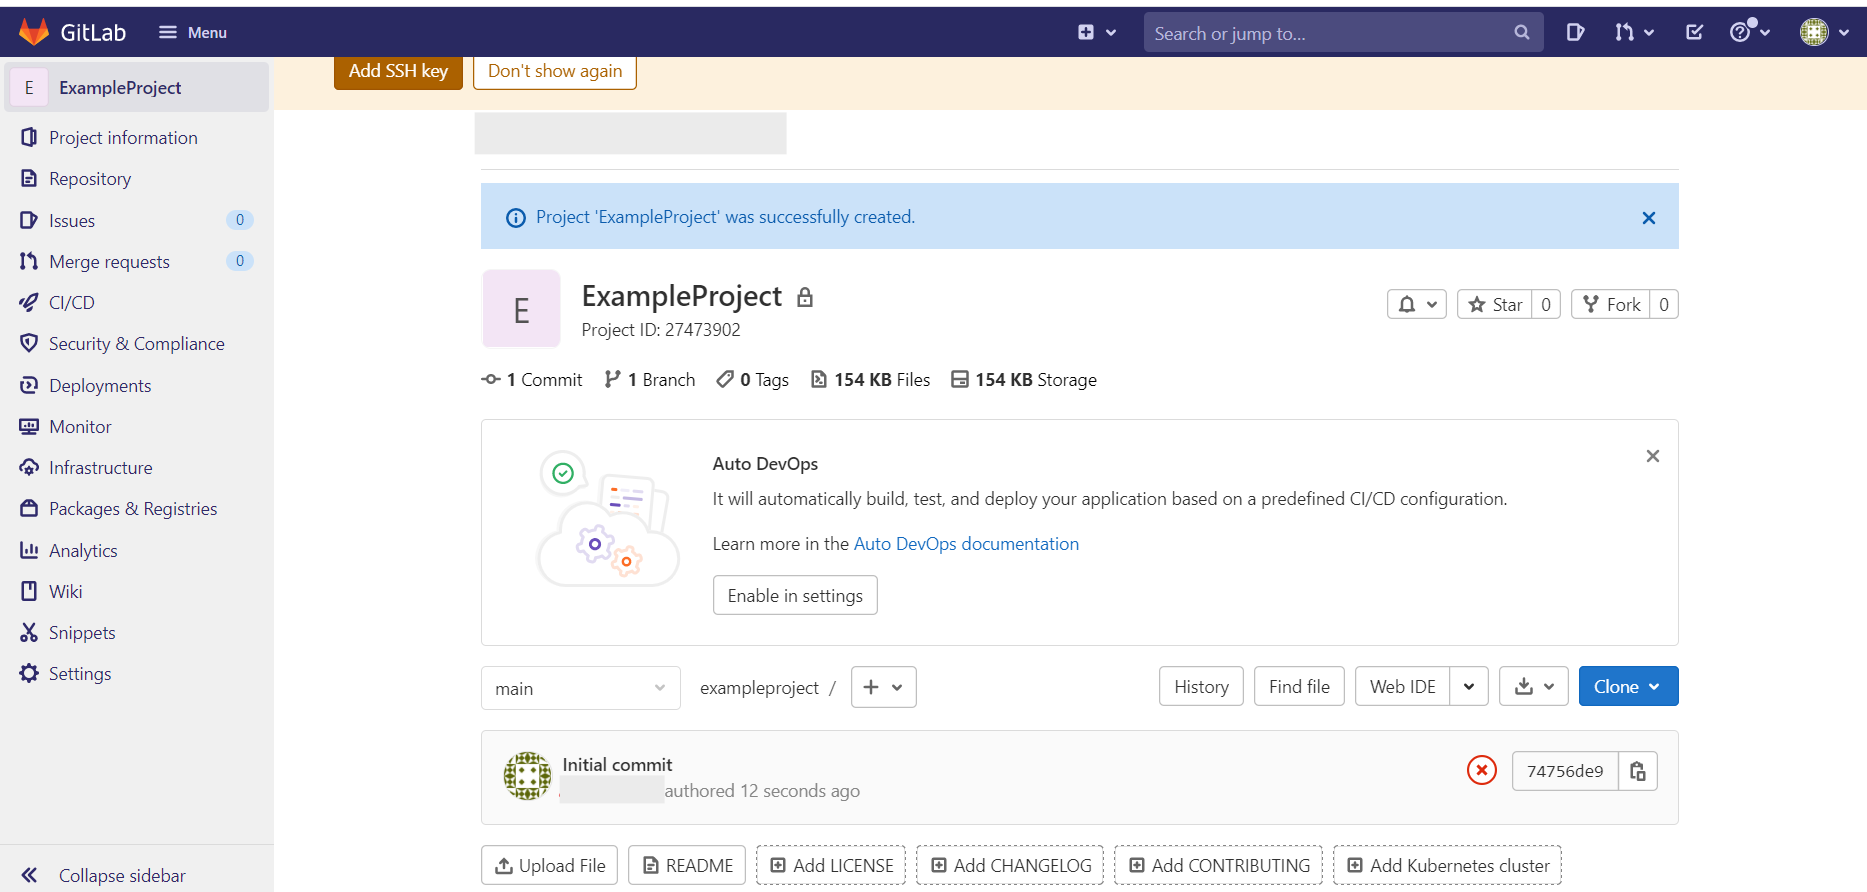
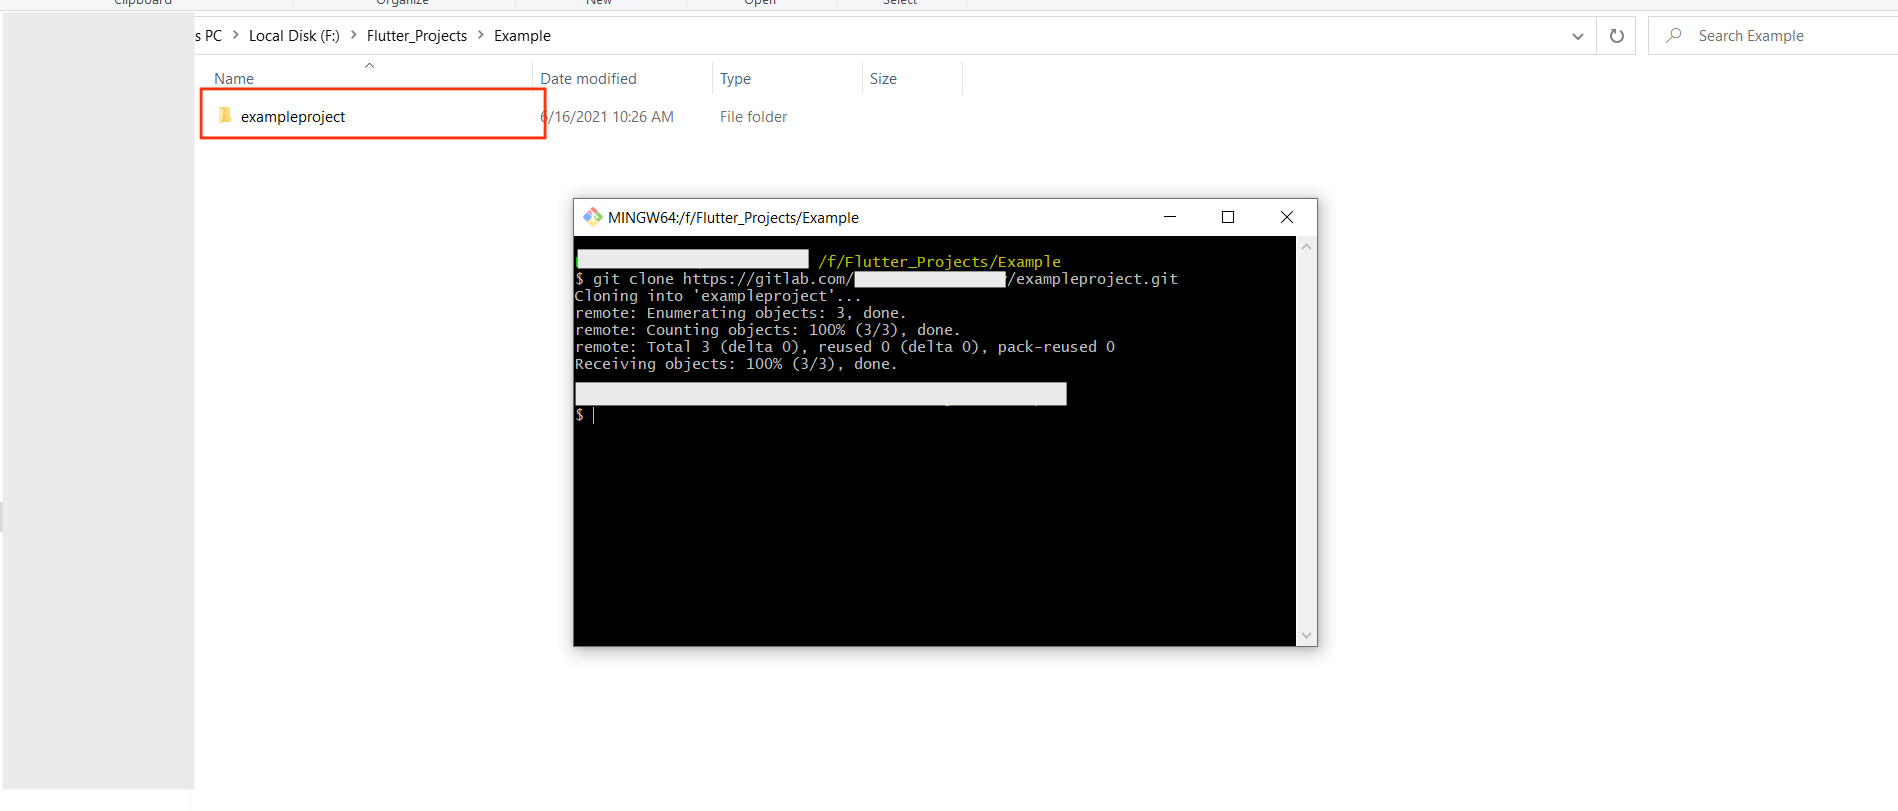
    • 1. Once project is created on your gitlab server. You have to clone the project to your local system. You can clone it with the command line.
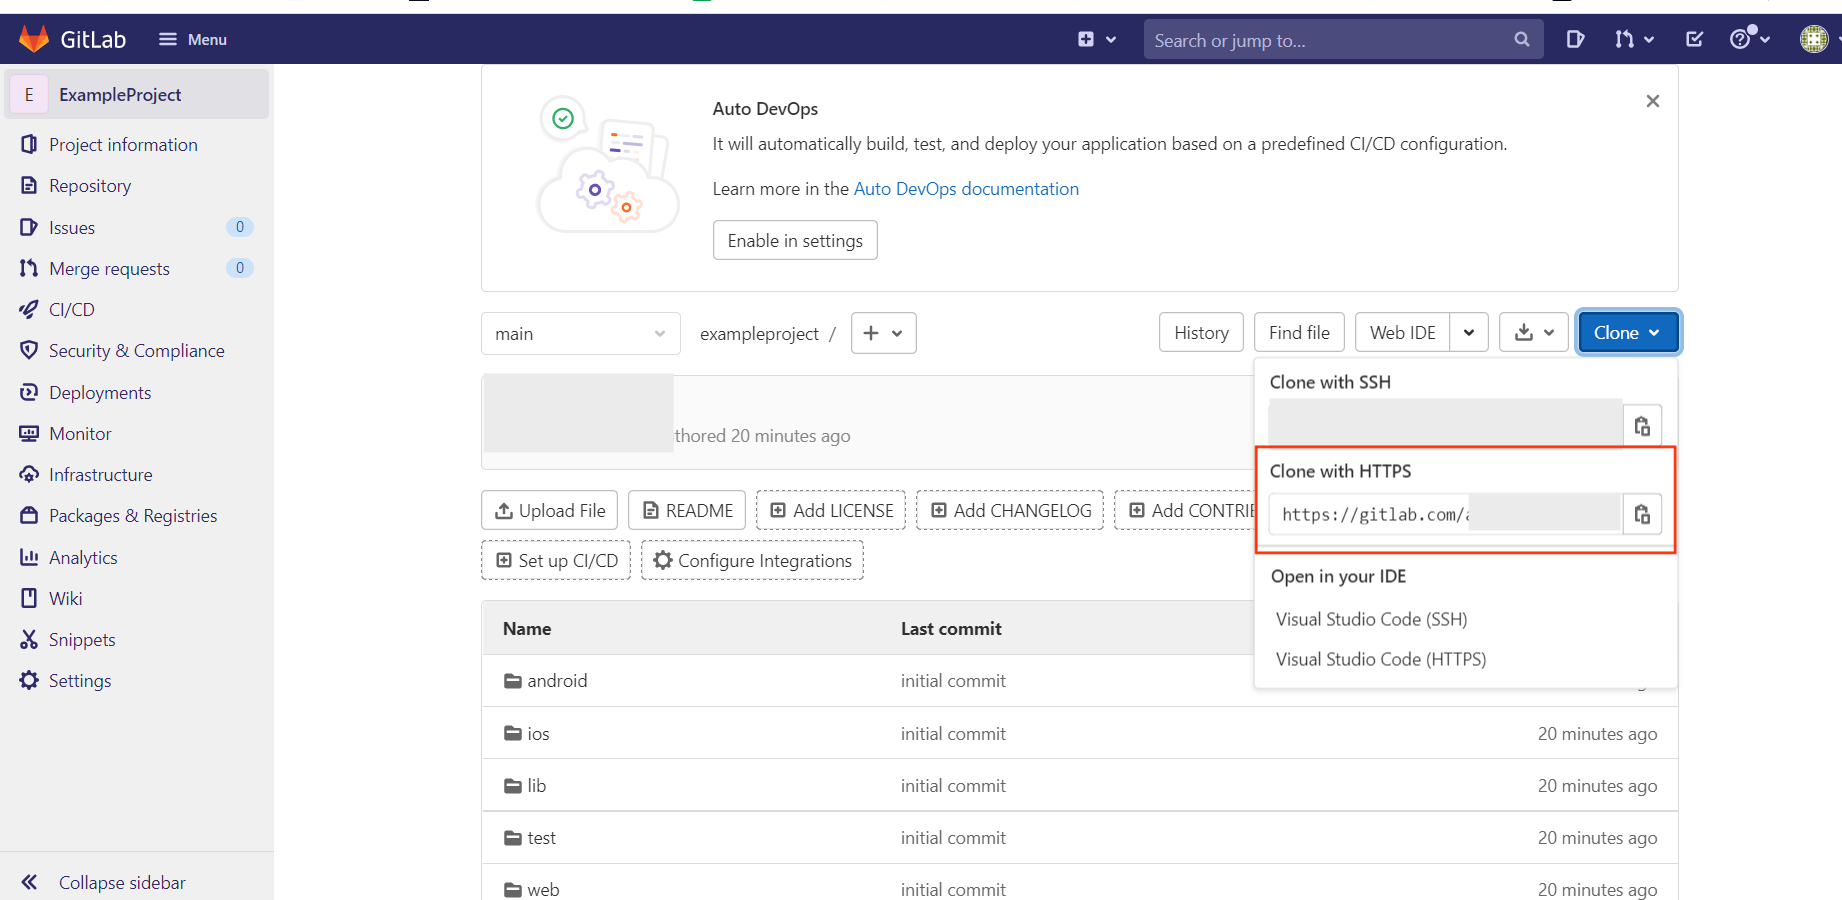
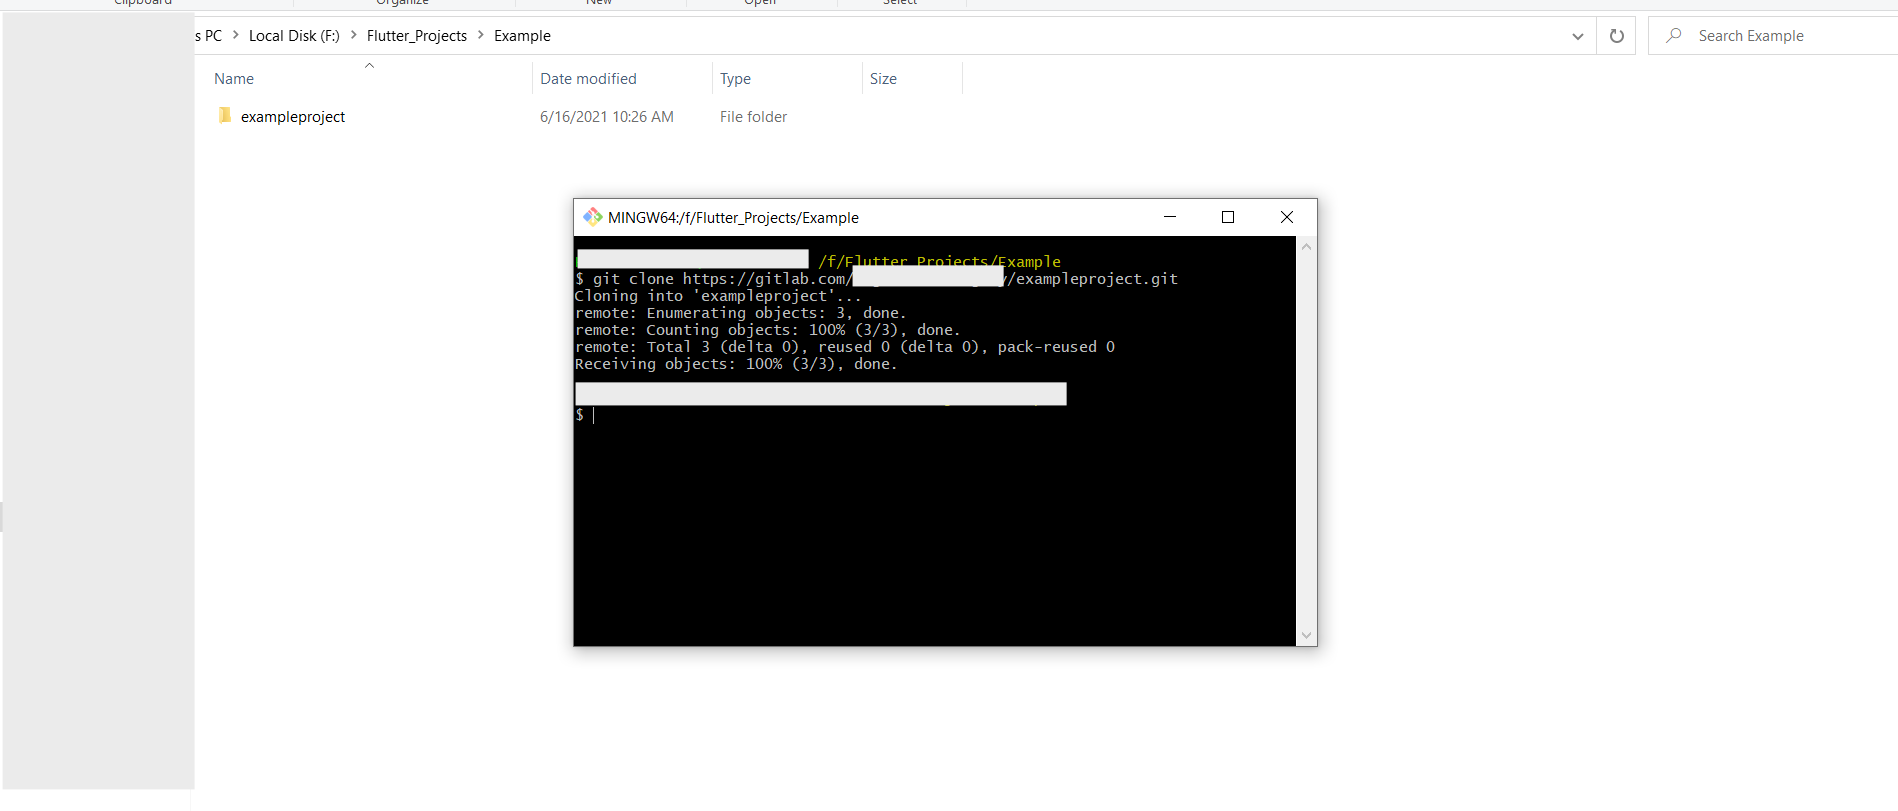
    • 2. git clone “repository path”
    • 3. Copy your project url and clone into your exiting system

    • logo
      logo
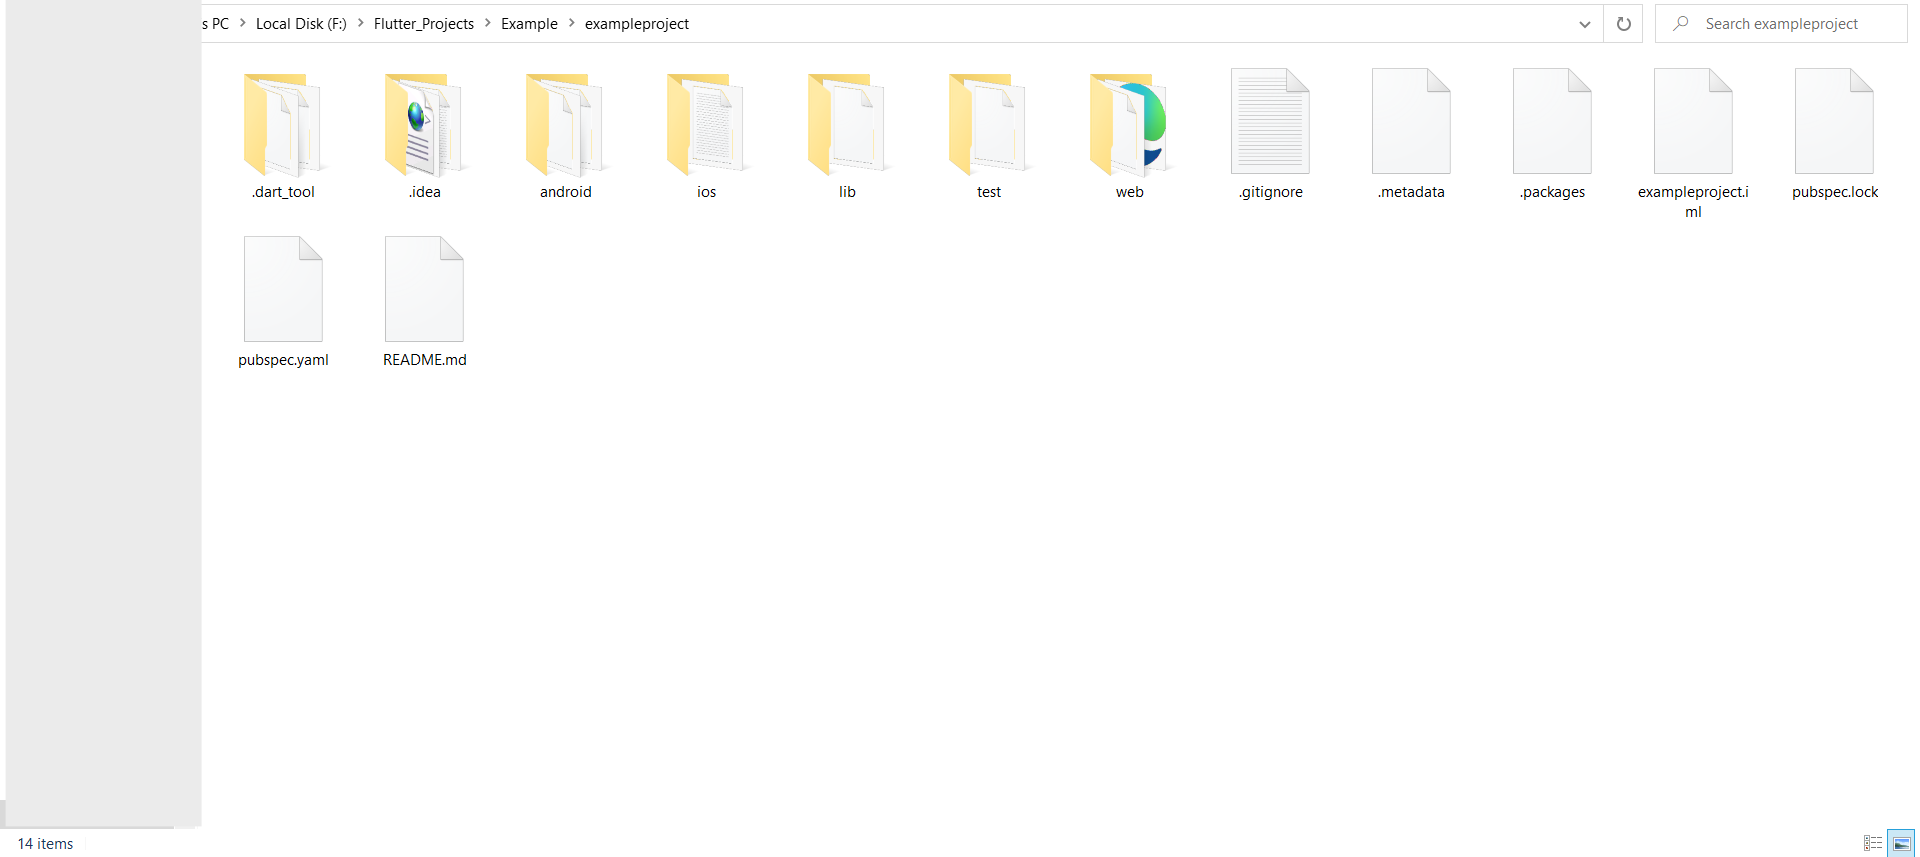
    • 4. Once successfully clone then system will create a folder on your system

    • logo
    Step 4: Download project from codecanyon server Step 5: Copy/paste your initial downloaded project to clone directories.

    Once successfully downloaded project from codecanyon, copy/paste your downloaded project into clone directories

    • Note
    • Only orignal source code is put here.
    logo
    Step 6: Commit and push to gitlab server

    Onces copy/paste your changes to clone directres, you have to push all files to your gitlab server. For that use the following commands.

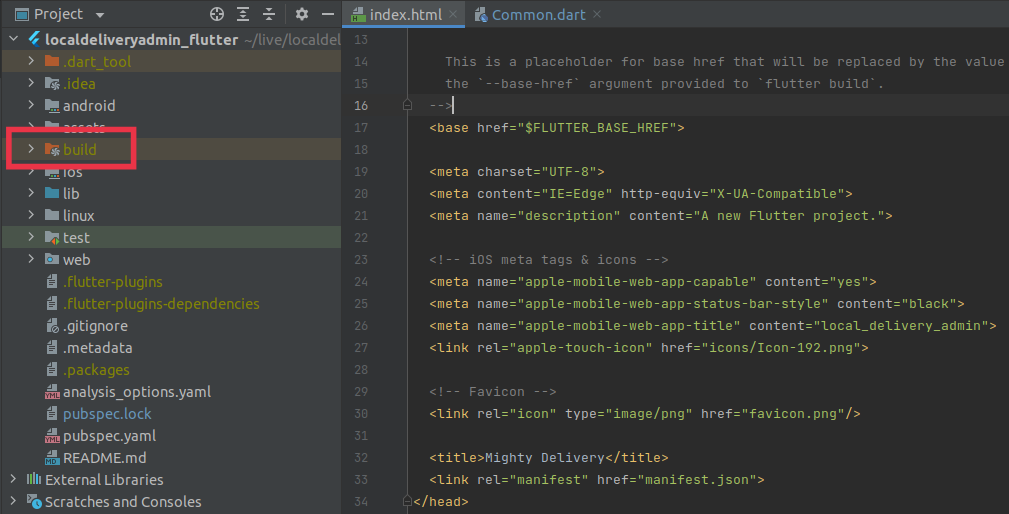
    Before commit to server directores, you have to remove below folder from your project

    • 1. build
    • 2. .idea
    • 3. .gradle

    After That follow below steps

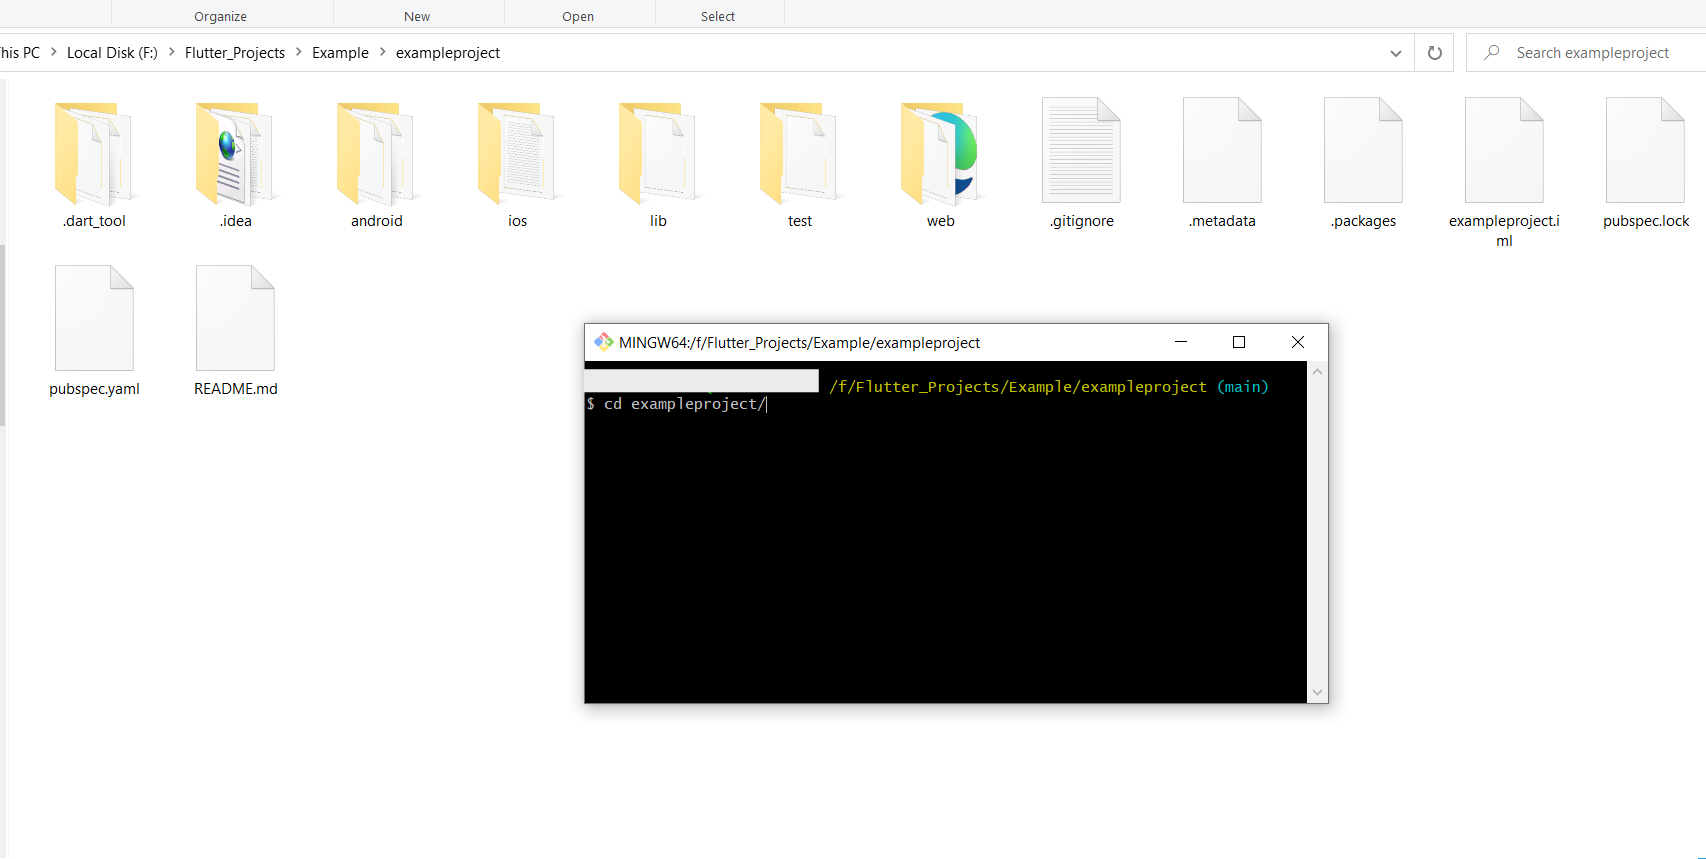
    • 1. Goto inside your clone directory project
    • logo
    • 2. Add your all files with “git add .” command
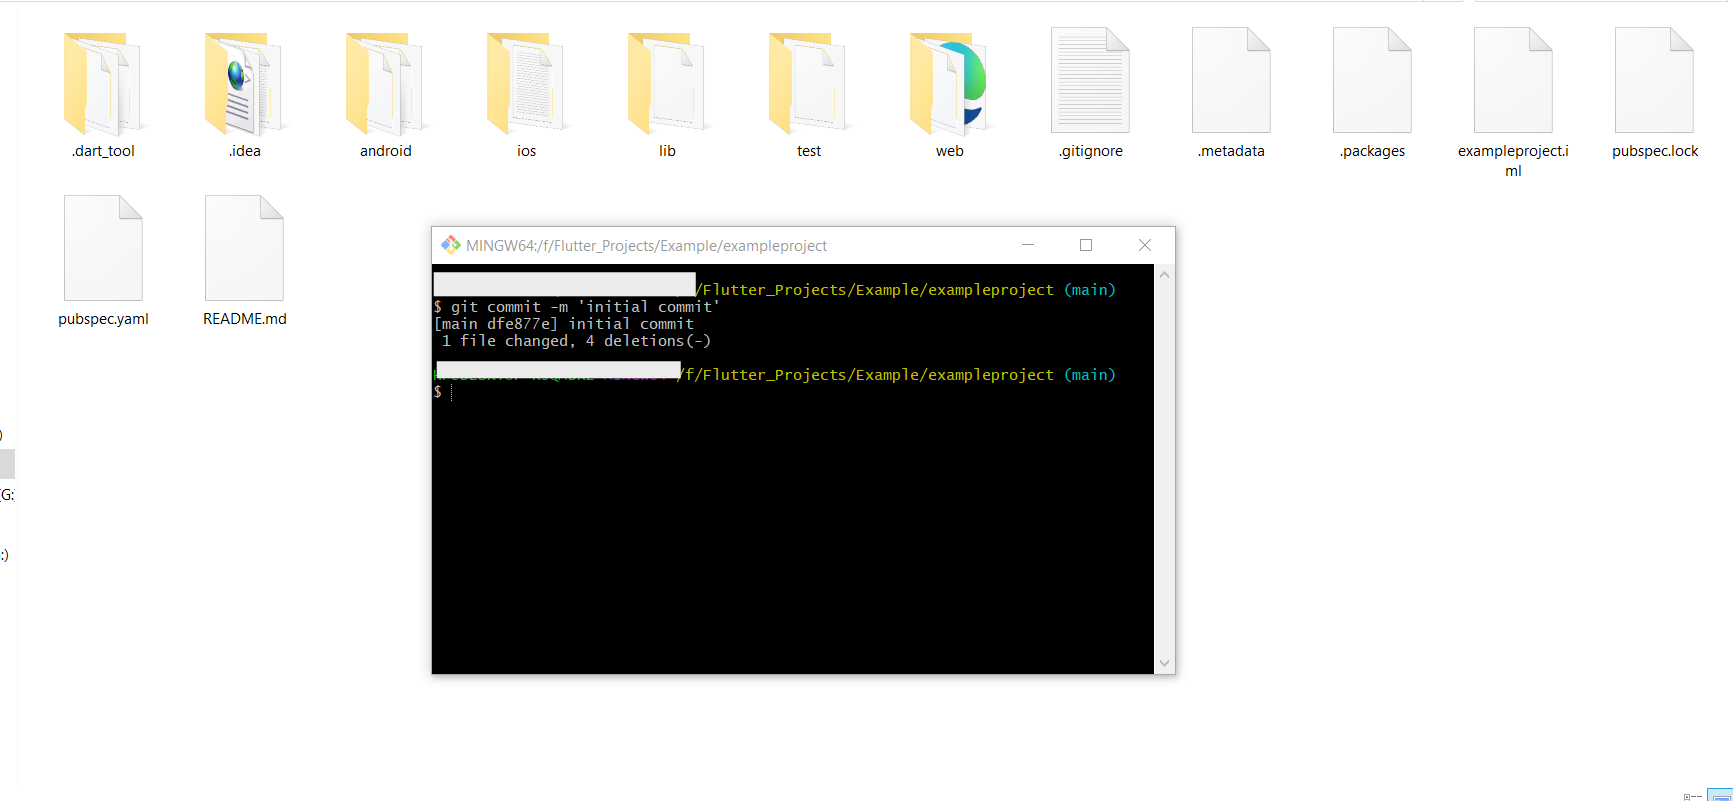
    • 3. Now commit your changes with below command
    • 4. git commit -m ‘initial commit’
      • Note
      • Write your latest version message instead of “initial commit”.
      logo
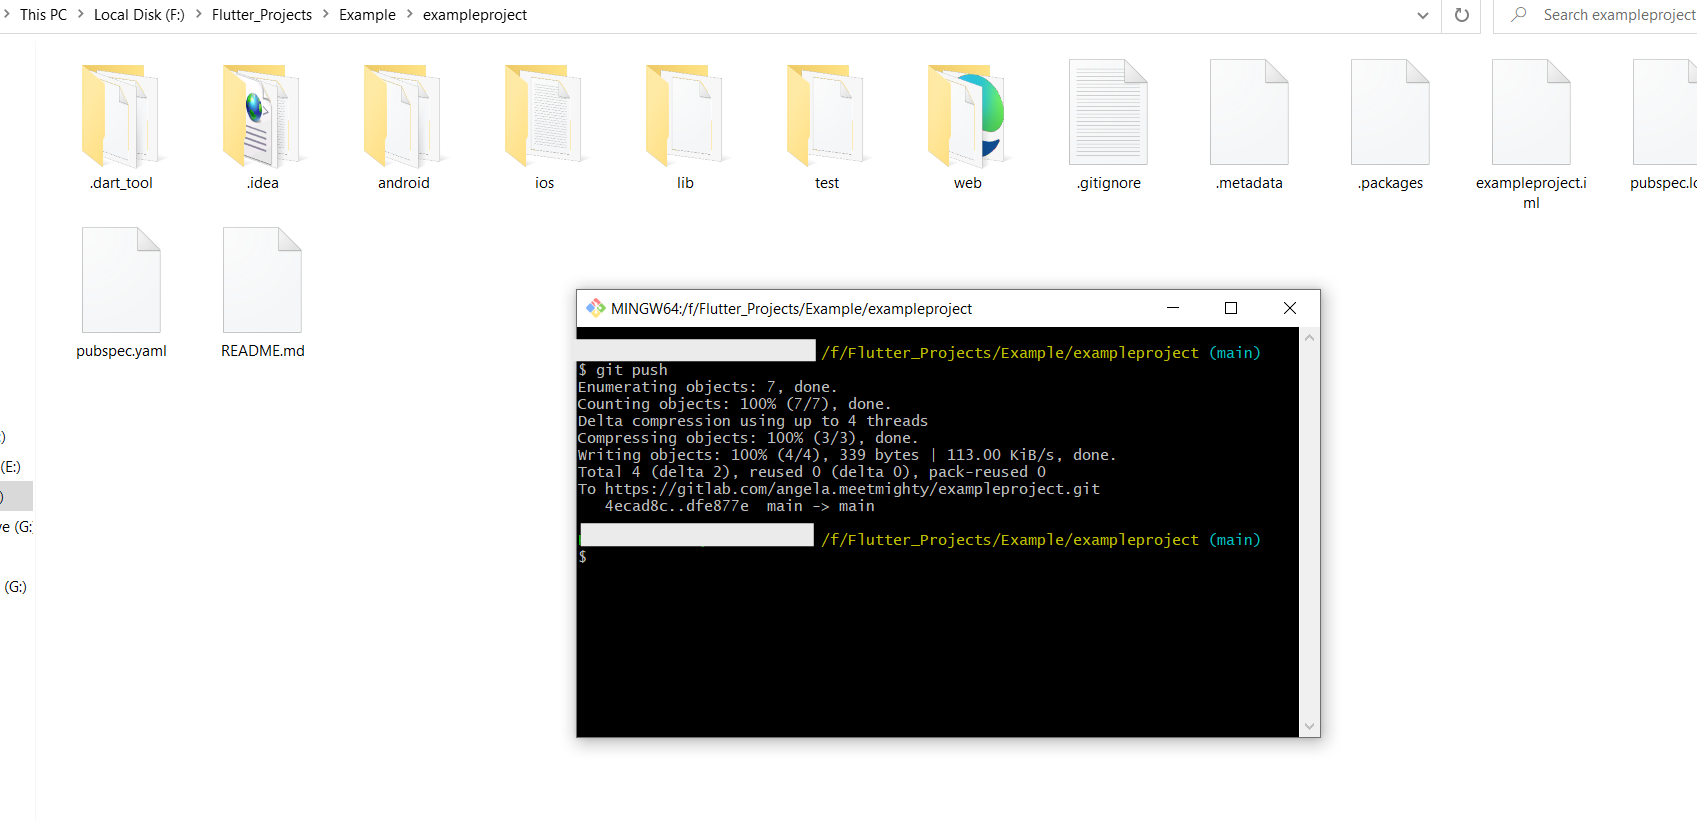
    • 5. Push your changes to server with below command
    • “git push” And provide you gitlab credential details

      logo
    • 6. Check your all changes to gitlab server
    logo

    For Update existing code (If Already have old version of project)

    Note

    If you remove the project from the local system then clone the project again from your gitlab server. Follow the same above Step 3: Clone your project to your local system

    Step 1: Download the latest version from codecanyon server.

    Once you will received mail for updates. Just download latest code from codecanyon server.

    Step 2: Copy/paste your initial downloaded project to clone directories.

    Once successfully downloaded project from codecanyon, copy/paste your downloaded project into clone directories

    Note

    Only orignal source code is put here.

    Step 3: Commit and push to gitlab server

    Follow same Step 6: Commit and push to gitlab server
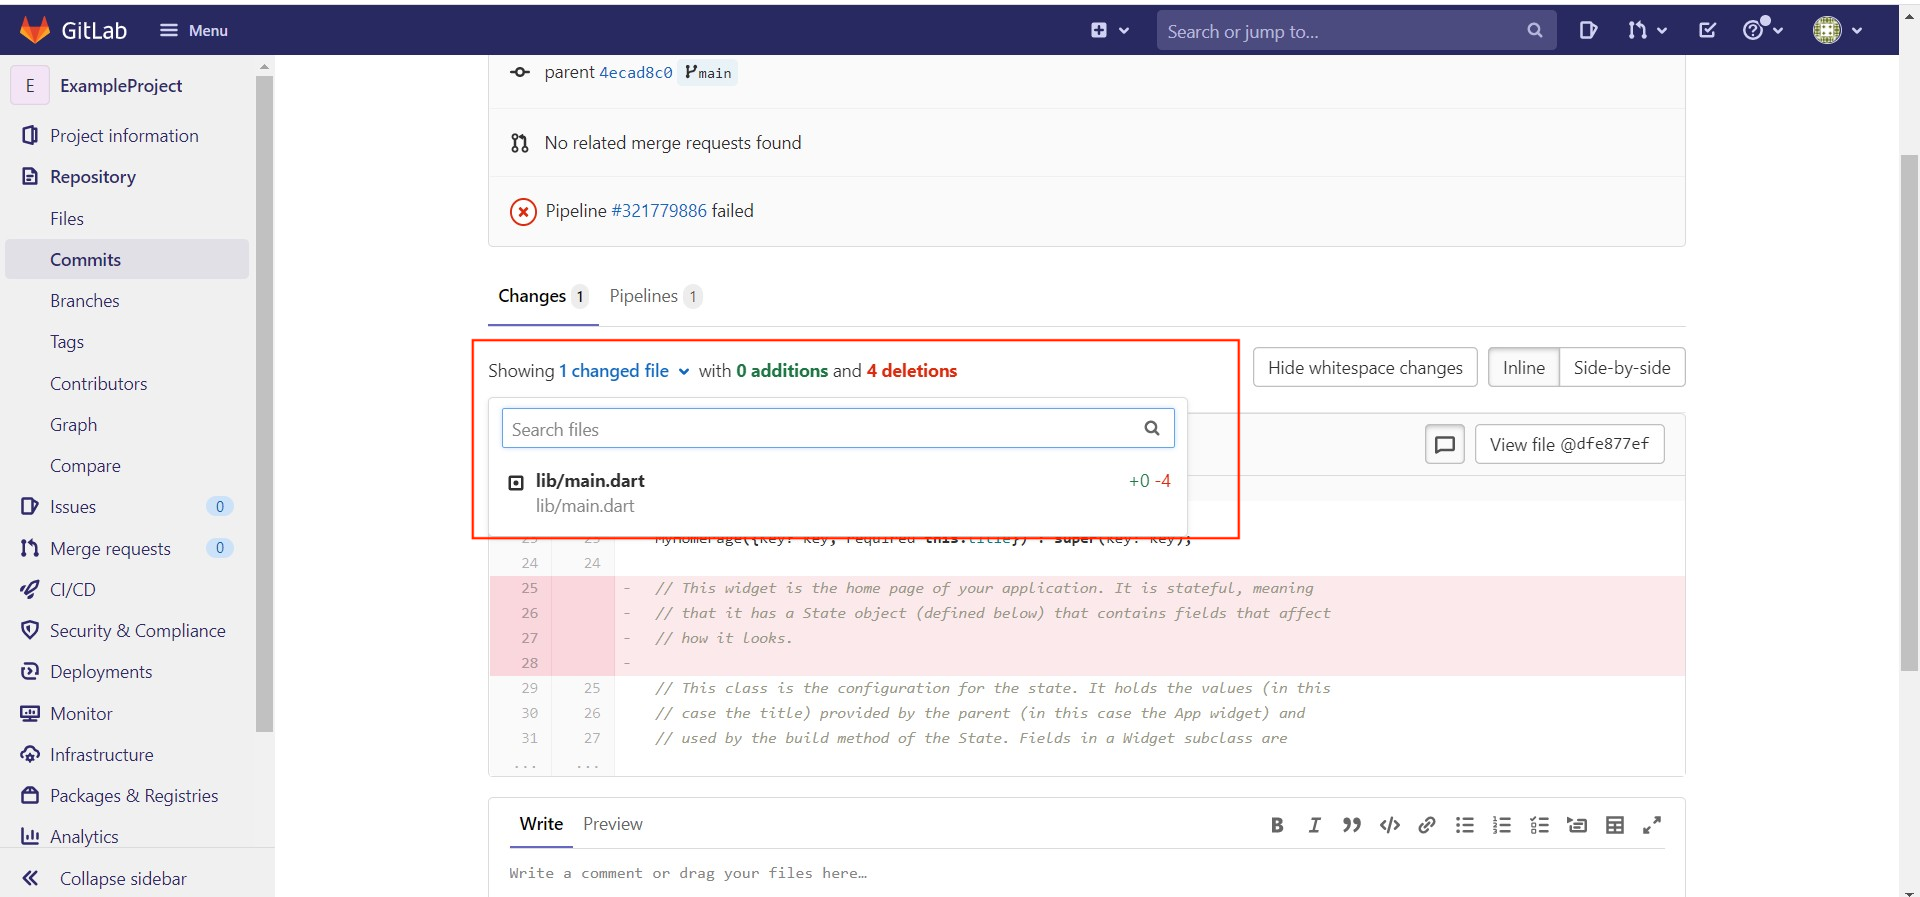
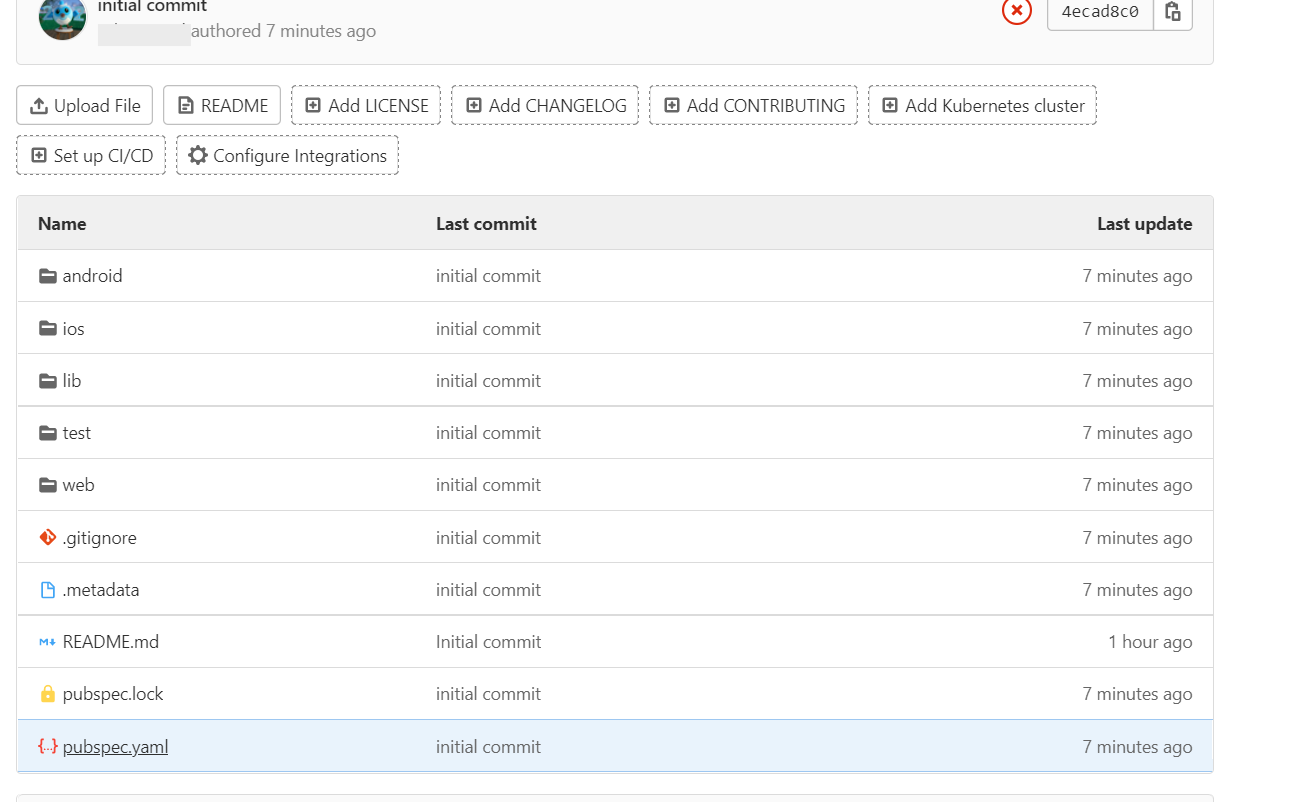
    Step 4: Check updated files

    After committing your latest changes. Goto the gitlab project dashboard and click on the commit link.

    logo

    Click on link which you have commit message on above steps 3

    logo

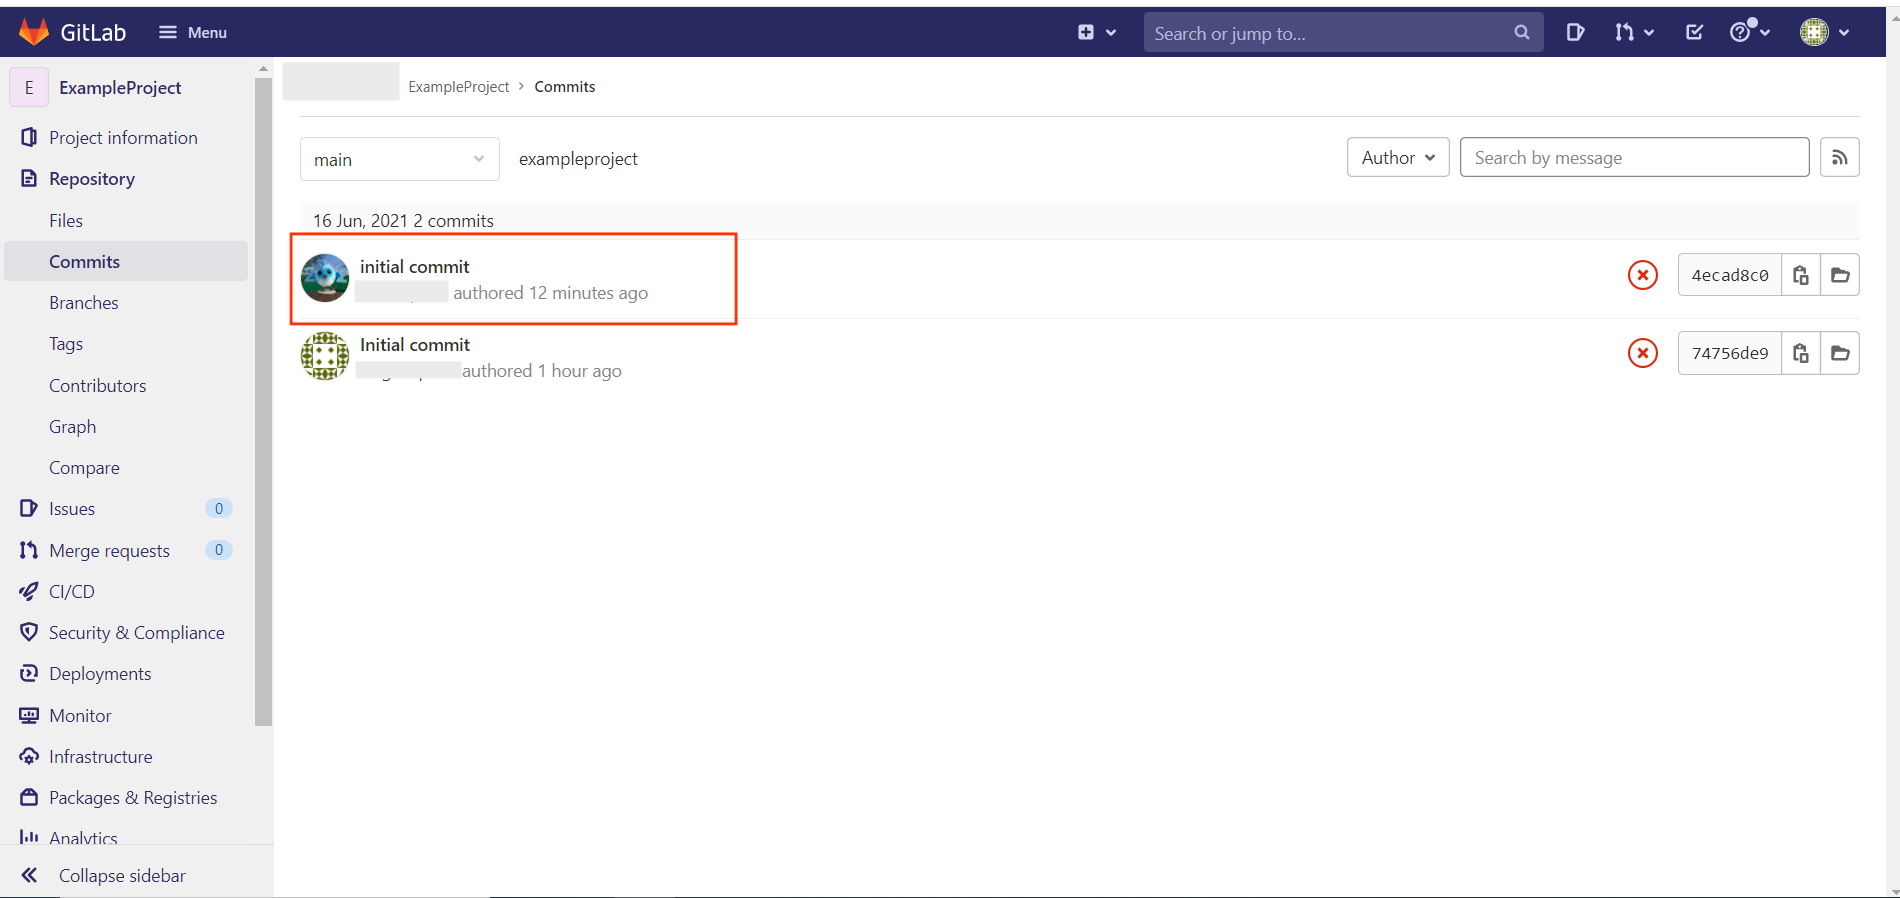
    Now check the all changed file.

    logo

    Click on “XYZ changed file” to see which file has been changed.

    logo

    Change Log

    Version 16.0 – 03 Jul 2023

    • Upgraded to the Latest Flutter 3.10.x SDK
    • Mobile number OTP verification at signup
    • Update invoice details from backend
    • Add/Update Wallet fund from backend
    • Show orders location on Google map in Admin
    • Bug fixed

    Version 15.0 – 03 May 2023

    • Bug fixed
    • Performance improvement

    Version 14.0 – 20 March 2023

    • Upgraded to the Latest Flutter 3.7.7 SDK
    • Added Vehicle Module

    Version 13.0 – 25 Jan 2023

    • Front-End Website
    • Show Delivery Person details in admin
    • Show User Details in admin
    • Show Earning History in Delivery Person
    • Bug fixed

    Version 12.0 – 09 Jan 2023

    • Wallet System
    • Commission based system
    • Add term and use of services at the time of login
    • View all invoice by admin on orders
    • Provide option to add user and delivery boy on admin panel
    • Shaw cancellation reason in Admin Order Details
    • Make admin Panel Responsive

    Version 10.0 – 26 Nov 2022

    • Pick up/drop location from google map
    • Latest Dependency Upgraded

    Version 9.0 – 21 Nov 2022

    • Admin can View Delivery Person Location
    • Google Map Tracking for Delivery Person
    • No Internet Connection handle
    • Delete User Account
    • Bug fixed

    Version 8.0 – 10 Oct 2022

    • PayStack Payment Gateway added
    • Upgraded to the Latest Flutter 3.3.4 SDK
    • Bug fixed

    Version 7.0 – 28 July 2022

    • Enable/Disable Otp Verification
    • Currency Setting
    • Bug fixed

    29 Jun 2022

    27 Jun 2022

    • Added Update Profile
    • Added Change Password
    • bug fixed

    Version 6.0 – 11 June 2022

    • Admin can create an order
    • Firebase Push notification on web admin
    • New order auto assign near by delivery person
    • bug fixed

    Version 5.0 – 23 May 2022

    • Invoice download functionality
    • Get mail to admin email when new order place by user
    • Confirm OTP while Pickup and drop order
    • Upgraded to the Latest Flutter 3.0.0 SDK
    • bug fixed

    Version 4.0 – 11 May 2022

    • Payment Gateway added
      1. PayPal
      2. PayTabs
      3. Mercado Pago
      4. Paytm
      5. MyFatoorah
    • Pickup location tracking
    • bug fixed

    Version 3.0 – 29 Apr 2022

    • Added localization key
    • bug fixed

    Version 2.0 – 20 Apr 2022

    • Document Verification
    • bug fixed

    Version 1.0 – 09 Apr 2022

    • Initial Release

    Admin App Change Log

    Version 9.0 – 03 Jul 2023

    • Upgraded to the Latest Flutter 3.10.x SDK
    • Update invoice details from backend
    • Add/Update Wallet fund from backend
    • Show orders location on Google map in Admin
    • Bug fixed

    Version 8.0 – 03 May 2023

    • Bug fixed
    • Performance improvement

    Version 7.0 – 20 March 2023

    • Upgraded to the Latest Flutter 3.7.7 SDK
    • Added Vehicle Module

    Version 6.0 – 25 Jan 2023

    • Show Delivery Person details
    • Show User Details
    • Bug fixed

    Version 5.0 – 09 Jan 2023

    • Wallet System
    • Commission based system
    • View all invoice by admin on orders
    • Provide option to add user and delivery boy on admin panel
    • Shaw cancellation reason in Admin Order Details

    Version 4.0 – 26 Nov 2022

    • Pick up/drop location from google map
    • View Delivery Person Location
    • Latest Dependency Upgraded

    Version 3.0 – 10 Oct 2022

    • PayStack Payment Gateway added
    • Upgraded to the Latest Flutter 3.3.4 SDK
    • Bug fixed

    Version 2.0 – 28 July 2022

    • Enable/Disable Otp Verification
    • Currency Setting
    • Bug fixed

    Version 1.0 – 27 Jun 2022

    • Initial Release

    Meet Mighty Help & Support

    We like to hear you out when you get stuck or encounter difficulty with our products. As soon as you buy one of our products – you can open a support ticket and share your concern right away.

    Submit support ticket: https://support.meetmighty.com/


    Support Policy:

    It is recommended that before submitting a ticket you take a close look at product documentation (Docs folder in the archive you have downloaded from Themeforest/Codecanyon). To get technical support and assistance, you need to have a valid purchase code. You will find this when you SignIn your Codecanyon/Themeforest “Download” page. Click on the product’s download link.

    Please Note:

    Free support policy includes troubleshooting, technical assistance with the product only. It does not include any customization, additional features integration or concerns about third-party plugins compatibility. But, support is applied to plugin(s) we have developed and integrated ourselves. We appreciate your understanding!

    If you need assistance and information on purchased product that is not covered in documentation, post them on our support portal at https://support.meetmighty.com/ You can expect answer within 24-48 hours, usually as soon as possible in the order they were received.

    Additionally, if any support ticket has no response from the item owner for more than 7 days, that support ticket will be closed by default. However, if you need further assistance, you can create a new ticket.

    All support requests are being processed on business days (Monday to Saturday) from 9:00 to 18:00 (GMT +05.30). We are in GMT+5:30 time zone. We address all the support queries 6 days weekly on the first-come, first-solve basis (Sundays off).

    Do you have any pre-sales questions or concerns, please write to us via our website contact page or email us at [email protected]. We like getting positive feedback from our customers, and this is why we do our best to earn it! Write a review: https://codecanyon.net/downloads